0%

ElasticStack

  • Beats
    • FileBeat
    • Metricbeat
  • Kibana
  • Logstash

beats-platform

ElasticStack

简介

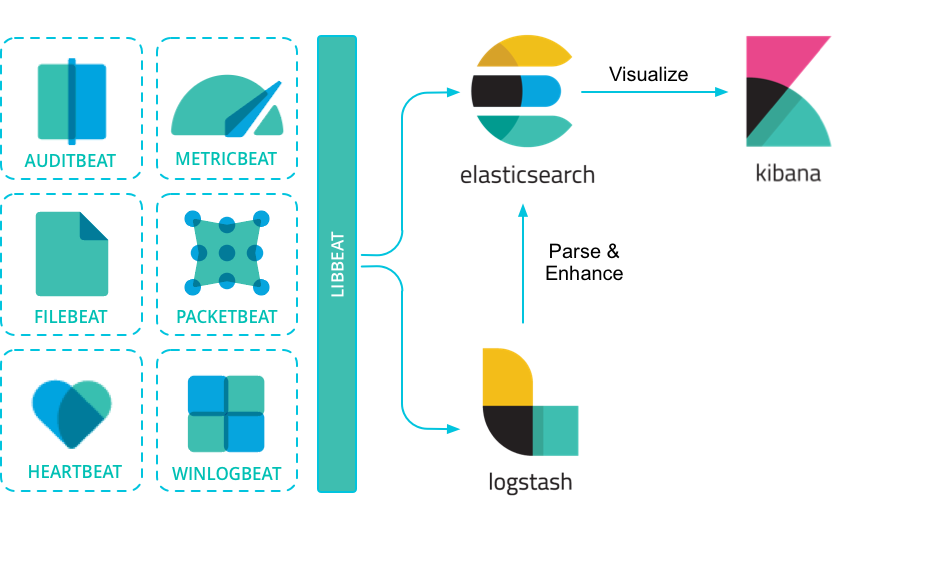
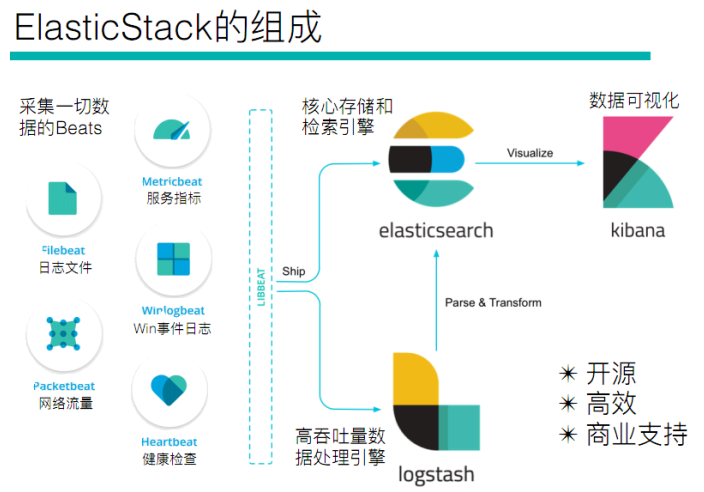
ELK(旧称呼),由ElasticSearch、Logstash、Kibana组成,及新加入的Beats
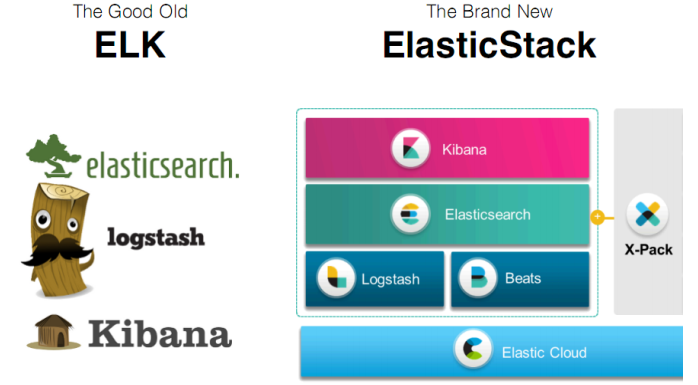
image-20210425144906074

image-20210425144937271

Beats

采集系统监控数据的代理,是在被监控服务器上以客户端形式运行的数据收集器的统称。可以直接把数据发送给ElasticSearch或者通过LogStash发送给ElasticSearch,然后进行后续的数据分析活动

Beats组成

  • PacketBeat:网络数据分析器,用于监控、收集网络流量信息、Packetbeat嗅探服务器之间的流
    量,解析应用层协议,并关联到消息的处理,其支 持ICMP (v4 and v6)、DNS、HTTP、Mysql、PostgreSQL、Redis、MongoDB、Memcache等协议;
  • Filebeat:用于监控、收集服务器日志文件,其已取代 logstash forwarder
  • Metricbeat:可定期获取外部系统的监控指标信息,其可以监控、收集 Apache、HAProxy、MongoDB 、MySQL、Nginx、PostgreSQL、Redis、System、Zookeeper等服务;
  • Winlogbeat:用于监控、收集Windows系统的日志信息;

Logstash

基于Java,可以用于手机,分析和存储日志的工具

由于与Beats功能部分重叠,现用于数据处理

ElasticSearch

基于Java,是开源分布式搜索引擎,特点有:分布式、零配置、自动发现,索引自动分片、索引副本机制、restful风格接口,多数据源、自动搜索负载

Kibana

基于nodejs,开源免费工具,Kibana可以为Logstash和ElasticSearch提供的日志分析友好的web界面,可以汇总、分析和搜索重要数据日志

Beats——日志采集

image-20210513093107064

Beats:Elasticsearch 的数据采集器 | Elastic

FileBeat

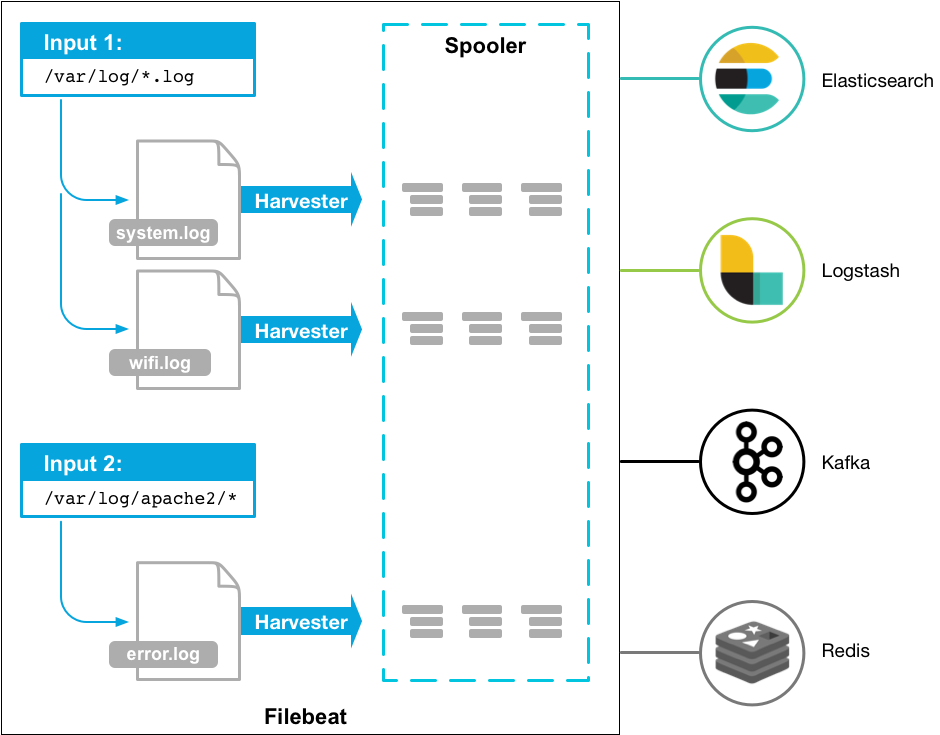
架构
img

FileBeat 由主要组件组成:prospector 和 harvester

  • harvester

    负责读取单个文件内容

    如果文件在读取时被删除或重命名,FileBeat将会继续读取文件

  • Prospector

    prospector 负责管理 harvester,并查找所有要读取的文件来源

    如果输入类型为日志,则查找器将查找路径匹配的所有文件,并为每个文件启动一个 harvester

    FileBeat支持两种 prospector :log 和 stdin

Filebeat如何记录文件的状态

  • Filebeat 保存每个文件的状态并经常将状态刷新到磁盘上的注册文件中
  • 该状态用于记住harvester 正在读取的最后偏移量,并确保发送所有日志行
  • 如果输出(Elasticsearch或Logstash)无法访问,Filebeat会跟踪最后发送的行,并在输出再次可用时继续读取文件
  • 在Filebeat运行时,每个 prspector 内存中也会保存文件状态信息,当重新启动FileBeat时,将使用 注册文件/data/registry 的数据来重建文件状态
  • 文件状态记录在 /data/registry

部署与运行

1
2
3
mkdir -p /haoke/beats
tar -xvf filebeat-6.5.4-linux-x86_64.tar.gz
cd filebeat-6.5.4-linux-x86_64
启动命令
1
2
3
4
5
6
7
./filebeat -e -c haoke.yml
./filebeat -e -c haoke.yml -d "publish"

#参数
-e: 输出到标准输出,默认输出到syslog和logs下
-c: 指定配置文件
-d: 输出debug信息
标准输入
1
2
3
4
5
6
7
8
9
10
11
12
13
# 创建配置文件 haoke.yml
filebeat.inputs:
- type: stdin
enabled: true
output.console:
pretty: true
enable: true
# es分片数
setup.template.settings:
index.number_of_shards: 3

# 启动 filebeat
./filebeat -e -c haoke.yml

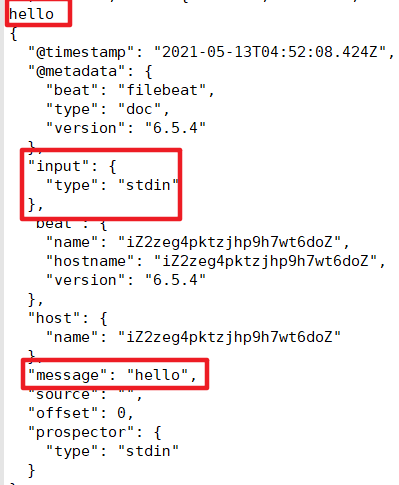
  • @metadata :元数据信息
  • message:输入的信息
  • prospector:标准输入勘探器
  • input:控制台标准输入
  • beat:beat版本以及主机信息
读取文件
1
2
3
4
5
6
7
8
9
10
11
12
13
14
15
16
17
18
19
20
21
22
cd filebeat-6.5.4-linux-x86_64

# haoke-log.yml 配置读取文件项
filebeat.inputs:
- type: log
enabled: true
path: /haoke/beats/logs/*.log
output.console:
pretty: true
enable: true
# es分片数
setup.template.settings:
index.number_of_shards: 3

# 启动filebeat
./filebeat -e -c haoke-log.yml

# /haoke/beats/logs下创建a.log,并输入
hello
world

# 观察filebeat输出

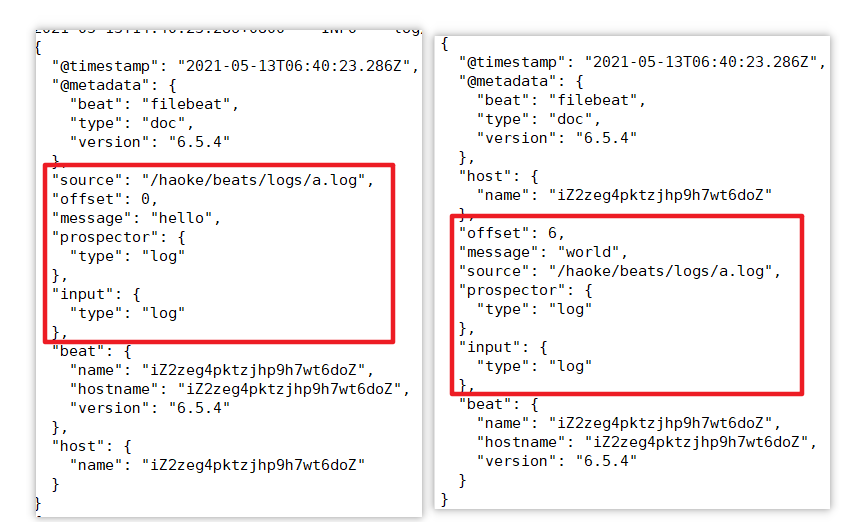
image-20210513144130232

可见,已经检测到日志文件有更新,立刻就会读取到更新的内容,并且输出到控制台

自定义字段
1
2
3
4
5
6
7
8
9
10
11
12
13
14
15
16
17
18
19
20
21
#配置读取文件项 haoke-log.yml
filebeat.inputs:
- type: log
enabled: true
path: /haoke/beats/logs/*.log
tags: ["test"] #添加自定义tag ,便于后续的处理
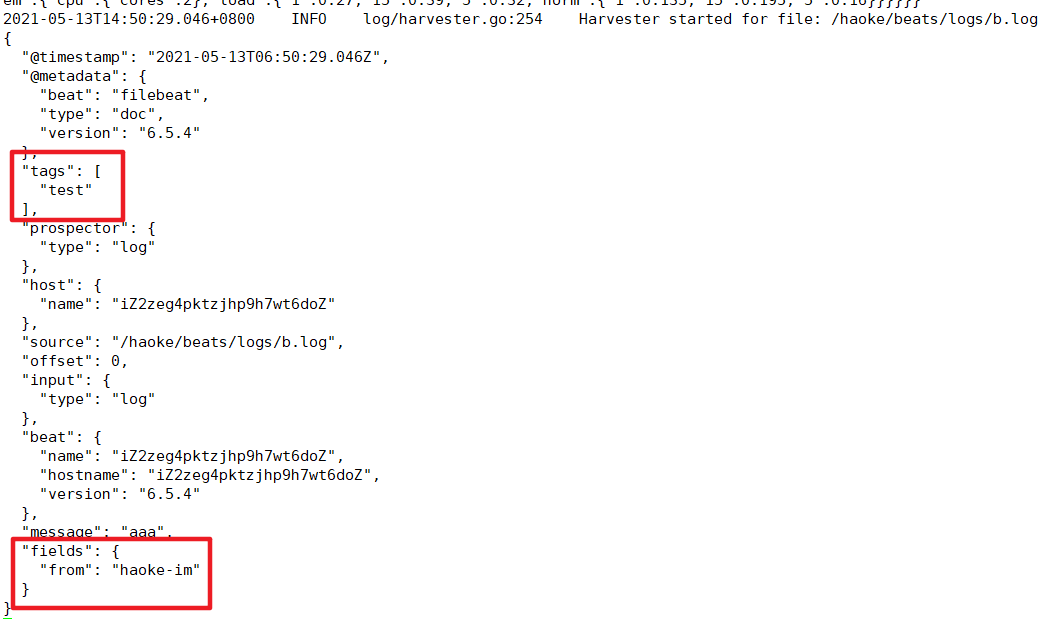
fields:
from: haoke-im
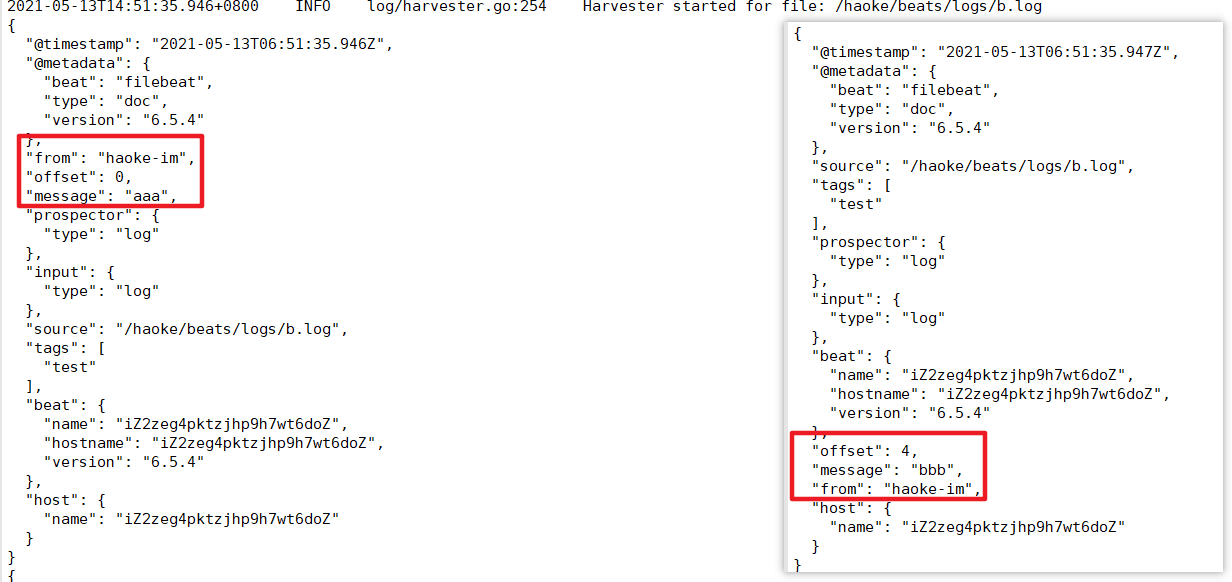
fields_under_root: false #true为添加到根结点,false为添加到根结点下的fields属性下
output.console:
pretty: true
enable: true
# es分片数
setup.template.settings:
index.number_of_shards: 3

# 启动filebeat
./filebeat -e -c haoke-log.yml

# /haoke/beats/logs/下创建b.log 写入以下内容
123

fields_under_root: false

image-20210513145050411

fields_under_root: true

image-20210513145256334

输出到ES
1
2
3
4
5
6
7
8
9
10
11
12
13
14
#配置读取文件项 haoke-log.yml
filebeat.inputs:
- type: log
enabled: true
path: /haoke/beats/logs/*.log
tags: ["test"] #添加自定义tag ,便于后续的处理
fields:
from: test
fields_under_root: false #true为添加到根结点,false为添加到根结点下的fields属性下
output.elasticsearch: #指定ES配置
hosts: ["8.140.130.91:9200","8.140.130.91:9201","8.140.130.91:9202"]
# es分片数
setup.template.settings:
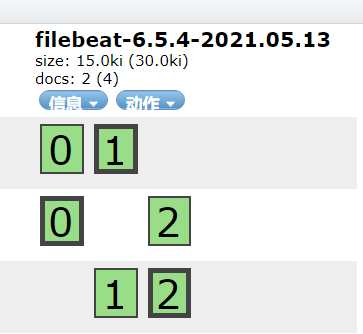
index.number_of_shards: 3# 指定索引的分区数

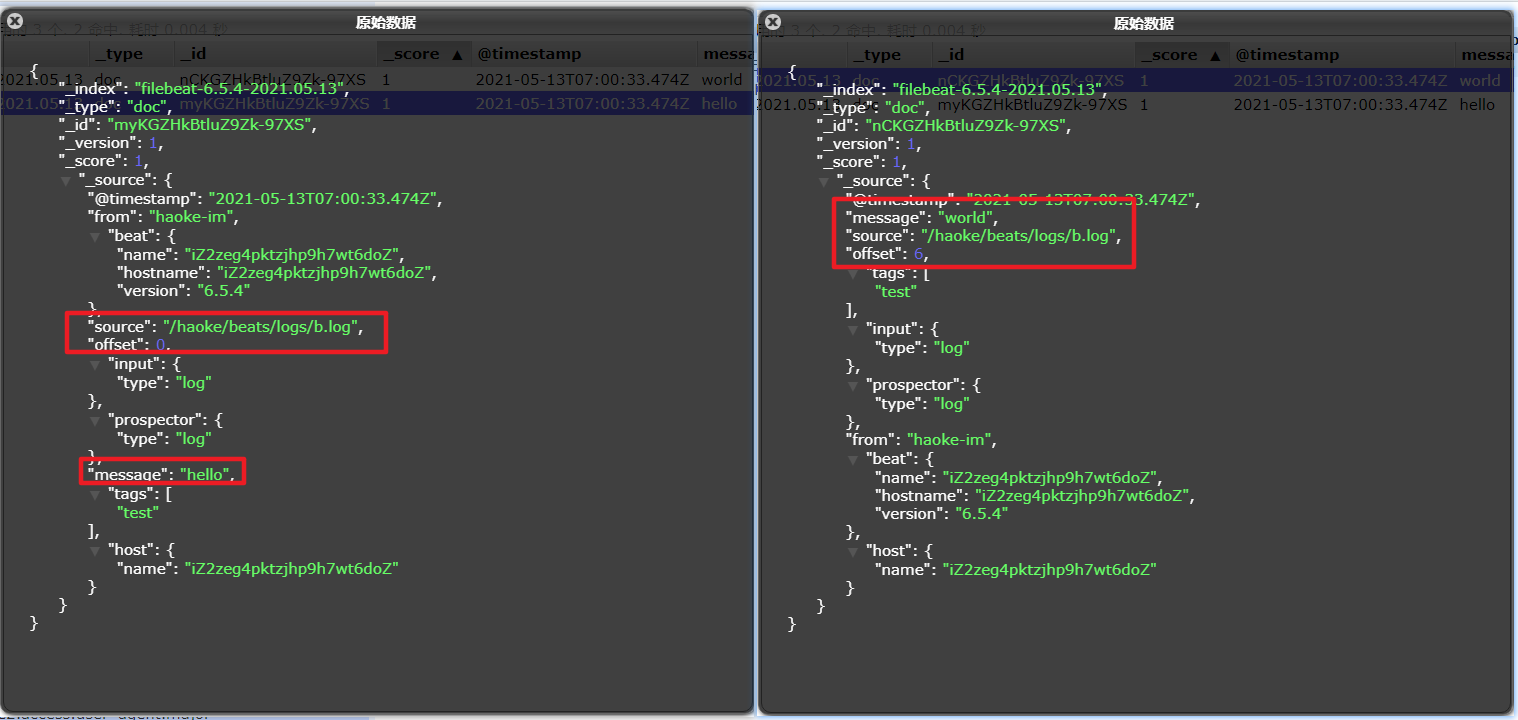
image-20210513150059425

image-20210513150244484

Module

前面想要实现日志数据的读取以及处理都是自己手动配置,其实,在 Filebeat 中,有大量的Module,可以简化配置

image-20210513151030026

1
2
3
4
5
6
7
8
9
10
11
12
13
14
15
16
17
18
19
20
21
22
23
./filebeat modules list

Enabled:

Disabled:
apache2
auditd
elasticsearch
haproxy
icinga
iis
kafka
kibana
logstash
mongodb
mysql
nginx
osquery
postgresql
redis
suricata
system
traefik

启动某一 module

1
2
./filebeat modules enable redis #启动
./filebeat modules disable redis #禁用

image-20210513151307032

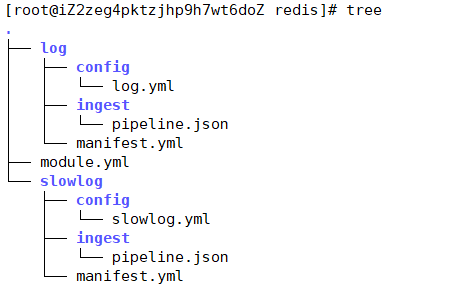
可见,启动某一 module 就是将 filebeat-6.5.4-linux-x86_64/modules.d/ 下的对应yml去掉disabled

redis module

image-20210513151526387

  • log:日志
  • slowlog:慢查询日志
redis module 配置
1
2
3
4
5
6
7
8
9
10
11
12
13
14
15
16
17
18
- module: redis
# Main logs
log:
enabled: true

# Set custom paths for the log files. If left empty,
# Filebeat will choose the paths depending on your OS.
#var.paths: ["/var/log/redis/redis-server.log*"]

# Slow logs, retrieved via the Redis API (SLOWLOG)
slowlog:
enabled: true

# The Redis hosts to connect to.
#var.hosts: ["localhost:6379"]

# Optional, the password to use when connecting to Redis.
#var.password:
修改redis的docker容器

redis 默认情况下,是不会输出日志的,需要自行配置

1
2
3
4
5
docker create --name redis-node01 --net host -v /data/redis-data/node01:/data redis --cluster-enabled yes --cluster-announce-ip 8.140.130.91 --cluster-announce-bus-port 16379  --cluster-config-file nodes-node-01.conf --port 6379 --loglevel debug --logfile nodes-node-01.log

docker create --name redis-node02 --net host -v /data/redis-data/node02:/data redis --cluster-enabled yes --cluster-announce-ip 8.140.130.91 --cluster-announce-bus-port 16380 --cluster-config-file nodes-node-02.conf --port 6380 --loglevel debug --logfile nodes-node-02.log

docker create --name redis-node03 --net host -v /data/redis-data/node03:/data redis --cluster-enabled yes --cluster-announce-ip 8.140.130.91 --cluster-announce-bus-port 16381 --cluster-config-file nodes-node-03.conf --port 6381 --loglevel debug --logfile nodes-node-03.log

loglevel 日志等级分为:debug、verbose、notice、warning

  • debug 会有大量信息,对开发、测试有用;
  • verbose 等于log4j 中的info,有很多信息,但是不会像debug那样乱;
  • notice 一般信息;
  • warning 只有非常重要/关键的消息被记录
配置filebeat
1
2
3
4
5
6
7
8
9
10
11
12
13
14
15
16
17
18
19
20
cd /haoke/beats/filebeat-6.5.4-linux-x86_64/modules.d/

- module: redis
# Main logs
log:
enabled: true

# Set custom paths for the log files. If left empty,
# Filebeat will choose the paths depending on your OS.
var.paths: ["/data/redis-data/node01/*.log","/data/redis-data/node02/*.log","/data/redis-data/node03/*.log"]

# Slow logs, retrieved via the Redis API (SLOWLOG)
slowlog:
enabled: false

# The Redis hosts to connect to.
#var.hosts: ["localhost:6379"]

# Optional, the password to use when connecting to Redis.
#var.password:
1
2
3
4
5
6
7
8
9
10
11
12
13
14
15
vim haoke-redis.yml

filebeat.inputs:
- type: log
enabled: true
paths:
- /data/redis-data/*.log
filebeat.config.modules: #获取到所有生效module的配置
path: ${path.config}/modules.d/*yml
reload.enabled: false
output.elasticsearch: #指定ES配置
hosts: ["8.140.130.91:9200","8.140.130.91:9201","8.140.130.91:9202"]
# es分片数
setup.template.settings:
index.number_of_shards: 3# 指定索引的分区数
启动测试
1
./filebeat -e -c haoke-redis.yml --modules redis

image-20210513155233594

其他Module用法

Modules | Filebeat Reference 7.12] | Elastic

Metricbeat

image-20210513155835985

  • 定期收集OS或应用服务的指标数据
  • 存储到Elasticsearch中,进行实时分析

Metricbeat组成

  • Module

    收集的对象,如:mysql、redis、操作系统等

  • Metricset

    收集指标的集合,如:cpu,memory,network

以RedisModule为例:
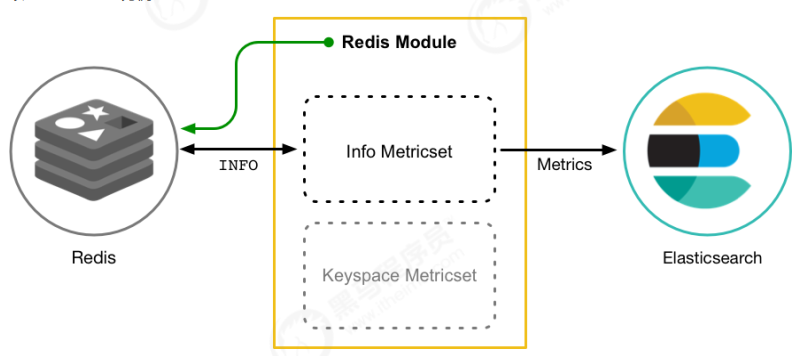
image-20210513160515669

部署与收集系统指标

1
2
3
4
5
6
7
8
9
10
11
12
13
14
15
16
17
18
19
20
21
tar -xvf metricbeat-6.5.4-linux-x86_64.tar.gz
cd /haoke/beats/metricbeat-6.5.4-linux-x86_64
vim metricbeat.yml

---
metricbeat.config.modules:
path: ${path.config}/modules.d/*.yml
reload.enabled: false
setup.template.settings:
index.number_of_shards: 3
index.codec: best_compression
setup.kibana:
output.elasticsearch:
hosts: ["8.140.130.91:9200","8.140.130.91:9201","8.140.130.91:9202"]
processors:
- add_host_metadata: ~
- add_cloud_metadata: ~
---

# 启动
./metricbeat -e -c metricbeat-log.yml

image-20210513161351173

image-20210513162556974

Module

System module配置
1
2
3
4
5
6
7
8
9
10
11
12
13
14
15
16
17
18
19
20
21
22
23
24
25
26
27
28
29
30
31
32
cd /haoke/beats/metricbeat-6.5.4-linux-x86_64/modules.d/
cat system.yml
---
- module: system
period: 10s
metricsets:
- cpu
- load
- memory
- network
- process
- process_summary
#- core
#- diskio
#- socket
process.include_top_n:
by_cpu: 5 # include top 5 processes by CPU
by_memory: 5 # include top 5 processes by memory

- module: system
period: 1m
metricsets:
- filesystem
- fsstat
processors:
- drop_event.when.regexp:
system.filesystem.mount_point: '^/(sys|cgroup|proc|dev|etc|host|lib)($|/)'

- module: system
period: 15m
metricsets:
- uptime
Redis module
1
2
3
4
5
6
7
8
9
10
11
12
13
14
15
16
17
18
19
20
21
22
#启用redis module
./metricbeat modules enable redis

#修改redis module配置
vim modules.d/redis.yml

- module: redis
metricsets:
- info
# - keyspace
period: 10s
# Redis hosts
hosts: ["8.140.130.91:6379","8.140.130.91:6380","8.140.130.91:6381"]
# Network type to be used for redis connection. Default: tcp
#network: tcp
# Max number of concurrent connections. Default: 10
#maxconn: 10
# Redis AUTH password. Empty by default.
#password: foobared

#启动
./metricbeat -e -c metricbeat-log.yml

image-20210513170708842

image-20210513170329559

1
2
3
4
5
6
7
8
9
10
11
12
13
14
15
16
17
18
19
20
21
22
23
24
25
26
27
28
29
30
31
32
33
34
35
36
37
38
39
40
41
42
43
44
45
46
47
48
49
50
51
52
53
54
55
56
57
58
59
60
61
62
63
64
65
66
67
68
69
70
71
72
73
74
75
76
77
78
79
80
81
82
83
84
85
86
87
88
89
90
91
92
93
94
95
96
97
98
99
100
101
102
103
104
105
106
107
108
109
110
111
112
113
114
115
116
117
118
119
120
121
122
123
124
125
126
127
128
129
130
131
132
133
134
135
136
137
138
139
140
141
142
143
144
145
146
147
148
149
150
151
152
153
154
155
156
157
158
159
160
161
162
163
164
165
166
167
168
169
170
171
172
173
174
175
176
177
178
179
180
181
182
183
184
185
186
187
188
189
190
191
192
193
194
195
196
197
198
199
200
201
202
203
204
205
206
207
208
209
210
211
212
213
214
215
216
217
218
{
"_index": "metricbeat-6.5.4-2021.05.13",
"_type": "doc",
"_id": "J1g4ZXkBkeBjvVA0_VG6",
"_version": 1,
"_score": null,
"_source": {
"@timestamp": "2021-05-13T10:15:03.364Z",
"metricset": {
"rtt": 1457,
"name": "info",
"module": "redis",
"host": "8.140.130.91:6380"
},
"redis": {
"info": {
"replication": { "master": { "second_offset": -1,"sync": { },"offset": 0},"slave": { },"role": "master","connected_slaves": 0,"master_offset": 0,"backlog": { "size": 1048576,"first_byte_offset": 0,"histlen": 0,"active": 0}},
"clients": {
"blocked": 0,
"connected": 1,
"longest_output_list": 0,
"biggest_input_buf": 640,
"max_output_buffer": 0,
"max_input_buffer": 640
},
"memory": {
"allocator": "jemalloc-5.1.0",
"allocator_stats": {
"active": 2015232,
"resident": 4378624,
"fragmentation": {
"ratio": 1.2,
"bytes": 333592
},
"rss": {
"bytes": 2363392,
"ratio": 2.17
},
"allocated": 1681640
},
"used": {
"value": 1563848,
"rss": 10366976,
"peak": 1563848,
"lua": 37888,
"dataset": 89872
},
"max": {
"value": 0,
"policy": "noeviction"
},
"fragmentation": {
"ratio": 6.91,
"bytes": 8866880
},
"active_defrag": {
"is_running": false
}
},
"server": {
"tcp_port": 6380,
"run_id": "1e6ccdcae239a1835b190a10f9e367e8801542c5",
"git_sha1": "00000000",
"mode": "cluster",
"gcc_version": "8.3.0",
"lru_clock": 10288167,
"arch_bits": "64",
"process_id": 1,
"version": "6.2.1",
"hz": 10,
"uptime": 4175,
"config_file": "",
"os": "Linux 4.18.0-240.15.1.el8_3.x86_64 x86_64",
"build_id": "3699ff74f0200394",
"git_dirty": "0",
"multiplexing_api": "epoll"
},
"stats": {
"connections": {
"received": 21,
"rejected": 0
},
"migrate_cached_sockets": 0,
"sync": {
"full": 0,
"partial": {
"err": 0,
"ok": 0
}
},
"keyspace": {
"misses": 0,
"hits": 0
},
"slave_expires_tracked_keys": 0,
"instantaneous": {
"output_kbps": 0,
"ops_per_sec": 0,
"input_kbps": 0
},
"active_defrag": {
"hits": 0,
"misses": 0,
"key_hits": 0,
"key_misses": 0
},
"commands_processed": 32,
"keys": {
"expired": 0,
"evicted": 0
},
"latest_fork_usec": 0,
"net": {
"output": {
"bytes": 65358
},
"input": {
"bytes": 1414
}
},
"pubsub": {
"patterns": 0,
"channels": 0
}
},
"slowlog": {
"count": 1
},
"cluster": {
"enabled": true
},
"cpu": {
"used": {
"user_children": 0.002411,
"sys": 7.740379,
"user": 7.258026,
"sys_children": 0.000598
}
},
"persistence": {
"aof": {
"write": {
"last_status": "ok"
},
"copy_on_write": {
"last_size": 0
},
"buffer": { },
"size": { },
"fsync": { },
"enabled": false,
"rewrite": {
"buffer": { },
"in_progress": false,
"scheduled": false,
"last_time": {
"sec": -1
},
"current_time": {
"sec": -1
}
},
"bgrewrite": {
"last_status": "ok"
}
},
"loading": false,
"rdb": {
"copy_on_write": {
"last_size": 0
},
"last_save": {
"changes_since": 0,
"time": 1620896728
},
"bgsave": {
"last_time": {
"sec": -1
},
"current_time": {
"sec": -1
},
"last_status": "ok",
"in_progress": false
}
}
}
}
},
"beat": {
"version": "6.5.4",
"name": "iZ2zeg4pktzjhp9h7wt6doZ",
"hostname": "iZ2zeg4pktzjhp9h7wt6doZ"
},
"host": {
"architecture": "x86_64",
"os": {
"platform": "centos",
"version": "8",
"family": "redhat"
},
"id": "20200218155604663518171520219378",
"containerized": false,
"name": "iZ2zeg4pktzjhp9h7wt6doZ"
},
"meta": {
"cloud": {
"instance_id": "i-2zeg4pktzjhp9h7wt6do",
"region": "cn-beijing",
"availability_zone": "cn-beijing-h",
"provider": "ecs"
}
}
},
"sort": [
1620900903364
]
}

Kibana——可视化

image-20210513171053904image-20210513171105611

Kibana:数据的探索、可视化和分析 | Elastic

docker 部署kibana

1
2
3
4
5
6
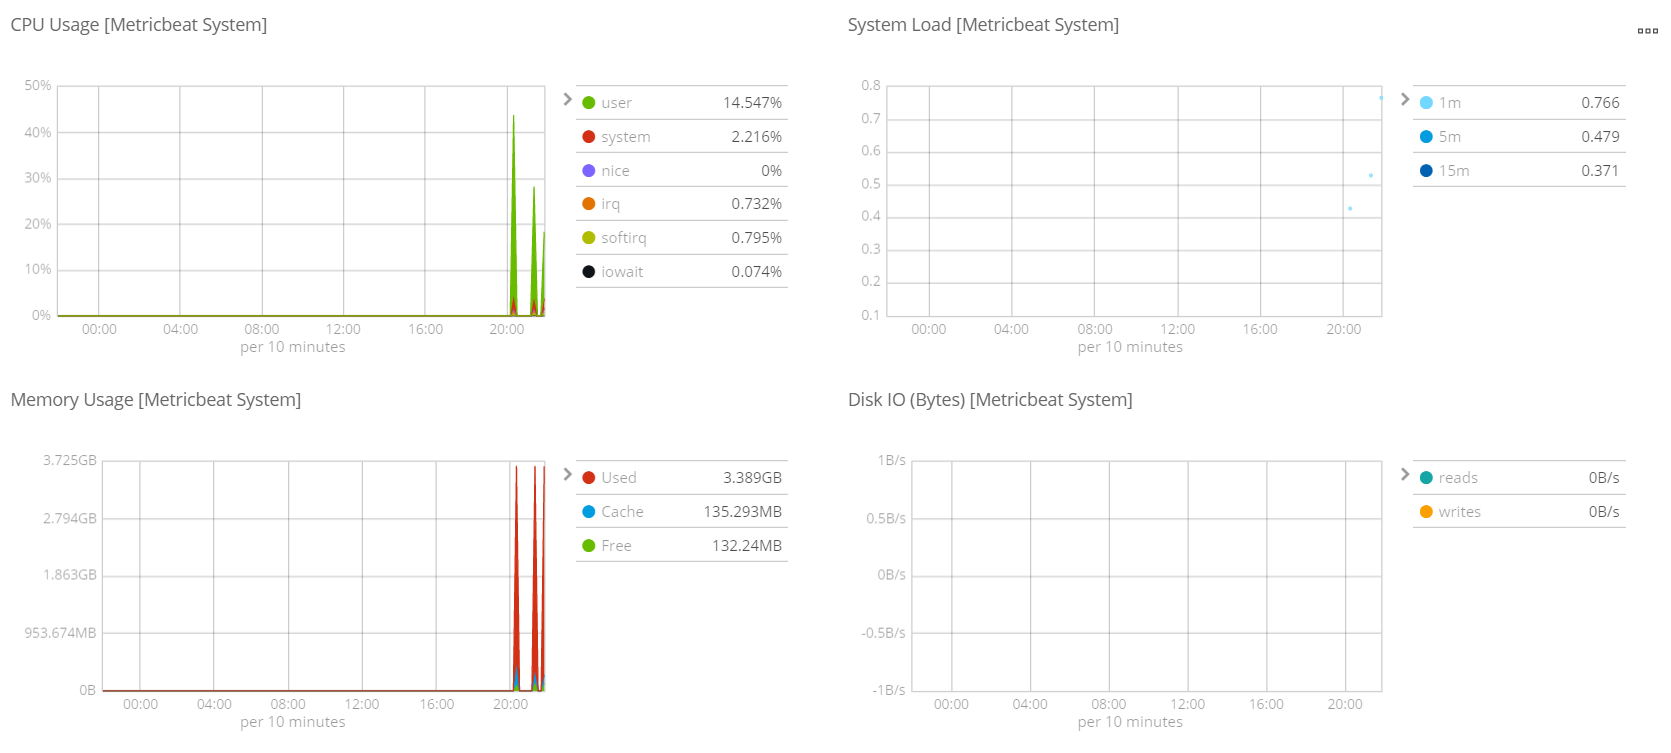
7
8
9
10
11
12
13
14
docker pull kibana:6.5.4

# 创建配置文件
cd /haoke/kibana-docker
vim kibana.yml
---
server.host: "8.140.130.91"
elasticsearch.url: "http://8.140.130.91:9200"
---

#创建容器
docker create --name kibana --net host -v /haoke/kibana-docker/kibana.yml:/usr/share/kibana/config/kibana.yml kibana:6.5.4

docker start kibana

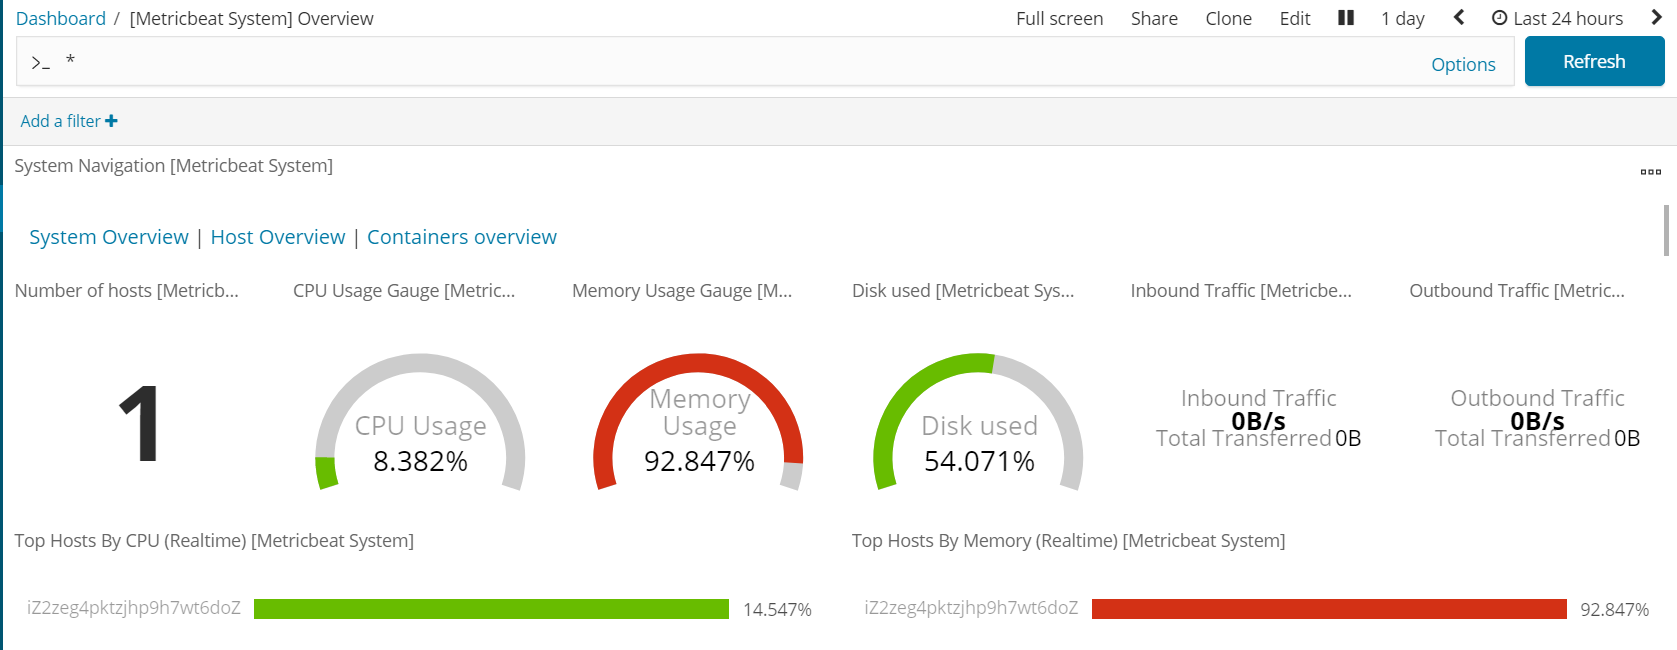
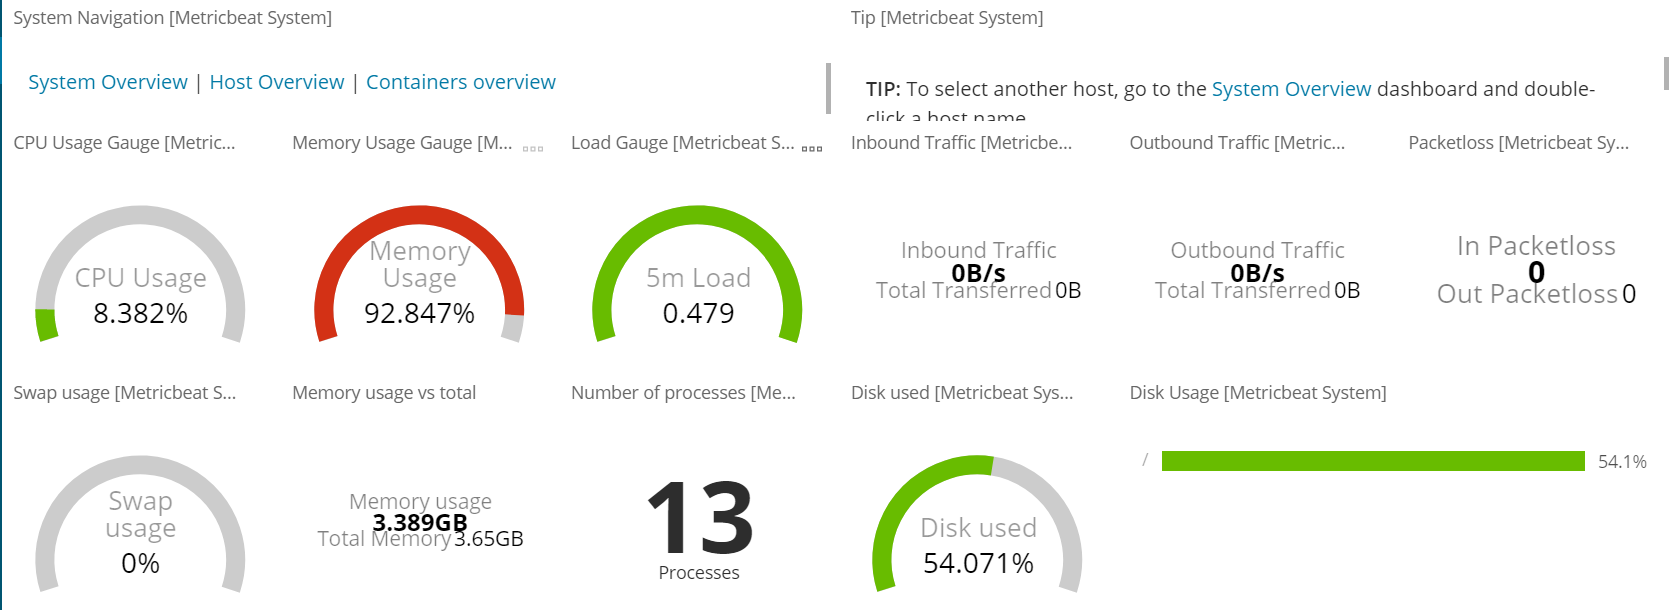
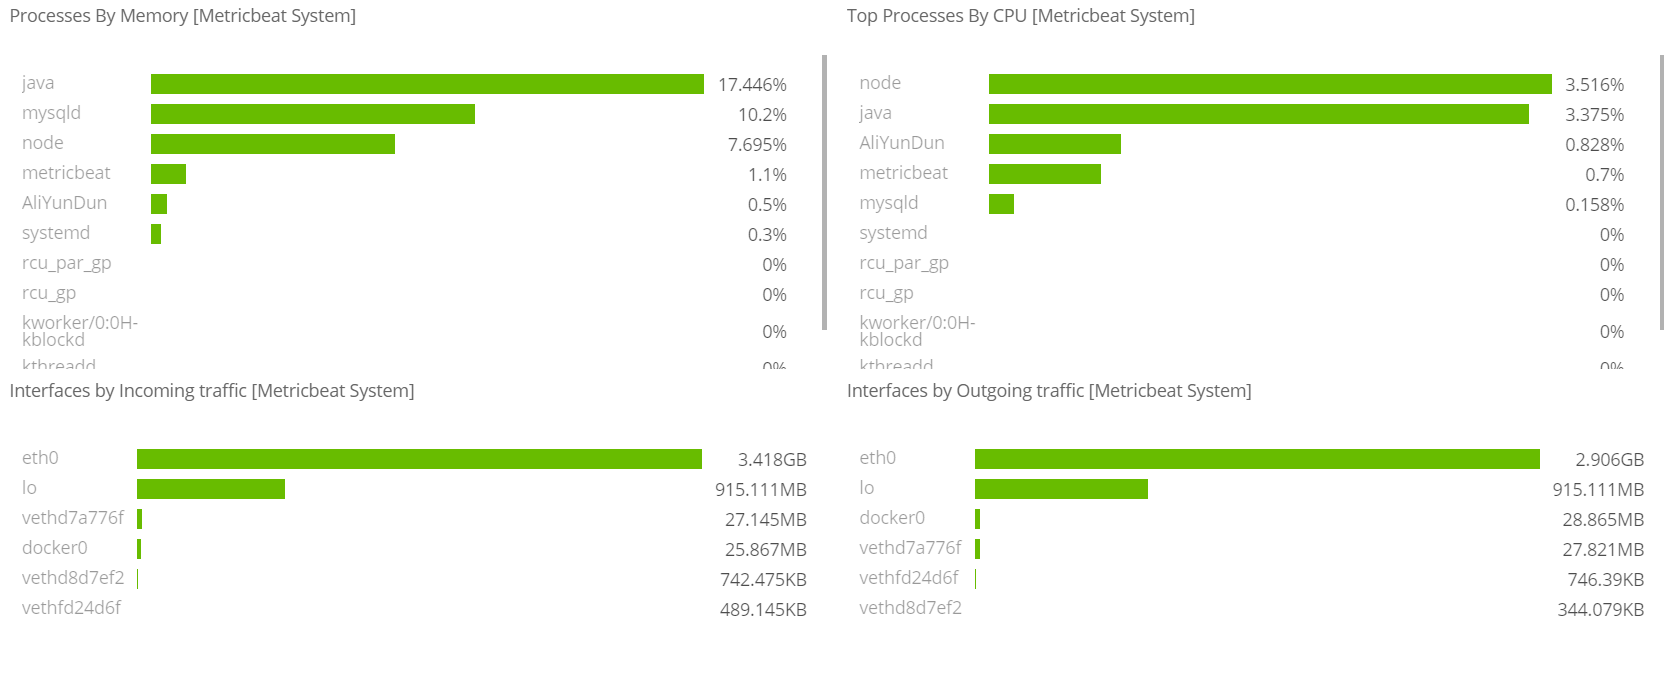
Metricbeat仪表盘

1
2
3
4
5
6
7
8
9
10
11
12
13
14
15
16
17
18
19
# 修改metricbeat.yml配置
metricbeat.config.modules:
path: ${path.config}/modules.d/*.yml
reload.enabled: false
setup.template.settings:
index.number_of_shards: 3
index.codec: best_compression
setup.kibana:
output.elasticsearch:
hosts: ["8.140.130.91:9200","8.140.130.91:9201","8.140.130.91:9202"]
processors:
- add_host_metadata: ~
- add_cloud_metadata: ~
setup.kibana:
host: "8.140.130.91:5601"
---

# 安装仪表盘到kibana
./metricbeat setup --dashboards

image-20210513194050175

image-20210513203318544

image-20210513220104053

image-20210513220613741image-20210513220627206image-20210513220644408

Filebeat仪表盘

1
2
3
4
5
6
7
8
9
10
11
12
13
14
15
16
17
18
19
20
21
#修改 filebeat.yml 配置文件
filebeat.inputs:
- type: log
enabled: true
paths:
- /haoke/logs/*.log
setup.template.settings:
index.number_of_shards: 3
filebeat.config.modules:
path: ${path.config}/modules.d/*.yml
reload.enabled: false

output.elasticsearch:
hosts: ["8.140.130.91:9200","8.140.130.91:9201","8.140.130.91:9202"]

setup.kibana:
host: "8.140.130.91:5601"


#安装仪表盘到kibana
./filebeat -c haoke-redis.yml setup

日志太大 就不做测试

Logstash

image-20210513221809283image-20210513221822494image-20210513221830037

部署安装

basic_logstash_pipeline

1
2
3
4
5
6
7
8
# 检查jdk环境,要求1.8+
java -version

#解压安装包
tar -xvf logstash-6.5.4.tar.gz

#第一个logstash示例
bin/logstash -e 'input {stdin{ } } output { stdout{ } }'

image-20210513225404245

接收Filebeat输入的日志

FilebeatLogstash 整合起来,读取 nginx 的日志

graph LR
Nginx-->|生成| B["日志文件"]
A["Filebeat"]--> |读取| B
A-->|发送| Logstash

Nginx生成日志文件

安装Nginx
1
2
3
4
5
6
7
8
9
10
11
12
apt install nginx -y
#/usr/sbin/nginx:主程序
#/etc/nginx:存放配置文件
#/usr/share/nginx:存放静态文件
#/var/log/nginx:存放日志

# nginx 服务命令
service nginx {start|stop|restart|reload|forcereload|status|configtest|rotate|upgrade}

# 通过浏览器访问页面并查看日志
# 访问地址:http://8.140.130.91
tail -f /var/log/nginx/access.log

image-20210513224016128

Filebeat向Logstash发送日志

配置Logstash——logstash处理日志
1
2
3
4
5
6
7
8
9
10
11
12
13
14
15
16
17
18
19
20
21
22
23
24
25
26
27
cd /haoke/logstash
vim haoke-pipeline.conf

---
input {
beats {
port => "5044"
}
}
#The filter part of this file is commented out to indicate that it is
# optional.
# filter {
#
#}
output {
stdout { codec => rubydebug }
}
---

# 启动 --config.test_and_exit 用于测试配置文件是否正确
bin/logstash -f haoke-pipeline.conf --config.test_and_exit

#Sending Logstash logs to /haoke/logstash-6.5.4/logs which is now configured via log4j2.properties
#[2021-05-14T09:23:53,124][WARN ][logstash.config.source.multilocal] Ignoring the 'pipelines.yml' file because modules or command line options are specified
#Configuration OK
#[2021-05-14T09:23:55,508][INFO ][logstash.runner ] Using config.test_and_exit mode. Config Validation Result: OK. Exiting Logstash

配置 Filebeat——读取nginx日志
1
2
3
4
5
6
7
8
9
10
11
12
13
14
15
16
17
18
# cd /haoke
# vim haoke-nginx.yml

filebeat.inputs:
- type: log
enabled: true
paths:
- /var/log/nginx/access.log
tags: ["log"]
fields:
from: nginx
fields_under_root: false
output.logstash:
hosts: ["8.140.130.91:5044"]

#启动
./filebeat -e -c haoke-nginx.yml
#说明:现在启动会报错,因为Logstash还没有启动
测试
1
2
#正式启动 --config.reload.automatic 热加载配置文件,修改配置文件后无需重新启动
bin/logstash -f haoke-pipeline.conf --config.reload.automatic

image-20210514092532799

1
2
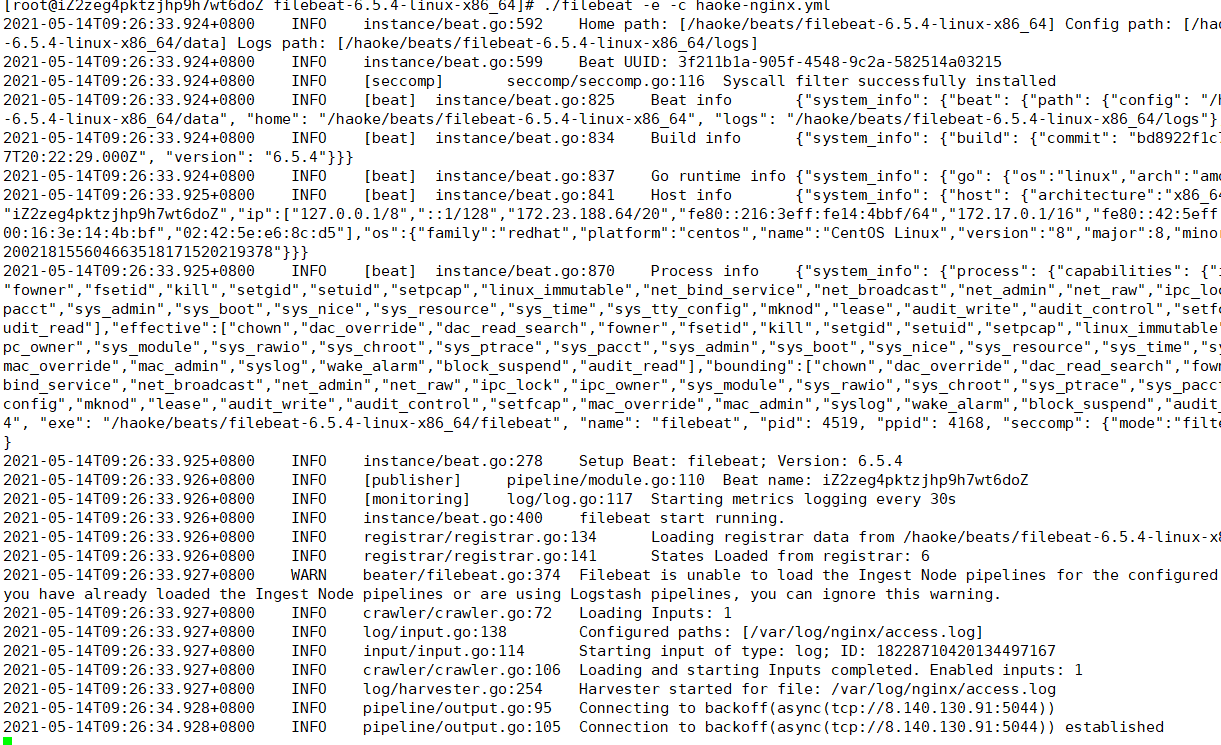
#启动 filebeat 采集nginx日志数据
./filebeat -e -c haoke-nginx.yml

image-20210514092650395


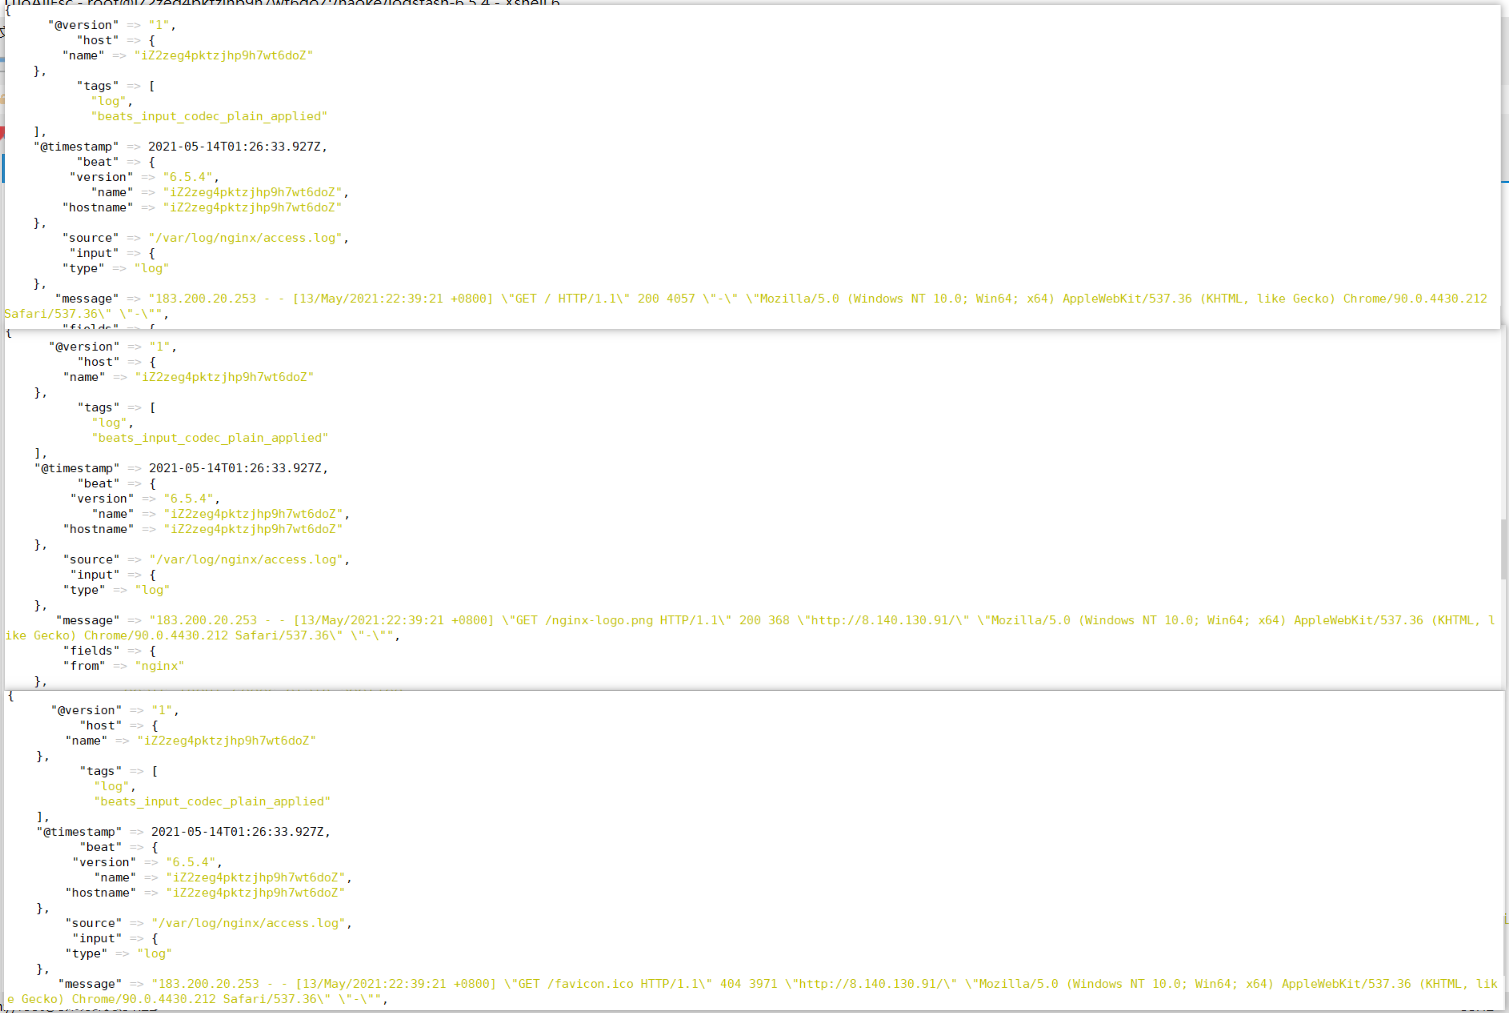
刷新页面

查看输出

image-20210514092933782

配置filter

未经处理的信息格式很不友好

自定义nginx日志格式
1
2
3
4
5
6
7
8
9
10
vim /etc/nginx/nginx.conf
---
log_format main '$remote_addr - $remote_user [$time_local] '
'"$request" $status $body_bytes_sent'
' "$http_referer" "$http_user_agent" ';

access_log /var/log/nginx/access.log main;
---

nginx -s reload

出现以下问题:Redirecting to /bin/systemctl start nginx.service

解决:安装 iptables

1
yum install iptables-services
编写nginx-patterns 文件
1
2
3
4
5
6
cd /haoke/logstash-6.5.4

vim nginx-patterns
---
NGINX_ACCESS %{IPORHOST:remote_addr} - %{USERNAME:remote_user} \[%{HTTPDATE:time_local}\] \"%{DATA:request}\" %{INT:status} %{NUMBER:bytes_sent} \"%{DATA:http_referer}\" \"%{DATA:http_user_agent}\"
---
修改 haoke-pipeline.conf
1
2
3
4
5
6
7
8
9
10
11
12
13
14
15
16
17
18
input {
beats {
port => "5044"
}
}

filter {
grok {
patterns_dir => "/haoke/logstash-6.5.4/nginx-patterns"
match => { "message" => "%{NGINX_ACCESS}"}
remove_tag => [ "_grokparsefailure" ]
add_tag => [ "nginx_access" ]
}
}

output {
stdout { codec => rubydebug }
}
测试
1
2
bin/logstash -f haoke-pipeline.conf --config.reload.automatic
./filebeat -e -c haoke-nginx.yml

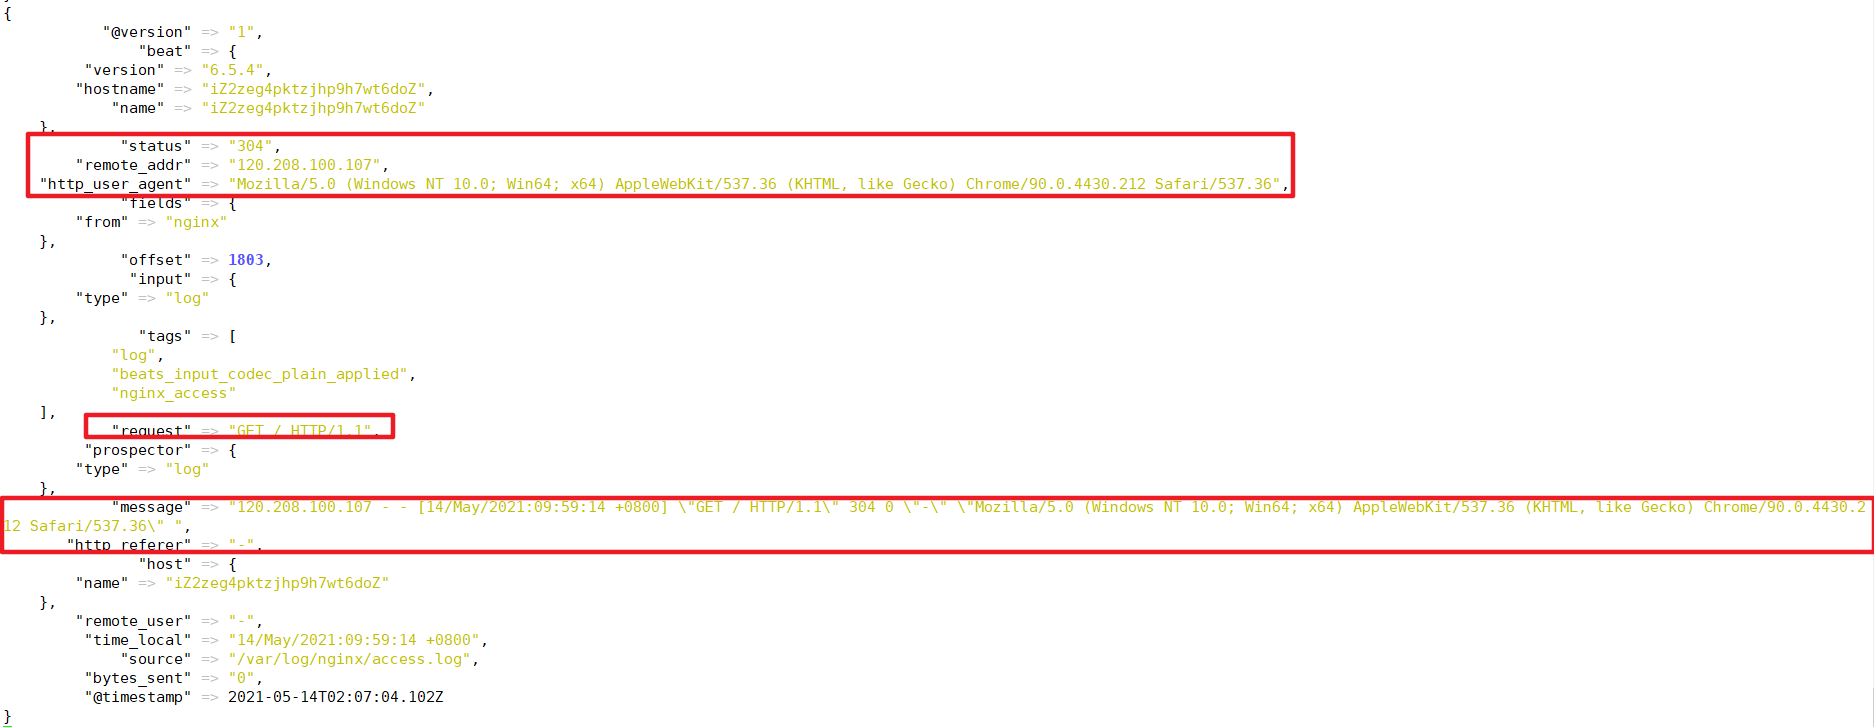
image-20210514100852948

Logstash 向ES发送数据

1
2
3
4
5
6
7
8
9
10
11
12
13
14
15
16
17
18
19
20
21
22
23
24
25
26
27
input{
beats{
port => "5044"
}

}

filter {
grok {
patterns_dir => "/haoke/logstash-6.5.4/nginx-patterns"
match => { "message" => "%{NGINX_ACCESS}"}
remove_tag => [ "_grokparsefailure" ]
add_tag => [ "nginx_access" ]
}
}

#output{
# stdout{
# codec => rubydebug
# }
#}

output {
elasticsearch {
hosts => [ "8.140.130.91:9200","8.140.130.91:9201","8.140.130.91:9202" ]
}
}

由于是 logstash 是热启动,修改配置文件后自动重载

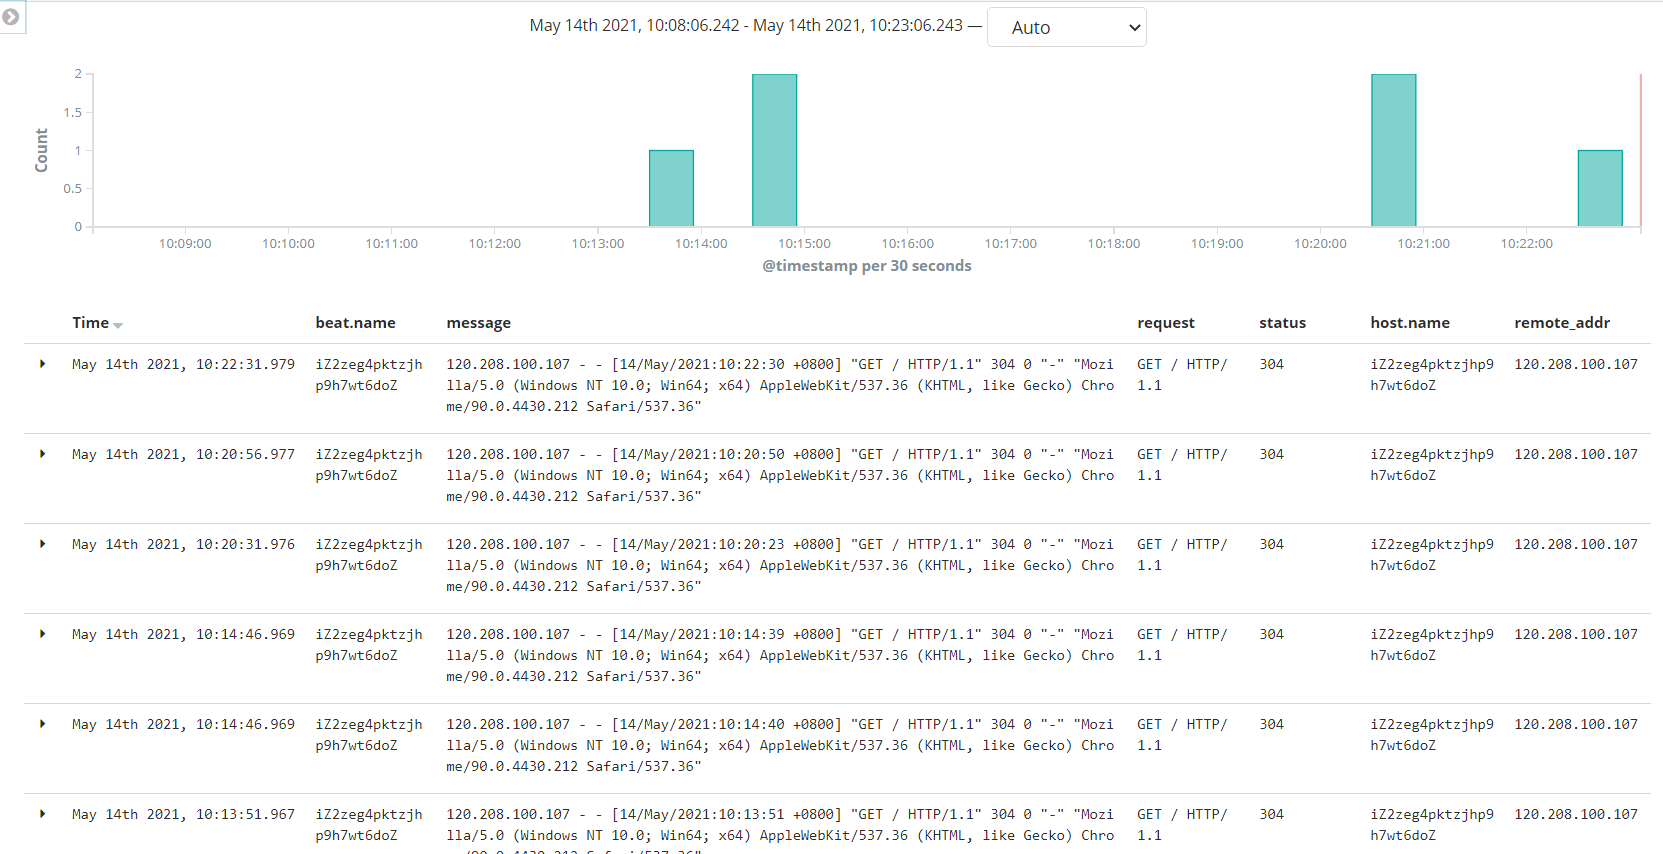
image-20210514101147433

启动filebeat 采集 nginx日志数据

image-20210514102321785

-------------本文结束-------------