0%

5.动手学深度学习-pytorch深度计算

[TOC]

5. 深度计算

5.1 层和块

5.1.1 块的概念

整个深度模型包含一些参数(所有组成层的参数集合),接受原始输入,生成输出。同样,每个层包含该层的参数,接受上一层提供的输出作为输入,并生成该层输出,这些参数根据下一层反向传播的信息被更新(误差反向传播)

  • 视觉领域,ResNet-152有数百层,这些层由 层组(groups of layers) 堆叠组成
  • 其他领域,也有 层组 堆叠排列的类似架构

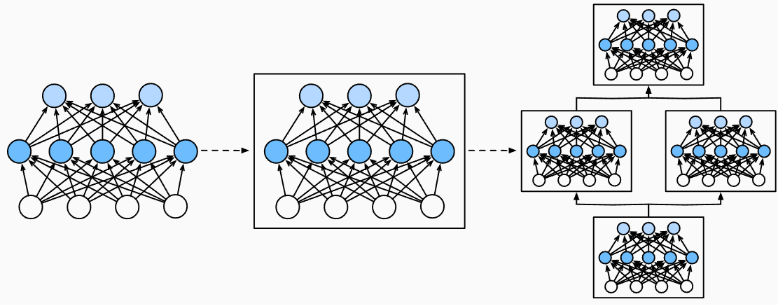
因此将神经网络组成模块划分为 (Module), 块可描述单个层、多个层组成的 层组 或深度模型本身。

image-20240322093857097

5.1.2 pytorc中的块

从编程实现角度, 的概念就是 。块 nn.Module 的任何子类都必须定义 $输入\mapsto 输出$ 的前向传播函数 forward(self,X) ;对各层输入、输出参数的初始化(该层参数形状)

  • 反向传播函数用于计算梯度,但由于自动微分的引入,不需要考虑
1
2
3
4
5
6
7
8
9
10
11
12
13
14
15
import torch
from torch import nn
# functional 库封装常用函数库
from torch.nn import functional as F

# 重点是这部分的理解
net = nn.Sequential(nn.Linear(20, 256), nn.ReLU(), nn.Linear(256, 10))

X = torch.rand(2, 20)
net(X)
# tensor([[ 0.0343, 0.0264, 0.2505, -0.0243, 0.0945,
# 0.0012, -0.0141, 0.0666,-0.0547, -0.0667],
# [ 0.0772, -0.0274, 0.2638, -0.0191, 0.0394,
# -0.0324, 0.0102, 0.0707,-0.1481, -0.1031]],
# grad_fn=<AddmmBackward0>)

nn.Sequential 构建了一个深度模型,层的顺序是参数传入的顺序

  • nn.Sequential :是 nn.Module 的一个子类,维护 实例的有序列表(也是 nn.Module 的实例 / 子类实例 )

    1
    2
    >>> print(nn.Sequential.__mro__)
    (<class 'torch.nn.modules.container.Sequential'>, <class 'torch.nn.modules.module.Module'>, <class 'object'>)

net(参数) 调用深度模型:相当于 net.__call__(X) 的简写

自定义块

块提供的功能

  1. 存储和访问前向传播计算所需的参数
  2. 根据需要初始化模型参数
  3. 接收输入数据:作为前向传播函数的参数
  4. 通过前向传播函数生成输出
  5. 计算输出关于输入的梯度:反向传播函数访问;通常自动微分完成
1
2
3
4
5
6
7
8
9
10
11
12
13
14
15
16
17
18
19
20
21
22
23
class MLP(nn.Module):
# 用模型参数声明层
def __init__(self):
# 调用MLP的父类Module的构造函数来执行必要的初始化。
# 子类实例化时也可以指定其他函数参数,例如模型参数params
super().__init__()
# 实例化两个全连接层
self.hidden = nn.Linear(20, 256) # 隐藏层
self.out = nn.Linear(256, 10) # 输出层

# 定义模型的前向传播,即如何根据输入X返回所需的模型输出
# 以X作为输入, 计算带有激活函数的隐藏表示,并输出其未规范化的输出值
def forward(self, X):
# 注意,这里我们使用ReLU的函数版本,其在nn.functional模块中定义。
return self.out(F.relu(self.hidden(X)))

net = MLP()
net(X)
# tensor([[ 0.0669, 0.2202, -0.0912, -0.0064, 0.1474,
# -0.0577, -0.3006, 0.1256,-0.0280, 0.4040],
# [ 0.0545, 0.2591, -0.0297, 0.1141, 0.1887,
# 0.0094, -0.2686, 0.0732,-0.0135, 0.3865]],
# grad_fn=<AddmmBackward0>)

顺序块

Sequential的设计是为了把其他模块串起来

  1. __init(self, *args)__ :将块逐个追加到列表中
  2. forward :前向传播:将输入按追加块的顺序前向传播
1
2
3
4
5
6
7
8
9
10
11
12
13
14
15
class MySequential(nn.Module):
def __init__(self, *args):
super().__init__()
for idx, module in enumerate(args):
# 这里,module是Module子类的一个实例。
# _modules:保存module实例的有序字典实例;属于 OrderedDict 类
self._modules[str(idx)] = module

def forward(self, X):
# OrderedDict保证了按照成员添加的顺序遍历它们
for block in self._modules.values():
# X是经过运算块后的返回值,相当于各层的输出
X = block(X)
# 这里返回的前向输出
return X

自定义有序字典类 OrderedDict 作用:在模型初始化过程中,pytorch从其实例 _modules 中查找需要初始化参数的子块

1
2
3
4
5
6
net = MySequential(nn.Linear(20, 256), nn.ReLU(), nn.Linear(256, 10))
net(X)
# tensor([[ 2.2759e-01, -4.7003e-02, 4.2846e-01, -1.2546e-01, 1.5296e-01,
# 1.8972e-01, 9.7048e-02, 4.5479e-04, -3.7986e-02, 6.4842e-02],
# [ 2.7825e-01, -9.7517e-02, 4.8541e-01, -2.4519e-01, -8.4580e-02,
# 2.8538e-01, 3.6861e-02, 2.9411e-02, -1.0612e-01, 1.2620e-01]], grad_fn=<AddmmBackward0>)
  • nn.ReLU() 内部调用了 F.rele() ,具有状态和可学习参数
块访问

nn.Sequential 实例可以理解为一个 nn.module 类实例的有序列表,可以通过索引来访问模型的任一层

1
2
3
4
5
6
7
8
9
10
11
12
13
14
15
16
17
18
19
20
# 访问顺序块,返回顺序块实例信息
print(net)
# MySequential(
# (0): Linear(in_features=20, out_features=256, bias=True)
# (1): ReLU()
# (2): Linear(in_features=256, out_features=10, bias=True)
# )

# 返回OrderedDict类实例,封装了该顺序块关联的块字典列表
print(net._modules)
# OrderedDict([('0', Linear(in_features=20, out_features=256, bias=True)),
# ('1', ReLU()),
# ('2', Linear(in_features=256, out_features=10, bias=True))])

# 根据索引获取字典中的块实例
print(net[2])#nn.Sequential中实现了通过索引访问,与下列两种方式等价
print(net._modules['2'])
print(net._modules.get('2'))
# Linear类继承Module类
# Linear(in_features=256, out_features=10, bias=True)

自定义块的特殊用法

Sequential 类允许我们定制深度网络架构,并提供很大灵活性。如:可以在前向传播中引入控制流或自定义处理

层引入常数参数

若在某一层需要合并一些其他参数 常数参数(constant param) :既不是上一层结果也不是可更新参数,如 $f(\mathbf{x};\mathbf{W})=c\mathbf{x}\mathbf{W}^T$ ,$c$ 就是常数参数,整个优化过程没有被更新

1
2
3
4
5
6
7
8
9
10
11
12
13
14
15
16
17
18
19
20
21
22
class FixedHiddenMLP(nn.Module):
def __init__(self):
super().__init__()
# 不计算梯度的随机权重参数。因此其在训练期间保持不变
self.rand_weight = torch.rand((20, 20), requires_grad=False)
self.linear = nn.Linear(20, 20)

# 1.计算线性层输出
# 2.对第一次输出乘常量参数+1,再relu
# 3.计算第二次输出的线性层输出
# 4.控制流:若X每个元素绝对值的和>1,则除2直至小于1
# 5.返回标量,X.sum()
def forward(self, X):
X = self.linear(X)
# 使用创建的常量参数以及relu和mm函数
X = F.relu(torch.mm(X, self.rand_weight) + 1)
# 复用全连接层。这相当于两个全连接层共享参数
X = self.linear(X)
# 控制流
while X.abs().sum() > 1:
X /= 2
return X.sum()
块组合

Sequential 类允许我们定制深度网络架构,并提供很大灵活性

1
2
3
4
5
6
7
8
9
10
11
12
class NestMLP(nn.Module):
def __init__(self):
super().__init__()
self.net = nn.Sequential(nn.Linear(20, 64), nn.ReLU(),
nn.Linear(64, 32), nn.ReLU())
self.linear = nn.Linear(32, 16)

def forward(self, X):
return self.linear(self.net(X))

chimera = nn.Sequential(NestMLP(), nn.Linear(16, 20), FixedHiddenMLP())
chimera(X)

5.1.3 操作效率

在一个高性能的深度学习库中进行了大量的字典查找、 代码执行和许多其他的Python代码。 Python的问题全局解释器锁 是众所周知的。 在深度学习环境中,我们担心速度极快的GPU可能要等到CPU运行Python代码后才能运行另一个作业。

5.2 参数管理

Paramater 类的实例是可优化的参数实例

在定义好模型架构并设置好超参数后,完成对 各层参数设置 后,就可以进行模型训练

  • 访问参数
  • 参数初始化
  • 不同 块(module) 间共享参数
1
2
3
4
5
6
7
import torch
from torch import nn

net = nn.Sequential(nn.Linear(4, 8), nn.ReLU(), nn.Linear(8, 1))
# 2个数据4维特征
X = torch.rand(size=(2, 4))
net(X)

5.2.1 参数访问

net.state_dict() 返回块的所有参数信息组成的字典 OrderedDict

  • 权重就是神经网络的状态,权重的一轮迭代就是网络状态的一次变化
1
2
3
4
5
6
7
8
9
10
11
12
13
14
15
16
17
18
19
20
21
22
23
24
25
26
# 使用nn.Sequential,该类封装了一些按索引访问方法,支持列表式访问各层
print(net[2])
# net[2] 返回Linear类的块实例,即本层信息
# Linear(in_features=8, out_features=1, bias=True)

# Module有state_dict():返回 a dictionary containing a whole state of the module
print(net.state_dict())
#OrderedDict([
# ('0.weight', tensor([[-0.3076, -0.4758, 0.1081, -0.2304],
# [ 0.4211, 0.4465, -0.3960, -0.1722],
# [ 0.2387, 0.3205, 0.2718, 0.2265],
# [ 0.2729, 0.1801, -0.1720, -0.0440],
# [-0.1461, -0.1271, 0.1468, 0.3713],
# [-0.4266, 0.4993, 0.1876, -0.3648],
# [-0.3004, 0.0743, -0.3056, 0.0593],
# [ 0.0245, -0.1389, -0.1488, -0.4814]])),
# ('0.bias', tensor([-0.2036, -0.0883, 0.4036, -0.3335, -0.4430, 0.2864, -0.1805, -0.1634])),
# ('2.weight', tensor([[ 0.2721, 0.2518, 0.3448, 0.2209, 0.1964, -0.1971, 0.0200, 0.2595]])),
# ('2.bias', tensor([0.1401]))])

net.state_dict()['0.bias']
# tensor([-0.0771, -0.1678, -0.3164, -0.3792, 0.1848, -0.2182, 0.3182, -0.1454])

# Linear类继承了Module类
print(net[2].state_dict())
# OrderedDict([('weight', tensor([[-0.2372, -0.2587, -0.2270, -0.1828, -0.1542, -0.2847, 0.1730, -0.1300]])), ('bias', tensor([-0.1647]))])

Linear类实例的输出是一个字典,键包括:权重,偏置

  • 键唯一标识每个参数

参数类

每个参数都被表示为一个参数类实例(<class 'torch.nn.parameter.Parameter'>),属性有:

  • 值:data
  • 梯度:grad
  • 其他额外信息

这些参数信息可以被统一管理和更新,所以需要 Parameter

1
2
3
4
5
6
7
8
9
10
11
12
print(type(net[2].bias))
# <class 'torch.nn.parameter.Parameter'>

# 返回的是参数类实例 参数名为bias的实例
print(net[2].bias)
# Parameter containing:
# tensor([-0.1647], requires_grad=True)

# 只返回bias属性的值
print(net[2].bias.data)
# tensor([-0.1647])
print(net[2].bias.grad)

一次性访问所有参数net.named_parameters()

1
2
3
4
5
6
7
8
# *[...]参数解包
# 接收元组的list,并将其作为两个单独的参数分别输出
print(*[(name, param.shape) for name, param in net[0].named_parameters()])
#('weight', torch.Size([8, 4])) ('bias', torch.Size([8]))
# param是Parameter类的实例

print(*[(name, param.shape) for name, param in net.named_parameters()])
#('0.weight', torch.Size([8, 4])) ('0.bias', torch.Size([8])) ('2.weight',torch.Size([1, 8])) ('2.bias', torch.Size([1]))

从嵌套块收集参数

深度模型中,层之间存在嵌套关系,也可以通过嵌套列表索引分层访问块参数

1
2
3
4
5
6
7
8
9
10
11
12
13
14
15
def block1():
return nn.Sequential(nn.Linear(4, 8), nn.ReLU(),
nn.Linear(8, 4), nn.ReLU())

def block2():
net = nn.Sequential()
for i in range(4):
# f'{i}' 格式化字符串,将{i}中的变量值替换
net.add_module(f'block {i}', block1())
return net

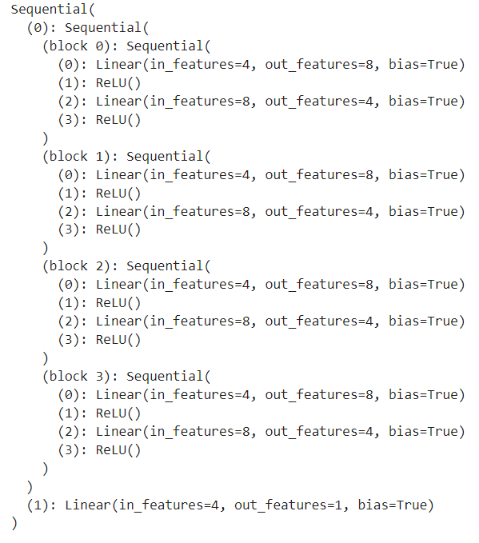
rgnet = nn.Sequential(block2(), nn.Linear(4, 1))
rgnet(X)

print(rgnet)

image-20240322175345411

1
2
3
4
5
# rgnet[0]=block2()
# rgnet[0][1]=block2()[1]=(block 1)
# rgnet[0][1][0]=block2()[1][0]=(block 1)[0]=Linear(in_features=4,out_feartures=8,bias=True)
# rgnet[0][1][0].bias=tensor(8)
rgnet[0][1][0].bias.data

5.2.2 参数初始化

pytorch提供默认随机初始化,也允许通过重写自定义初始化方法

  • 默认情况下,PyTorch会根据一个范围均匀地初始化权重和偏置矩阵, 这个范围是根据输入和输出维度计算出的——Xavier初始化

预置初始化

nn.init 模块提供类很多预置的初始化方法

  • 正态分布
  • 全0,全1
  • 常量
  • Xavier初始化

正态分布、全0/全1

1
2
3
4
5
6
7
def init_normal(m):
if type(m) == nn.Linear:
nn.init.normal_(m.weight, mean=0, std=0.01)
nn.init.zeros_(m.bias)

net.apply(init_normal)
net[0].weight.data[0], net[0].bias.data[0]

net.apply(fn) 递归地将一个函数应用到神经网络中的每个子模块上,包括其本身

  • 需要定义一个函数,该函数接收一个模块作为参数,并对该模块执行自定义操作

常量

1
2
3
4
5
6
7
def init_constant(m):
if type(m) == nn.Linear:
nn.init.constant_(m.weight, 1)
nn.init.zeros_(m.bias)
net.apply(init_constant)
net[0].weight.data[0], net[0].bias.data[0]
# (tensor([1., 1., 1., 1.]), tensor(0.))

Xavier初始化

  • xavier_normal
  • xavier_normal_ :这个是更新后的版本,在计算时会考虑到ReLU激活函数的特性,以确保网络在初始化时的激活值分布更加合理
  • xavier_uniform
  • xavier_uniform_
1
2
3
4
5
6
7
8
9
10
11
def init_xavier(m):
if type(m) == nn.Linear:
nn.init.xavier_uniform_(m.weight)
def init_42(m):
if type(m) == nn.Linear:
nn.init.constant_(m.weight, 42)

net[0].apply(init_xavier)
net[2].apply(init_42)
print(net[0].weight.data[0])
print(net[2].weight.data)

自定义初始化

1
2
3
4
5
6
7
8
9
def my_init(m):
if type(m) == nn.Linear:
print("Init", *[(name, param.shape)
for name, param in m.named_parameters()][0])
nn.init.uniform_(m.weight, -10, 10)
m.weight.data *= m.weight.data.abs() >= 5

net.apply(my_init)
net[0].weight[:2]

也可以在任意位置直接修改参数

1
2
3
4
5
net[0].weight.data[:] += 1
net[0].weight.data[0, 0] = 42

net[0].weight.data[0]
# tensor([42.0000, -5.2469, 9.0045, 1.0000])

5.2.3 参数共享

在层之间共享权重,实质上共享层引用是同一个参数矩阵的值

1
2
3
4
5
6
7
8
9
10
11
12
13
14
# 我们需要给共享层一个名称,以便可以引用它的参数
shared = nn.Linear(8, 8)
net = nn.Sequential(nn.Linear(4, 8), nn.ReLU(),
shared, nn.ReLU(),
shared, nn.ReLU(),
nn.Linear(8, 1))
net(X)
# 检查参数是否相同
print(net[2].weight.data[0] == net[4].weight.data[0])
net[2].weight.data[0, 0] = 100
# 确保它们实际上是同一个对象,而不只是有相同的值
print(net[2].weight.data[0] == net[4].weight.data[0])
# tensor([True, True, True, True, True, True, True, True])

net有4个隐藏层,第二个隐藏层和第三个隐藏层都由shared定义

  • 作用:由于模型参数包含梯度,因此在反向传播期间参数共享层的梯度会加在一起

5.3 自定义层

与自定义块类似,只需要继承 nn.module ,并实现 __init__(self)forward(self,X) 即可

5.3.1 不带参数的层

1
2
3
4
5
6
7
8
9
10
11
12
13
14
15
import torch
import torch.nn.functional as F
from torch import nn

class CenteredLayer(nn.Module):
def __init__(self):
super().__init__()

def forward(self, X):
return X - X.mean()

layer = CenteredLayer()
# 将数据 X=[1,2,3,4,5] 传入该层,会输出前向传播的值
layer(torch.FloatTensor([1, 2, 3, 4, 5]))
# tensor([-2., -1., 0., 1., 2.])

只要继承了 nn.Module 类的块都可以应用到更复杂的模型中

1
2
3
4
5
net = nn.Sequential(nn.Linear(8, 128), CenteredLayer())

Y = net(torch.rand(4, 8))
Y.mean()
# tensor(7.4506e-09, grad_fn=<MeanBackward0>)

不管第1隐藏层输出是什么,$\overline{h_1-\overline{h}_1}=\frac{\sum\limits (h_1-\overline{h}_1)}{\vert h_1\vert}=\frac{\sum h_1-\vert h_1\vert\overline{h_1}}{\vert h_1\vert}=0$ ,即 Y.mean() 应该为0 ,在计算机中表示为一个非常小的数

5.3.2 带参数的层

接受层的输入与输出形状

由于参数在torch中以 Paramater 类封装便于计算,所以在 __init__() 中将参数定义为该类

1
2
3
4
5
6
7
8
9
10
11
class MyLinear(nn.Module):
def __init__(self, in_units, units):
super().__init__()
self.weight = nn.Parameter(torch.randn(in_units, units))
self.bias = nn.Parameter(torch.randn(units))
def forward(self, X):
linear = torch.matmul(X, self.weight.data) + self.bias.data
return F.relu(linear)

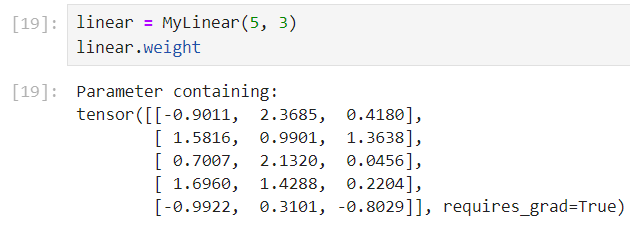
linear = MyLinear(5, 3)
linear.weight

通过 nn.Paramater 实例化自定义参数的形状与定义时相同,即 p=nn.Parameter(torch.randn(5, 3)) ,则 p.shape=torch.Size([5,3])

  • image-20240323202329871

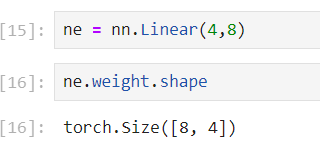
通过 net=nn.Linear(5,3) 实例化 ,其参数 ne.weight.shape=torch.Size([3, 5])

  • image-20240323202247119
1
2
3
linear(torch.rand(2, 5))
#tensor([[0., 0., 0.],
# [0., 0., 0.]])

也可以将自定义应用于网络模型构建

1
2
3
4
net = nn.Sequential(MyLinear(64, 8), MyLinear(8, 1))
net(torch.rand(2, 64))
#tensor([[0.],
# [0.]])

5.3.3 自定义添加层—net.add()

net.add_module([key],[块声明]) :向神经网络中添加模块

  • net.add_module('layer1', nn.Linear(10, 20))

5.4 读写文件

有时我们希望保存训练的模型, 以备将来在各种环境中使用(比如在部署中进行预测)。 此外,当运行一个耗时较长的训练过程时, 最佳的做法是定期保存中间结果,以确保在服务器电源被不小心断掉时,我们不会损失几天的计算结果

5.4.1 加载和保存

对于基本类型:tensortensor[]mydict={'a':a,'b':b} 直接调用 torch.load()torch.save() 进行读写,参数为要保存的变量

1
2
3
4
5
6
7
8
9
10
11
12
13
14
15
16
17
18
19
20
import torch
from torch import nn
from torch.nn import functional as F

# 张量从内存保存到文件
x = torch.arange(4)
torch.save(x, 'x-file')
# 张量从文件取到内存
x2 = torch.load('x-file')
x2

# 张量列表保存与取回
y = torch.zeros(4)
torch.save([x, y],'x-files')
x2, y2 = torch.load('x-files')

# 张量字典的保存与取回
mydict = {'x': x, 'y': y}
torch.save(mydict, 'mydict')
mydict2 = torch.load('mydict')

5.4.2 保存和加载模型参数

深度学习框架提供了内置函数来保存和加载整个网络

但并不保存整个模型架构,为了恢复模型,我们需要用代码生成架构, 然后从磁盘加载参数

1
2
3
4
5
6
7
8
9
10
11
12
class MLP(nn.Module):
def __init__(self):
super().__init__()
self.hidden = nn.Linear(20, 256)
self.output = nn.Linear(256, 10)

def forward(self, x):
return self.output(F.relu(self.hidden(x)))

net = MLP()
X = torch.randn(size=(2, 20))
Y = net(X)

保存参数 :将模型 state_dict() 输出的参数字典 OrderedDict 实例,保存在 mlp.params 的文件中

1
torch.save(net.state_dict(), 'mlp.params')

恢复模型 :读取文件,并转换为 OrderedDict 类的实例作为参数

1
2
3
4
5
6
7
clone = MLP()
clone.load_state_dict(torch.load('mlp.params'))
clone.eval()
# MLP(
# (hidden): Linear(in_features=20, out_features=256, bias=True)
# (output): Linear(in_features=256, out_features=10, bias=True)
# )

5.5 GPU

使用GPU来进行机器学习,因为单个GPU相对运行速度快

1
2
# 查看nvidia驱动程序及CUDA
nvidia-smi

在torch中,每个数据都归属于一个设备 (device),称其为环境(context)。默认情况,所有的变量和计算都分配给CPU

设备间进行数据传输非常不划算 ,在设备(CPU、GPU和其他机器)之间传输数据比计算慢得多。这也使得并行化变得更加困难,因为我们必须等待数据被发送(或者接收),然后才能继续进行更多的操作。

  • 根据经验,多个小操作比一个大操作糟糕得多。 此外,一次执行几个操作比代码中散布的许多单个操作要好得多。 如果一个设备必须等待另一个设备才能执行其他操作, 那么这样的操作可能会阻塞。
  • 当我们打印张量或将张量转换为NumPy格式时, 如果数据不在内存中,框架会首先将其复制到内存中, 这会导致额外的传输开销。 更糟糕的是,它现在受制于全局解释器锁,使得一切都得等待Python完成。

在创建、使用变量是要合理分配环境,最大限度地减少设备间的数据传输时间

5.5.1 设备查看

GPU设备仅代表一个卡和相应的显存,如果有多个 GPU,使用 'cuda:0''cuda:1' 分别表示第1块和第2块GPU,'cuda' 默认返回第1块GPU

1
2
3
4
5
import torch
from torch import nn

torch.device('cpu'), torch.device('cuda'), torch.device('cuda:1')
# (device(type='cpu'), device(type='cuda'), device(type='cuda', index=1))

在torch中,通过 torch.device([设备字符串]) 查看在运算时可使用的设备

1
2
# 查看设备数量
torch.cuda.device_count()

5.5.2 设备获取

1
2
3
4
5
6
7
8
9
10
11
12
13
14
15
16
# 尝试将第i块gpu拿出来返回
def try_gpu(i=0): #@save
"""如果存在,则返回gpu(i),否则返回cpu()"""
if torch.cuda.device_count() >= i + 1:
return torch.device(f'cuda:{i}')
return torch.device('cpu')

def try_all_gpus(): #@save
"""返回所有可用的GPU,如果没有GPU,则返回[cpu(),]"""
devices = [torch.device(f'cuda:{i}') for i in range(torch.cuda.device_count())]
return devices if devices else [torch.device('cpu')]

try_gpu(), try_gpu(10), try_all_gpus()
# (device(type='cuda', index=0),
# device(type='cpu'),
# [device(type='cuda', index=0)])

5.5.3 使用GPU存储变量

1
2
3
x = torch.tensor([1, 2, 3])
x.device
# device(type='cpu')

可见,不指定设备的前提下,变量默认存储在CPU上

将变量存储在GPU

若对两个张量运算,首先要确定两个张量存储在同一个设备上

创建时指定设备
1
2
3
4
5
X = torch.ones(2, 3, device=try_gpu())
X
# tensor([[1., 1., 1.],
# [1., 1., 1.]], device='cuda:0')
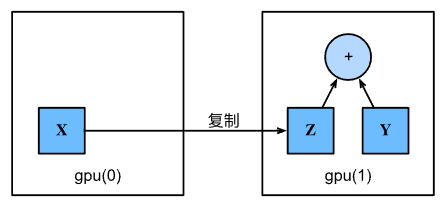
设备间复制

image-20240324003641277

X与Y需要再同一个设备上才可以计算,否则由于在同一设备上找不到数据导致异常。 若不在同一GPU上,需要将变量复制到同一GPU上

1
2
3
4
5
6
7
8
9
10
11
# 将X移动到GPU 1上作为变量Z
Z = X.cuda(1)
print(X)
print(Z)
#tensor([[1., 1., 1.],
# [1., 1., 1.]], device='cuda:0')
#tensor([[1., 1., 1.],
# [1., 1., 1.]], device='cuda:1')

#在GPU1上进行加法
Y + Z

假设变量 Z 已经在第2个GPU上,仍会返回 Z ,并不会复制并分配新内存

神经网络与GPU

神经网络模型也可以指定设备

1
2
3
4
5
net = nn.Sequential(nn.Linear(3, 1))
net = net.to(device=try_gpu())

net[0].weight.data.device
# device(type='cuda', index=0)
-------------本文结束-------------