前置知识:JDBC
学习视频:https://www.bilibili.com/video/BV1NE411Q7Nx?spm_id_from=333.999.0.0
Mybatis——一种ORM框架:将Java中的Bean映射为数据库的记录
- ORM:用于实现面向对象编程语言里不同类型系统的数据之间的转换
Mybatis运行过程——工厂模式
#{} 与 ${} ——三点区别
动态Sql
分页——两种方法
缓存——查询缓存顺序
MyBatis
文档
sql相关
- sql引擎
- innoDB底层
- 索引
- 索引优化
概述
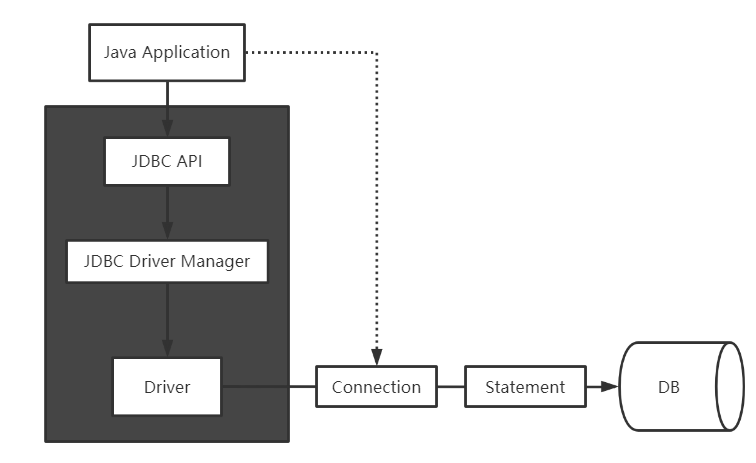
JDBC
JDBC驱动程序:JDBC(Java Database Connectivity, Java 数 据 库 连 接)是 一 种可用于执行 SQL 语句的 Java API(Application Programming Interface)
实现了从 Java 程序内调用标准的
SQL命令对数据库进行查询、插入、删除和更新等操作, 并确保数据事务的正常进行基本层次结构由 Java 程序、JDBC 驱动程序管理器、数据库驱动程序和数据库四部分组成
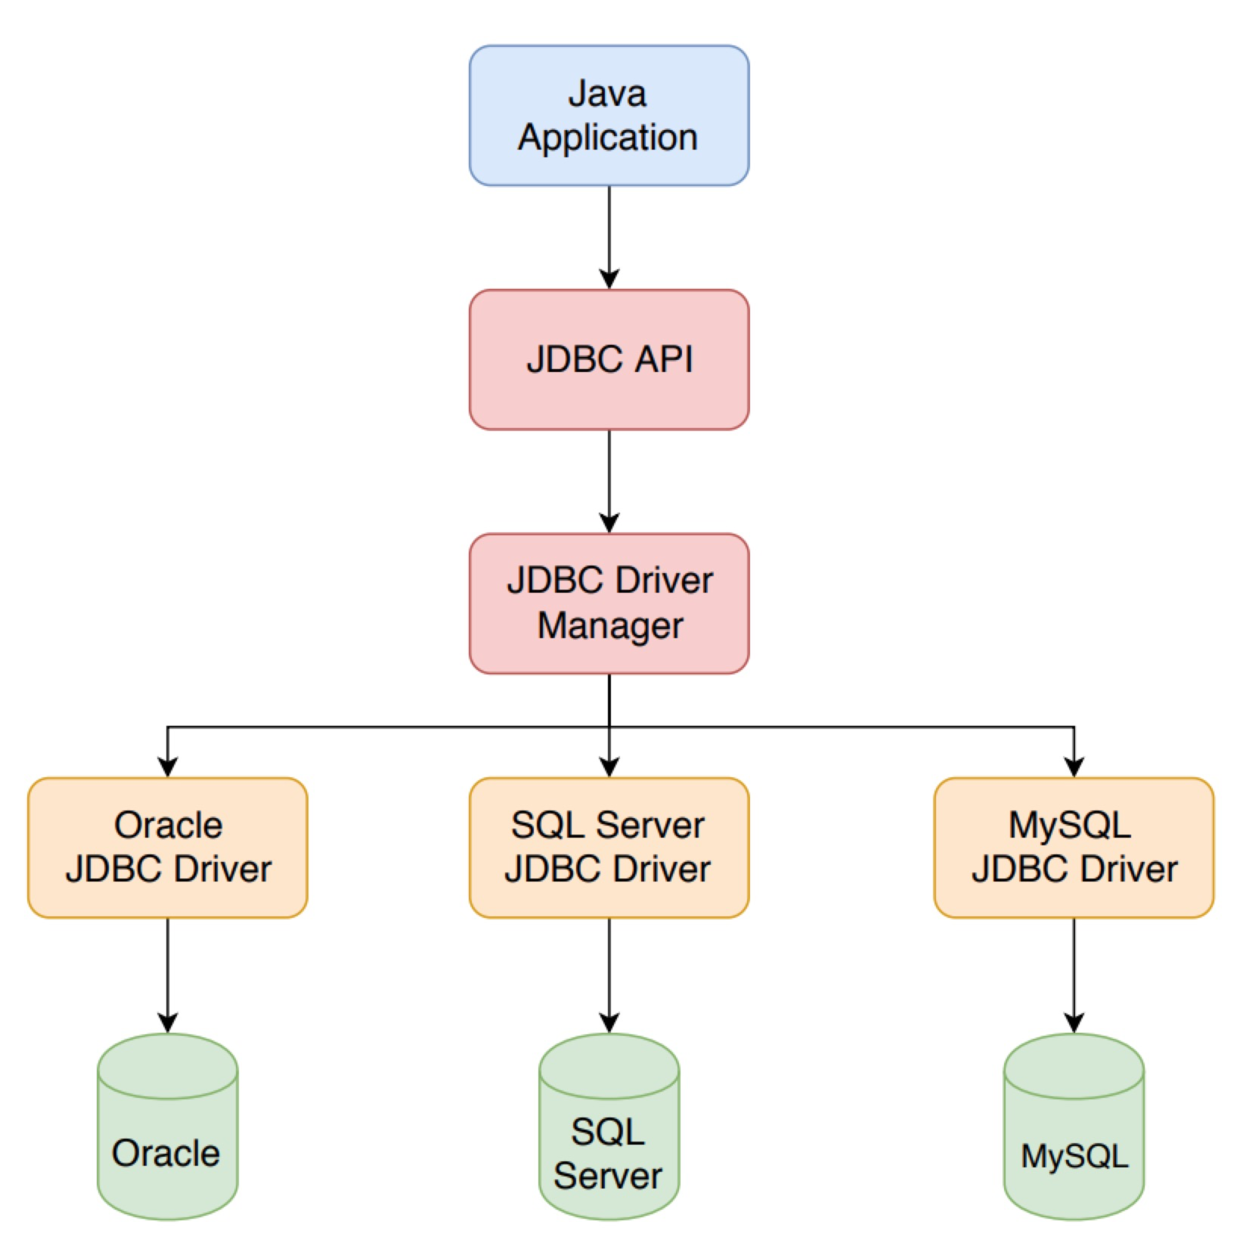
Java 程序依赖于 JDBC API,通过
DriverManager来获取驱动,并且针对不同的数据库可以使用不同的驱动。这是典型的桥接的设计模式,把
抽象 Abstraction与行为实现Implementation 分离开来,从而可以保持各部分的独立性以及应对他们的功能扩展。
JDBC步骤
1 | public static void connectionTest(){ |
JDBC存在的问题
- 传统的JDBC代码复杂
- 实现步骤多
- 需要设计一种 将数据映射到数据库的框架 来简化JDBC的步骤
Mybatis特点
持久层框架
持久化:将程序中的数据从 瞬时状态【内存:断电即失】转化为 持久状态【数据库jdbc,io文件持久化】的过程
持久层:完成数据持久化工作的代码块,层次间界限分明
定制化Sql
避免JDBC代码,手动设置参数和获取结果集
优点
- 简单:两个jar文件(mybatis.jar+mysql-connector.jar)+配置几个sql映射文件(Mapper)
- 灵活:sql写在xml里,统一管理(mybatis-config.xml)
- 解除sql与程序的耦合:通过提供Mapper层,将业务逻辑与数据访问逻辑分离
- 提供映射标签:JavaBean与数据库字段的关系映射
- 提供xml标签,支持编写动态sql
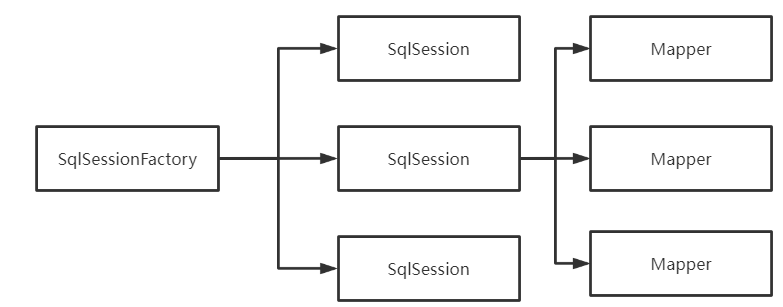
Mybatis执行流程
通过简单的 XML 或注解来配置和映射原始类型、接口和 Java POJO
- 获取配置文件
- 实例化
SqlSessionFactoryBuilder - 加载 mybatis-config.xml 中的配置信息
- 实例化
SqlsessionFactory - 创建执行器
executor - 创建
SqlSession - 实现CRUD逻辑
- CRUD后提交事务,判断是否执行成功
graph TB
A[Resources获取加载全局配置文件]-->B[实例化SqlSessionFactoryBuilder构造器]
B-->C[解析配置文件流XMLConfigBuilder]
C-->D[Configuration加载所有的配置信息]
D-->E[SqlSessionFactory实例化]
E-->F[transactional事务管理器]
F-->G[创建executor执行器]
G-->H[创建SqlSession]
H-->I[实现CRUD]
I-->F
F-->J{查看是否执行成功}
J--否-->F
J--是-->K[提交事务]
K-->L[关闭]
1. 导包——Maven
1 | <dependency> |
SqlSessionFactoryBuilder
一旦创建了 SqlSessionFactory ,就不再需要它了。
因此 SqlSessionFactoryBuilder 实例的最佳作用域是方法作用域
- 作用域:局部变量
SqlSessionFactory <=> 数据库连接工厂
每个基于 MyBatis 的应用都是以一个 SqlSessionFactory 的实例为核心
构造方法:从xml中配置文件中构建SqlSessionFactory实例
SqlSessionFactory 一旦被创建就应该在应用的运行期间一直存在
作用域:应用作用域
最简单的就是使用单例模式或者静态单例模式。
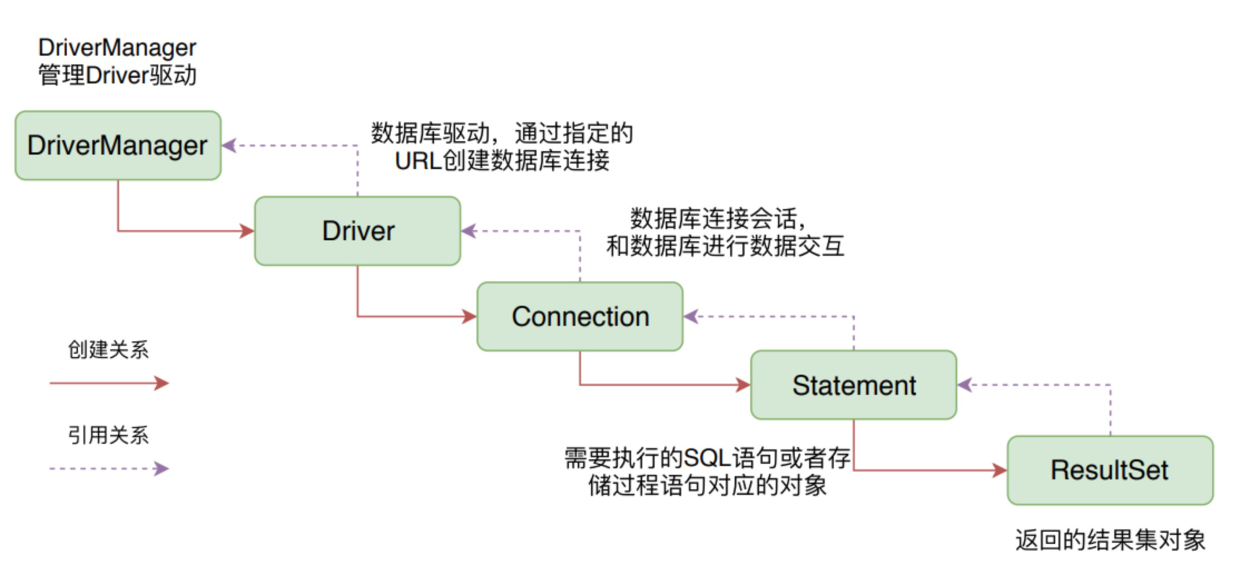
SqlSession => JDBC:Connection对象
通过 SqlSessionFactory 获得 SqlSession 的实例。
SqlSession 提供了在数据库执行 SQL 命令所需的所有方法。
SqlSession的实例时线程不安全的,不能被共享
- 每次收到一个数据库访问请求,打开一个SqlSession,返回响应后,立即关闭
Mapper => JDBC:Statement
代理对象 执行具体业务
将接口与xml进行绑定
Mybatis示例程序
graph LR A[搭建环境]--> B[编写代码]--> C[测试] D[导入mysql驱动,MyBatis包]-->E[核心配置文件mybatis-config.xml]-->F[编写工具类提供SqlSession对象]
1. 搭建数据库
1 | create table user( |
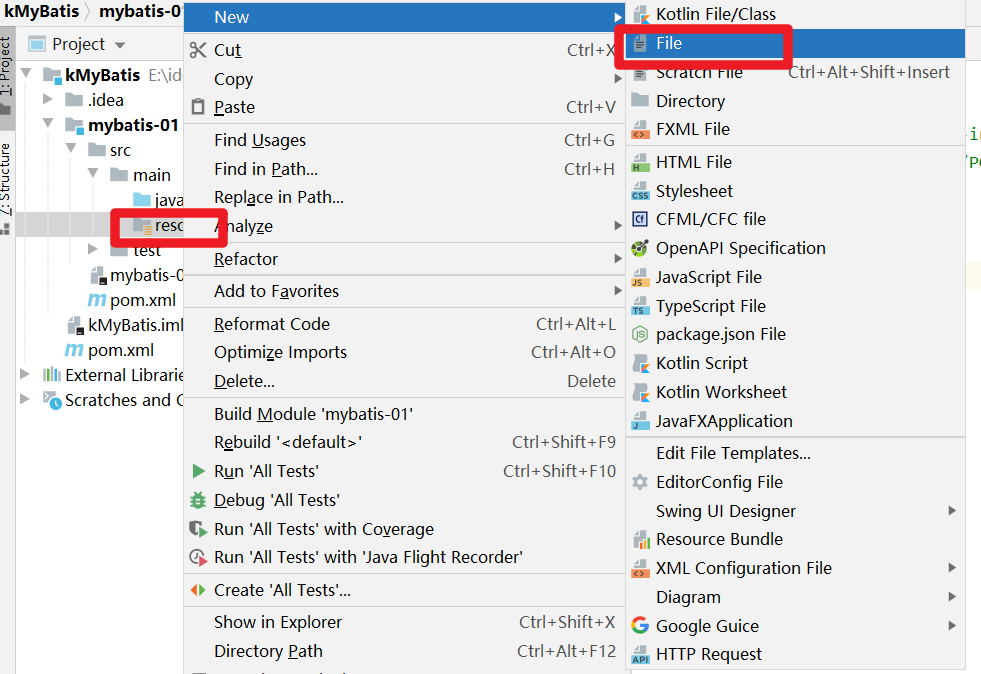
2. 新建项目
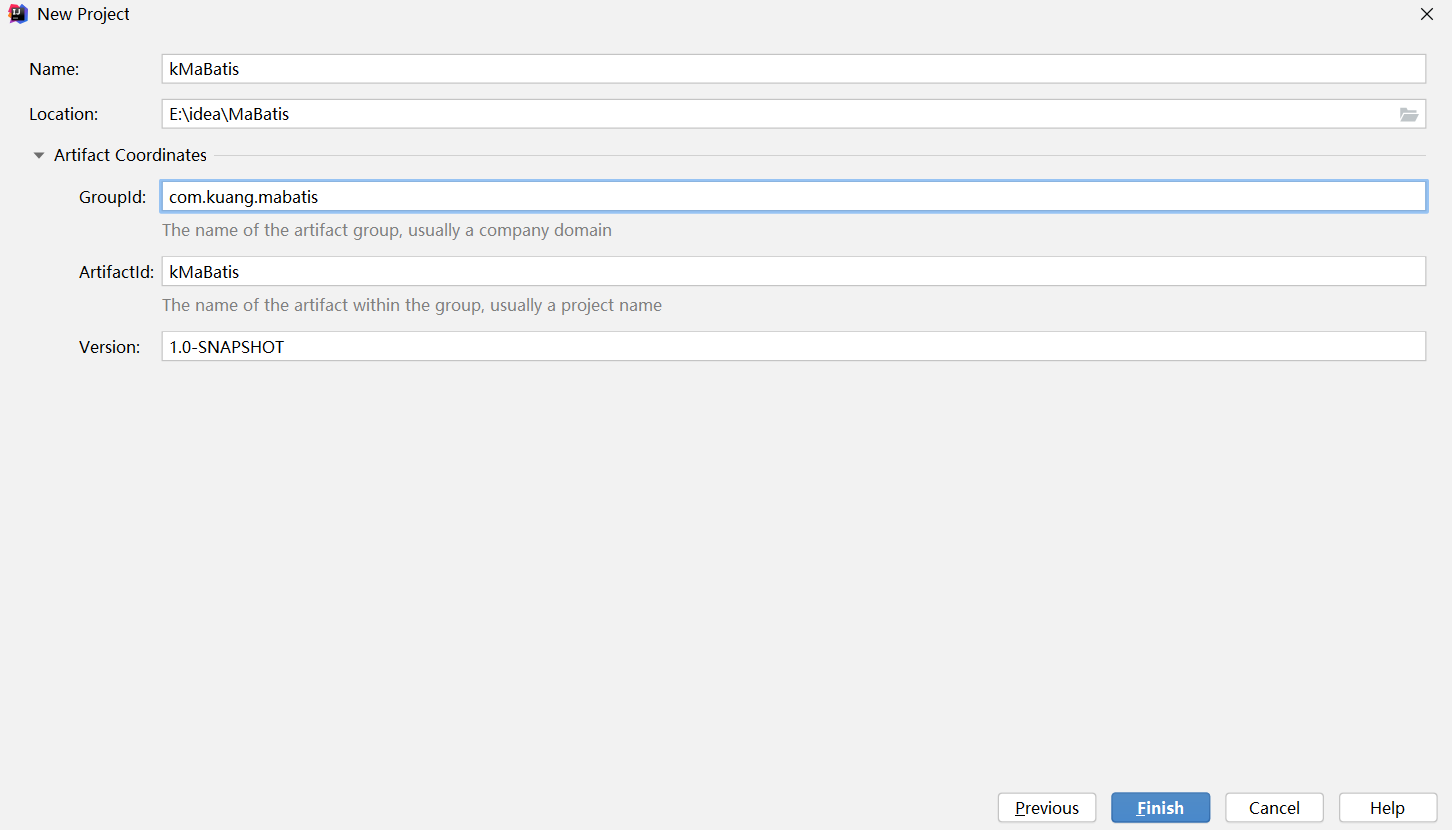
3. 删除src,使项目成为父工程
4. maven导入依赖
1 | <!-- 父工程 --> |
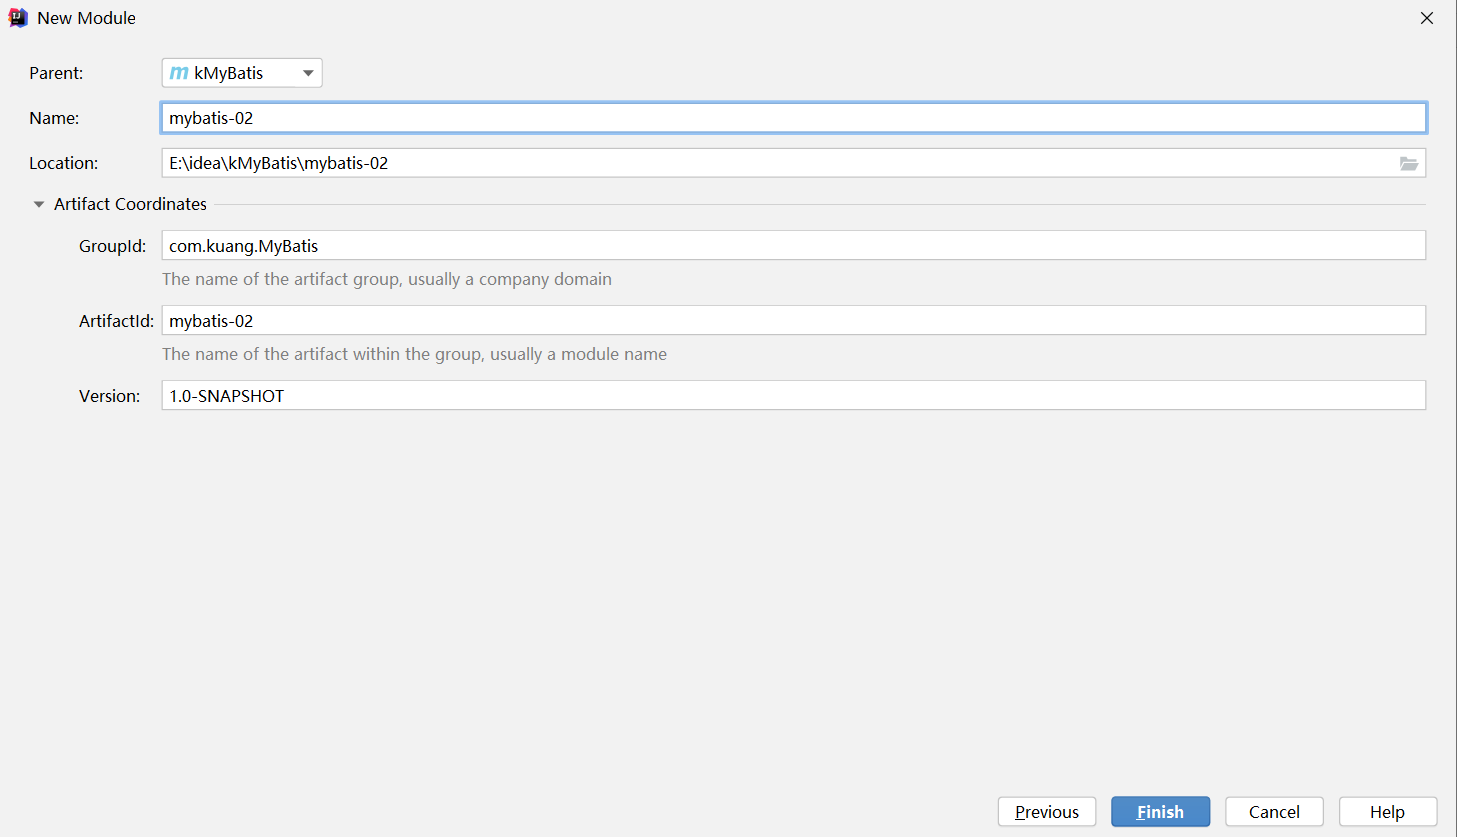
5. 新建模块
6. 获取数据库连接对象
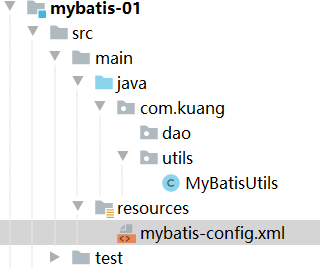
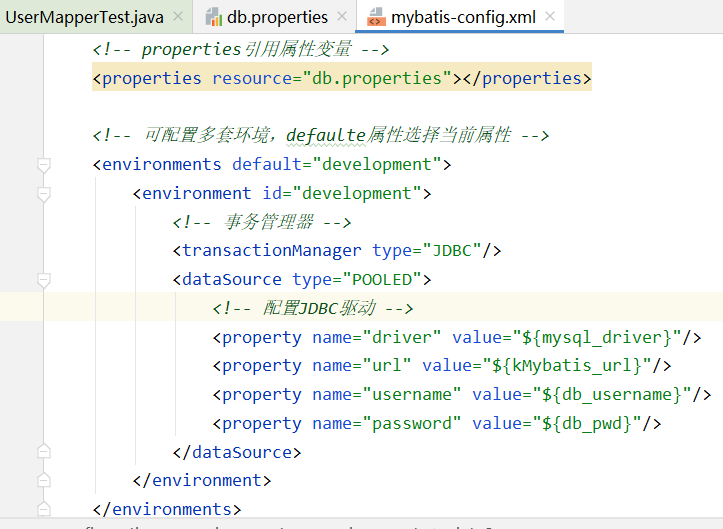
a. 编写核心配置文件——mybatis-config.xml
1 |
|
- useSSL:使用安全连接
- useUnicode:保证中文不乱码
- characterEncoding:编码格式

b. 编写MyBatis工具类
新建dao包,utils包
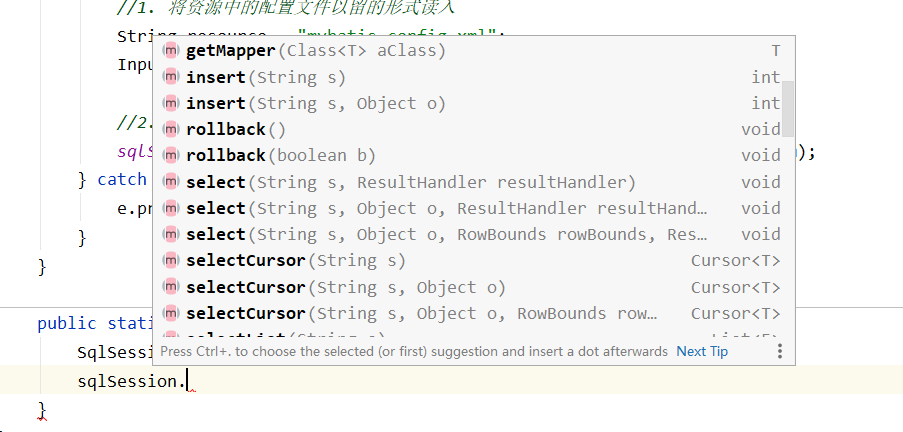
1 | public class MyBatisUtils { |
7. 编写代码

实体类
pojo的作用就是将从数据库获取到的数据封装为一个一个的对象,让java能够更好的进行操作DO、VO
1 | package com.kuang.pojo; |
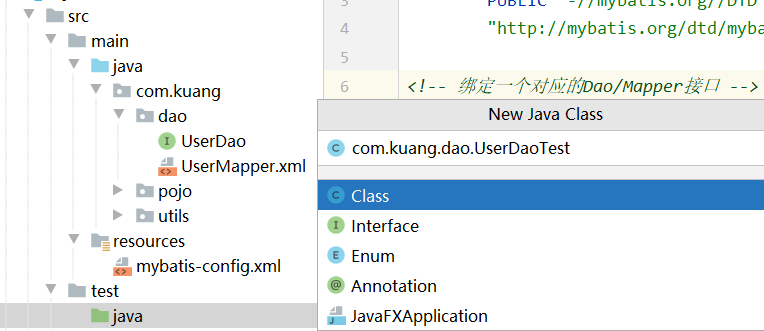
Dao接口
1 | public interface UserDao{ |
接口的实现
由 UserDaoImpl 转化为 Mapper 配置文件

1 |
|
- namespace:相当于指定要实现的接口
- 将不同的语句隔离开来,同时也实现了接口绑定
- 全限定名(比如 “com.mypackage.MyMapper.selectAllThings)将被直接用于查找及使用
- 短名称(比如 “selectAllThings”)如果全局唯一也可以作为一个单独的引用。 如果不唯一,有两个或两个以上的相同名称(比如 “com.foo.selectAllThings” 和 “com.bar.selectAllThings”),那么使用时就会产生“短名称不唯一”的错误,这种情况下就必须使用全限定名。
- 将不同的语句隔离开来,同时也实现了接口绑定
- id:方法名
- resultType:返回单个
- resultMap:返回多个
8. 测试
新建 测试类
编写测试代码
1 | package com.kuang.dao; |
遇到的各种错误
org.apache.ibatis.io不存在——IDEA2020.1


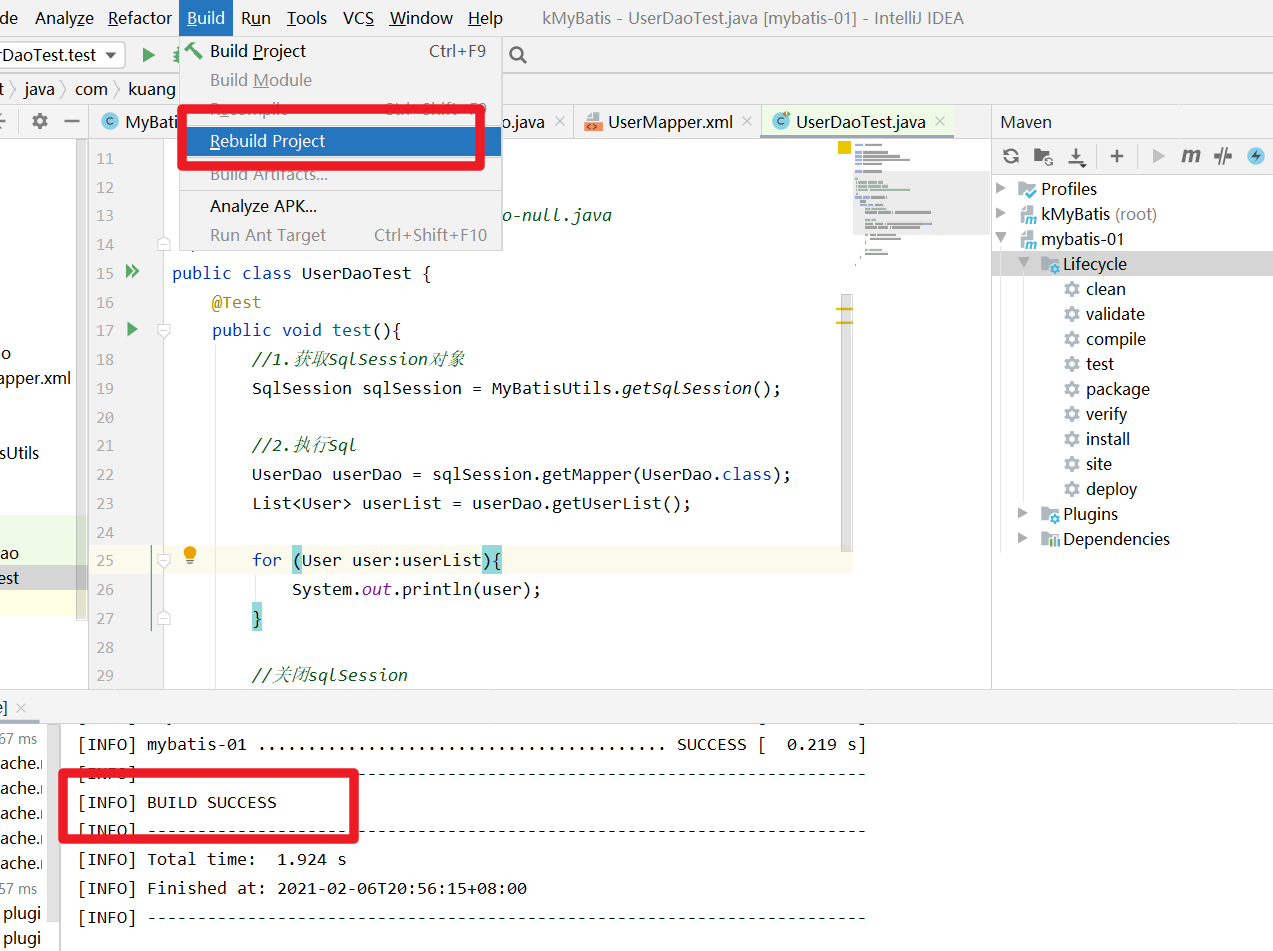
class not found:ClassTest
执行UserDaoTest的test方法之前,要先 mvn test-compile 生成 test classes才可被部署并发现


Type interface com.kuang.dao.UserDao is not known to the MapperRegistry
1 | <!-- 每一个Mapper.xml都需要在MyBatis核心配置文件中注册 --> |
Could not find resource com/kuang/dao/UserMapper.xml
Maven约定大于配置,自己写的配置文件默认不会被导出或生效
Maven默认的资源(自己配置的xml)位置在resources目录下,当前项目的xml位于java目录下,所以找不到

1 | <!-- build中配置resources,防止资源导出失败问题 --> |
终于成功
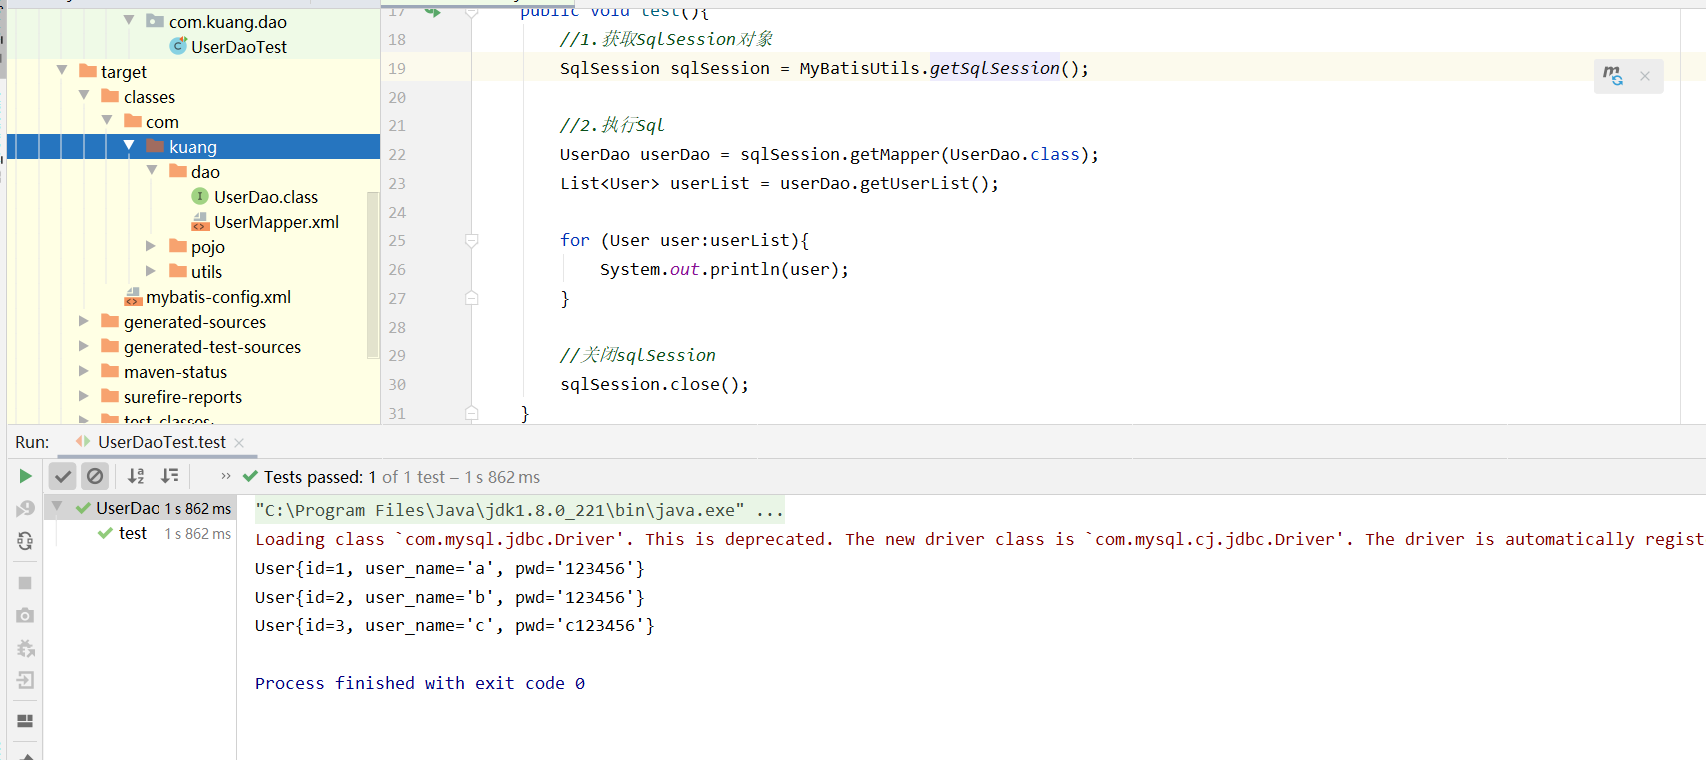
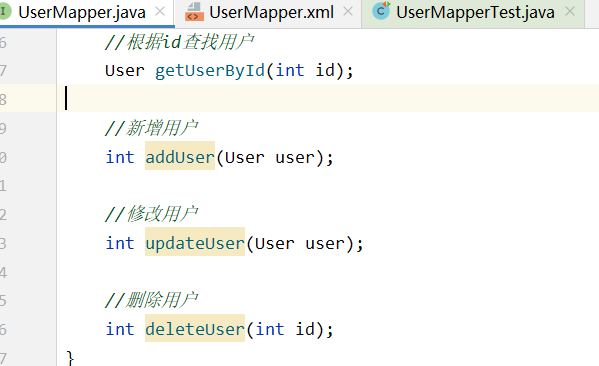
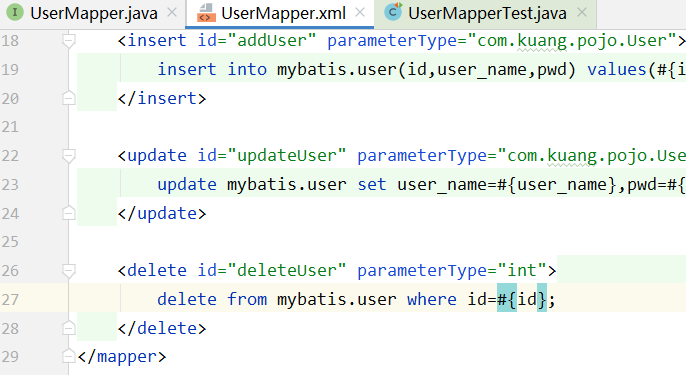
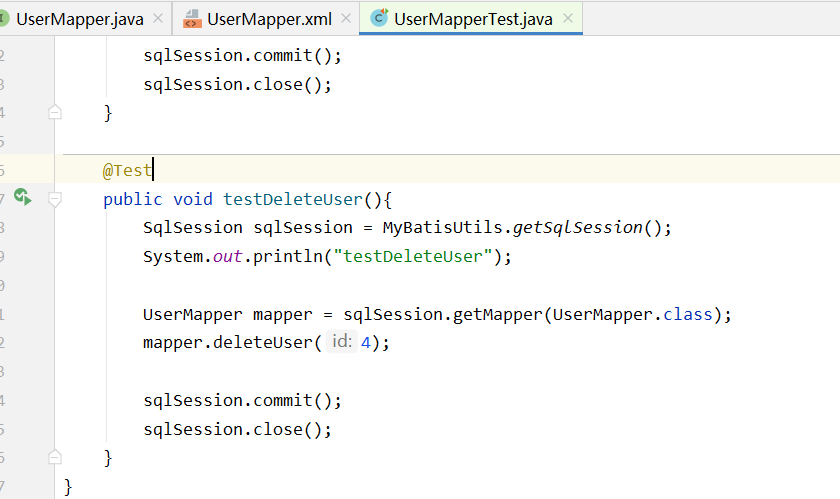
增删改查CRUD
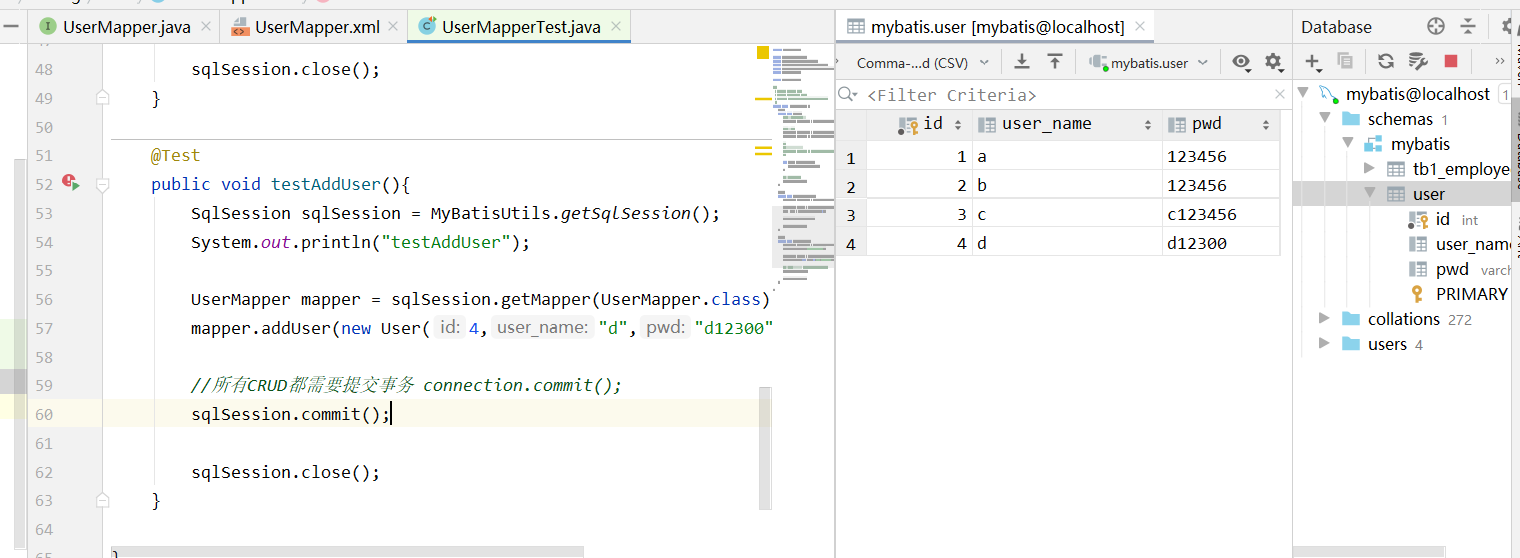
CUD 需要通过connection对象以Transition(事务)的形式提交
- 编写接口
- (实现接口)编写mapper中对应的sql语句
- 测试
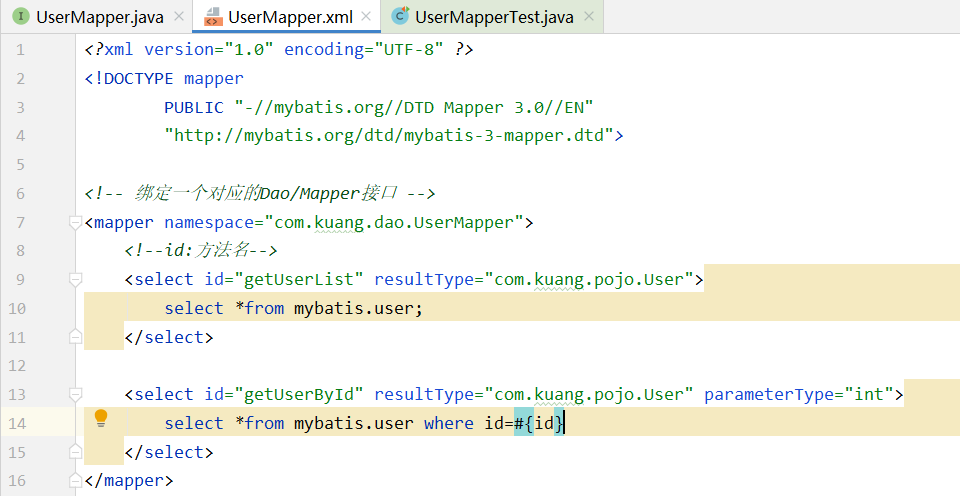
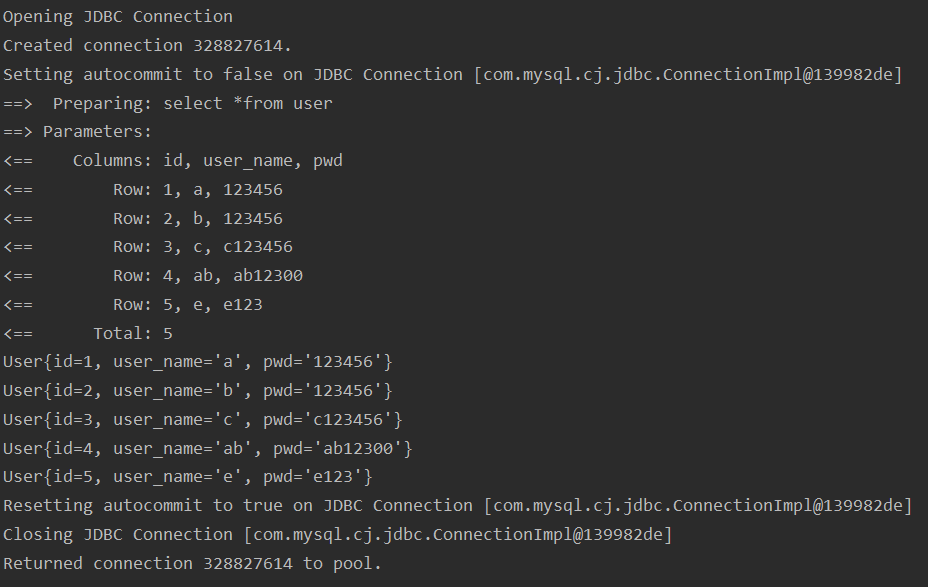
select
选择,查询语句:
- id:方法名
- resultType:Sql语句执行的返回值
- parameterType:参数类型
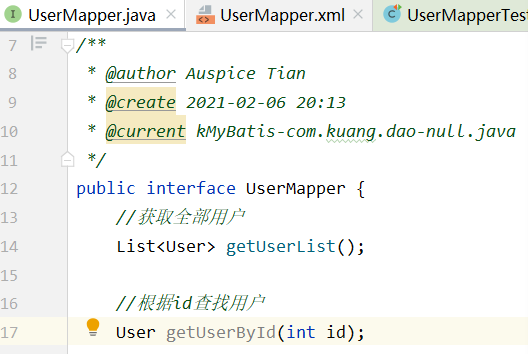
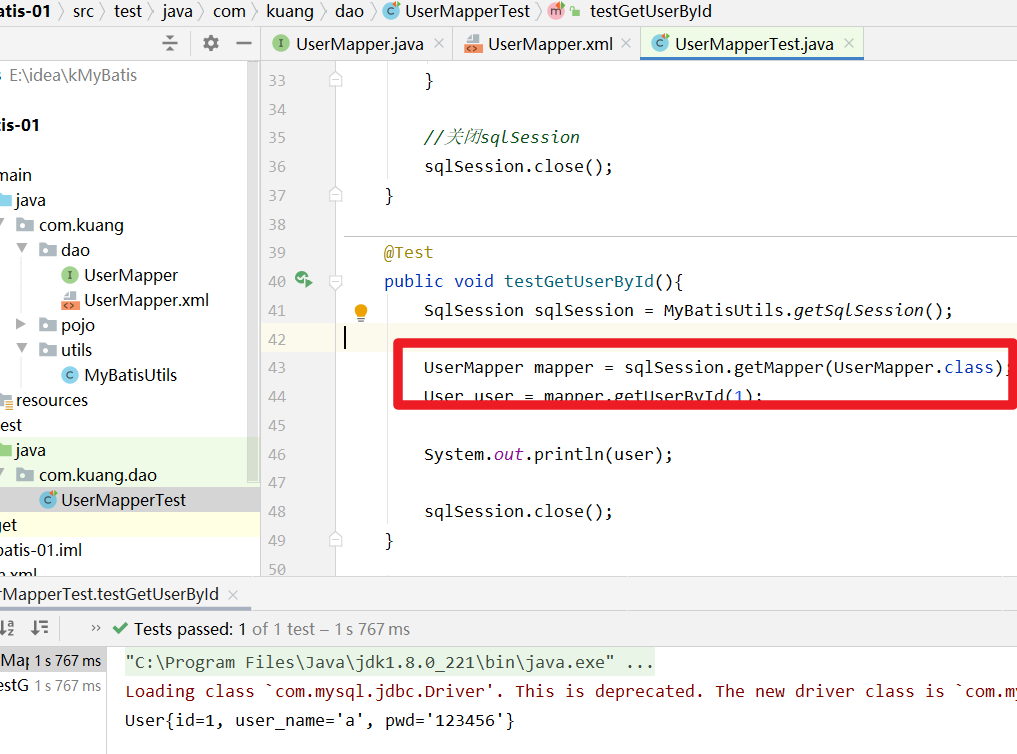
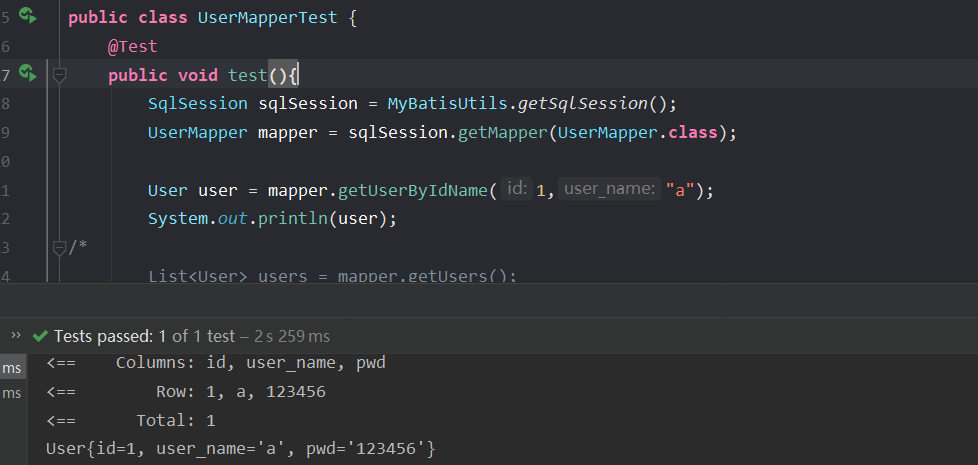
通过id获取用户
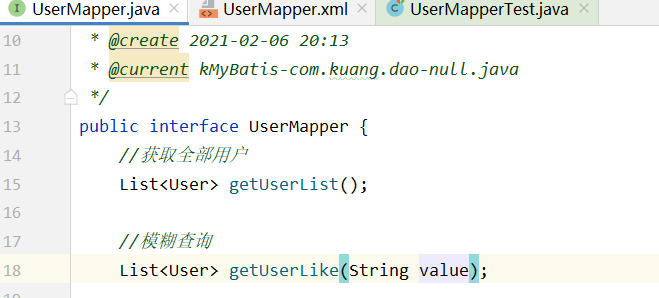
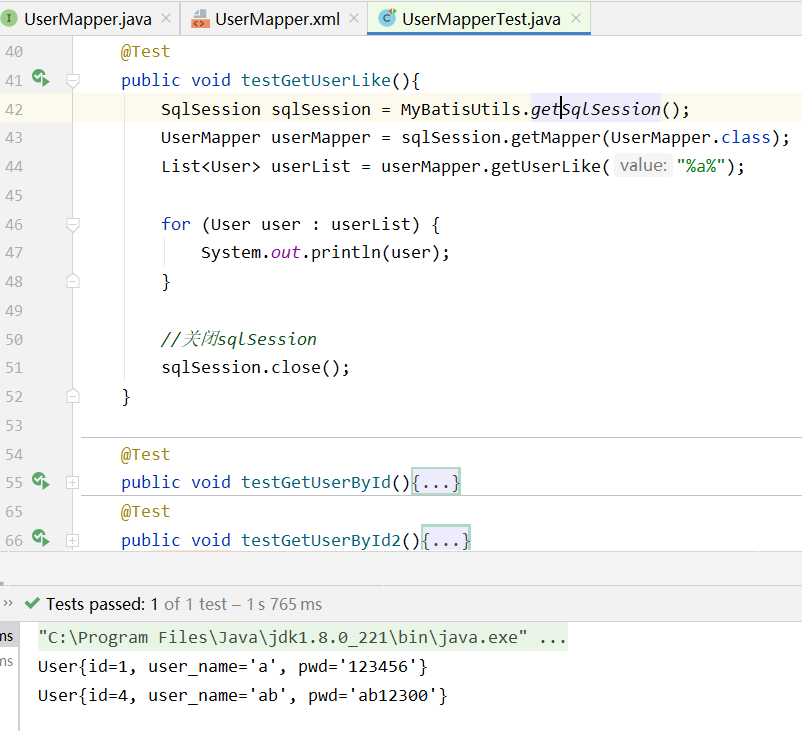
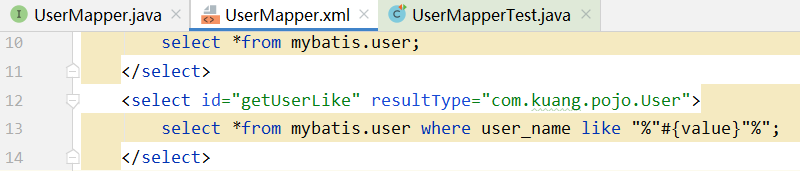
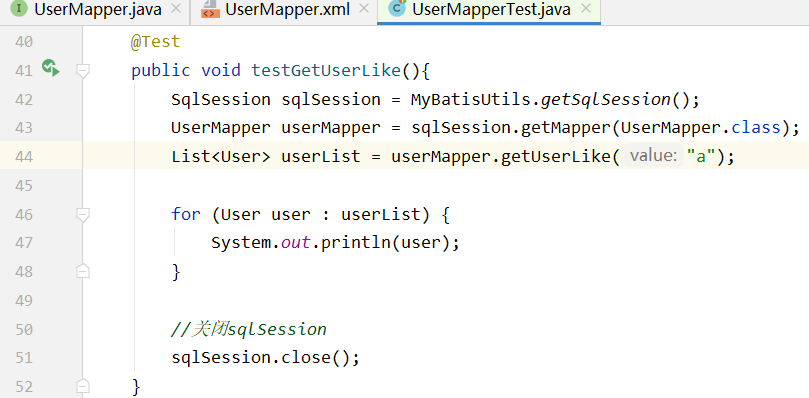
模糊查询
Java代码执行时,传递通配符
%%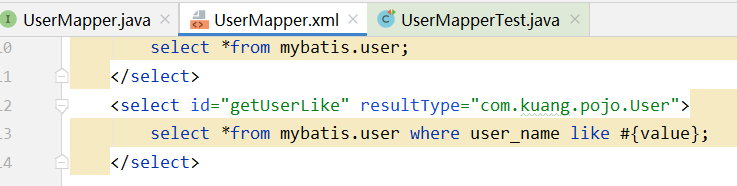
在sql语句拼接中使用通配符
- 存在sql注入的风险
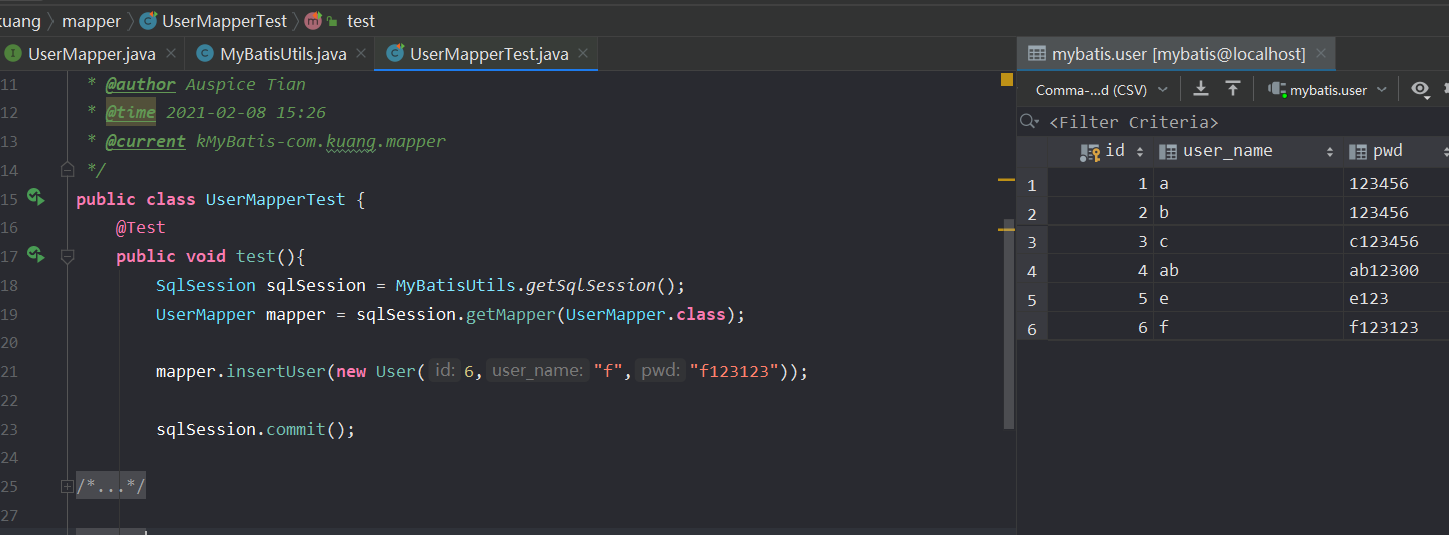
insert

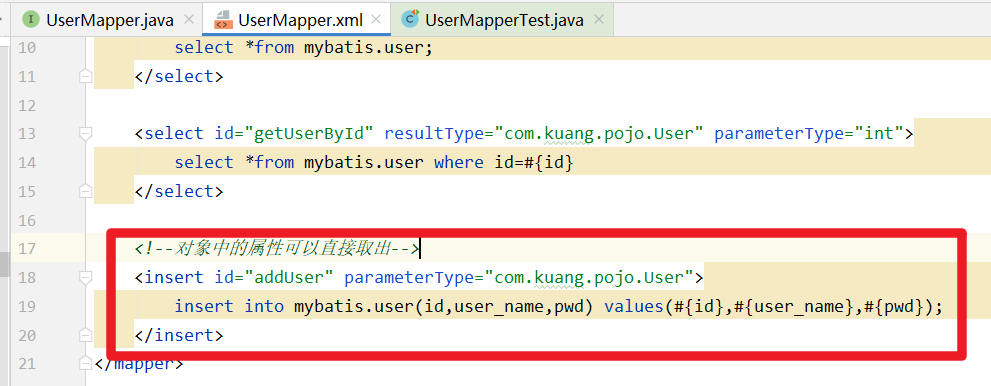

并没有新增
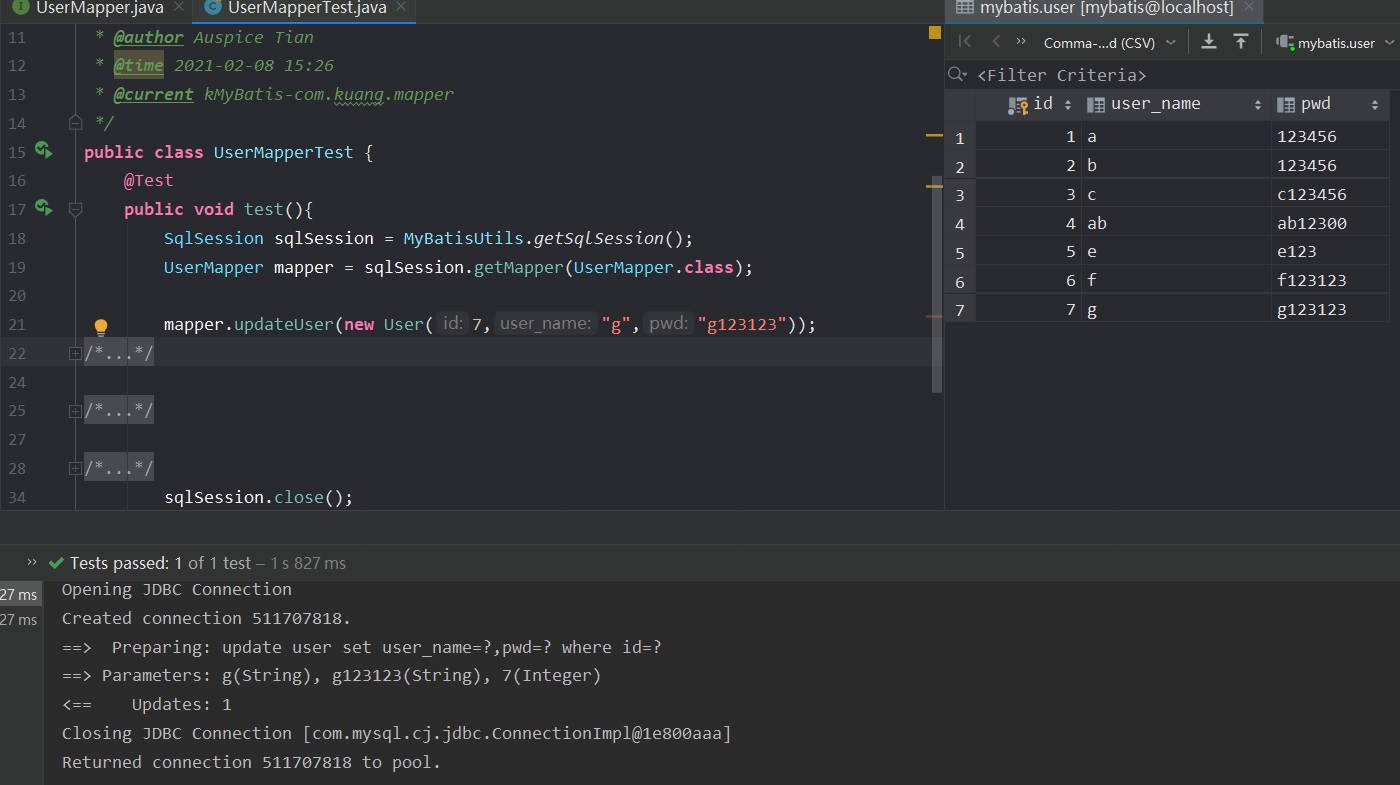
更新


删除
参数传递&Map
单个参数传递方式
- 只有一个 基本数据类型 ,可省略
- 实体类对象作为参数,sql语句中的参数取对象的属性
- Map作为参数,sql语句中参数取Map的属性
多个参数的传递
使用Map的情况
当字段过多时,考虑使用 Map,可以自定义需要传递的参数
- 若使用实体类作为参数传递,当字段过多时,一个实体类的每个属性都必须设置值


Plugin——通用Mapper
核心配置——mybatis-config.xml
configuration(配置)
- properties(属性)
- settings(设置)
- typeAliases(类型别名)
- environments(环境配置)
- environment(环境变量)
- transactionManager(事务管理器)
- dataSource(数据源)
- environment(环境变量)
- mappers(映射器)
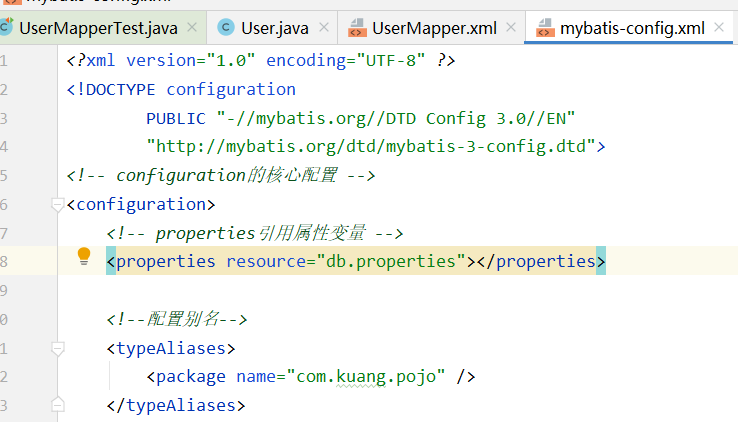
属性(properties)
通过Properties引用配置文件
- 优先使用外部配置文件
- properties文件定义属性的键值对——定义变量
1 | #db.properties |
通过
<properties/>声明引用属性
1
2<!-- properties引用属性变量 -->
<properties resource="db.properties"/>使用属性
设置Settings
| Setting | Description | Valid Values | Default | |
|---|---|---|---|---|
| cacheEnabled | 是否缓存Globally enables or disables any caches configured in any mapper under this configuration. | true \ | false | true |
| lazyLoadingEnabled | 懒加载,提高开发效率When enabled, all relations will be lazily loaded. This value can be superseded for a specific relation by using the fetchType attribute on it. | true \ | false | false |
| mapUnderscoreToCamelCase | Enables automatic mapping from classic database column names A_COLUMN to camel case classic Java property names aColumn. | true \ | false | false |
| logImpl | MyBatis的日志实现方式Specifies which logging implementation MyBatis should use. | LOG4J\ | STDOUT_LOGGING | No Set |
日志实现——logImpl
- SLF4J
- LOG4J | LOG4J2
- JDK_LOGGING
- COMMONS_LOGGING
- STDOUT_LOGGING
- NO_LOGGING
STDOUT_LOGGING
1 | <!--设置日志实现方式--> |
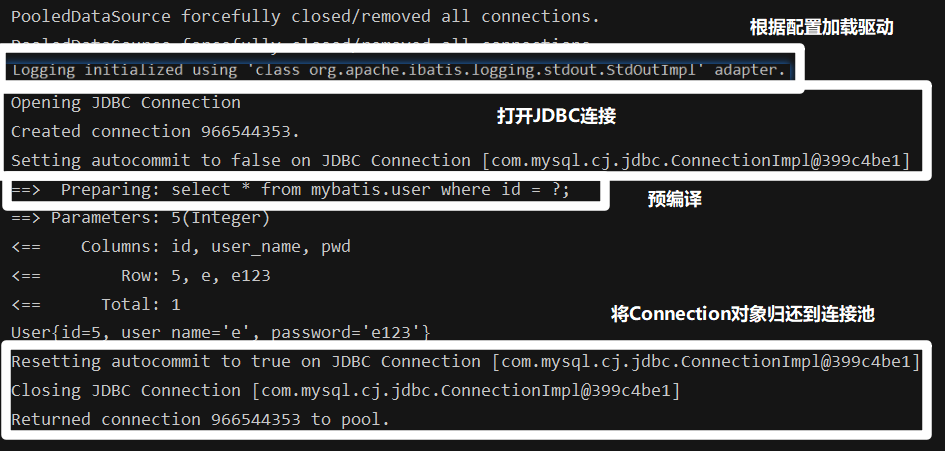
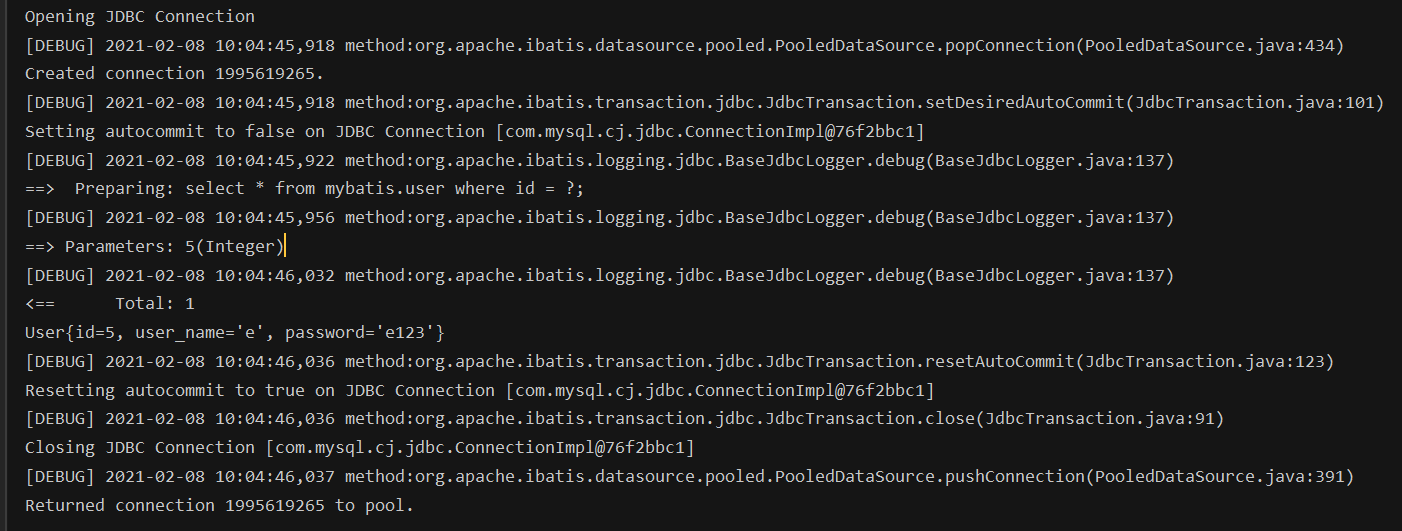
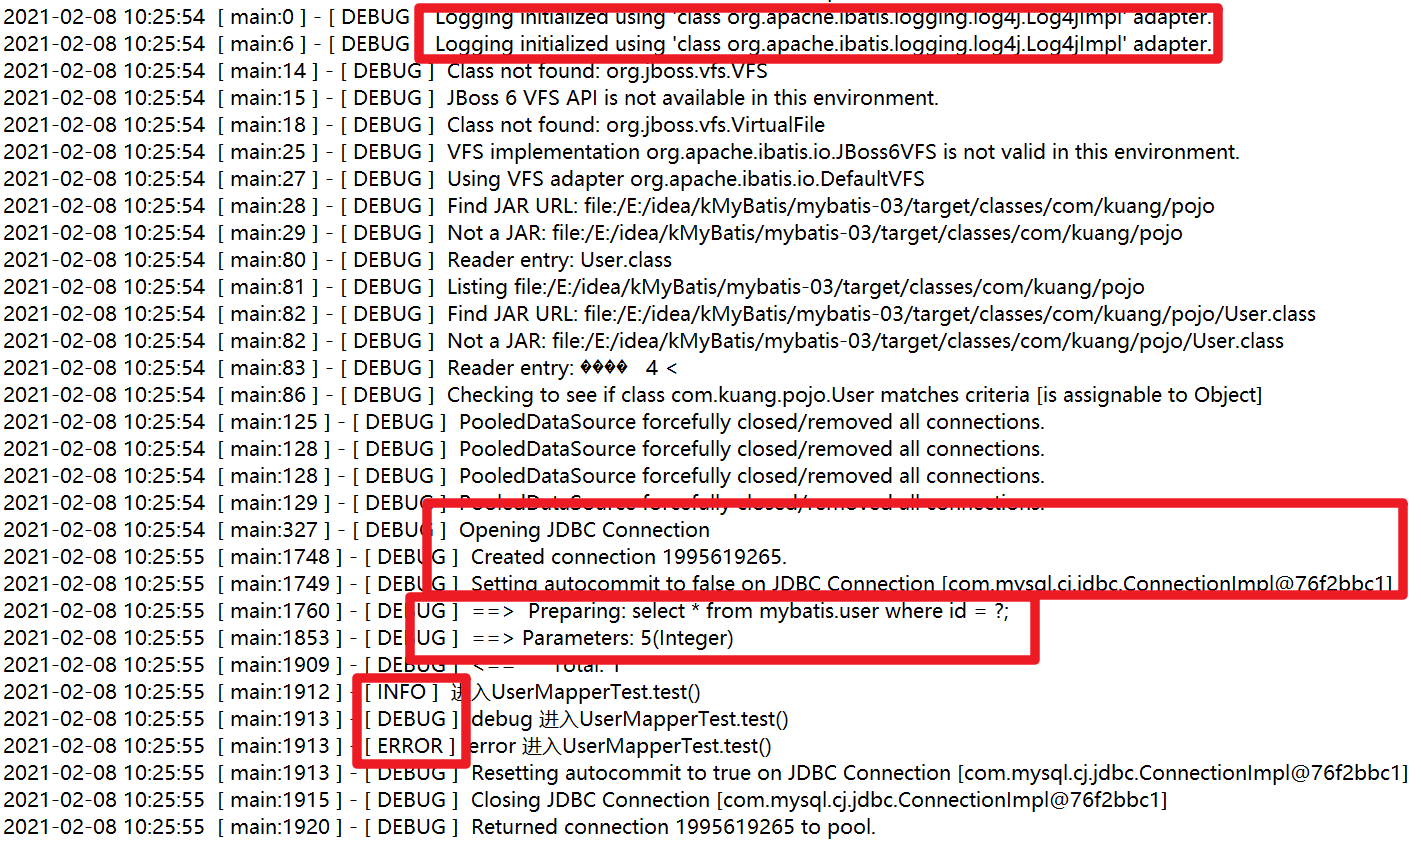
- 由日志可见,MyBatis底层是基于JDBC实现的
LOG4J
- 控制日志信息输送的目的地是控制台、文件、GUI组件,甚至是套接口服务器、NT的事件记录器、UNIX Syslog守护进程等
- 控制每一条日志的输出格式
导入
LOG4J包1
2
3
4
5<dependency>
<groupId>log4j</groupId>
<artifactId>log4j</artifactId>
<version>1.2.17</version>
</dependency>配置log4j.properties资源
1 | # 将等级为DEBUG的日志信息输出到console和file两个目的地,console和file的定义在下面的代码 |
程序中使用log4j
导包
1
import org.apache.log4j.Logger;
设置变量
1
static Logger logger = Logger.getLogger(UserMapperTest.class);
Logger.getLogger(className):将日志对象与目标对象绑定
使用
log级别
- info([信息])
- debug([信息])
- error([信息])
环境配置 enviroments
MyBatis 可以配置成适应多种环境,但每个 SqlSessionFactory 实例只能选择一种环境
如果你想连接两个数据库,就需要创建两个 SqlSessionFactory 实例,每个数据库对应一个。
- 默认使用的环境 ID(比如:default=”development”)。
- 每个 environment 元素定义的环境 ID(比如:id=”development”)。
- 事务管理器的配置(比如:type=”JDBC”)。
- 数据源的配置(比如:type=”POOLED”)。
事务管理器(transactionManager)
两种类型的事务管理器(也就是 type=”[JDBC|MANAGED]”)
- 使用 Spring + MyBatis,则没有必要配置事务管理器,因为 Spring 模块会使用自带的管理器来覆盖前面的配置。
数据源(dataSource)
连接数据库:
- jdbc
- dbcp
- c3p0
- druid
三种数据源类型
UNPOOLED——用完即销毁
无连接池,每次请求时打开和关闭连接
浪费资源
POOLED——用完即回收
JNDI
类型别名typeAliases
用于减少完全限定名的冗余给Bean取别名
配置方式
实体类较少,可逐一指定
1
2
3
4
5
6
7
8
9
10
11
12<!-- mybatis-config.xml -->
<typeAliases>
<typeAlias type="com.kuang.pojo.User" alias="User"/>
</typeAliases>
<!-- UserMapper.xml -->
<mapper namespace="com.kuang.mapper.UserMapper">
<!--id:方法名-->
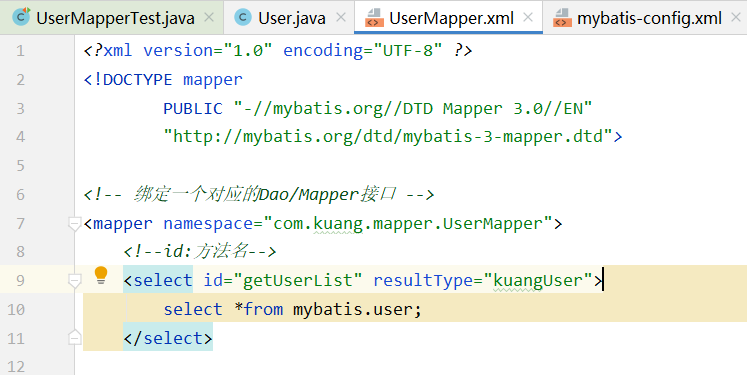
<select id="getUserList" resultType="User">
select *from mybatis.user;
</select>
</mapper>You can also specify a package where MyBatis will search for all beans.包中实体类的别名为 lowercase(类名的首字母)
1
2
3
4
5
6
7
8
9
10
11
12<!-- mybatis-config.xml -->
<typeAliases>
<package name="com.kuang.pojo" />
</typeAliases>
<!-- UserMapper.xml -->
<mapper namespace="com.kuang.mapper.UserMapper">
<!--id:方法名-->
<select id="getUserList" resultType="user">
select *from mybatis.user;
</select>
</mapper>If the
@Aliasannotation is found its value will be used as an alias. 优先级 :注解别名>配置别名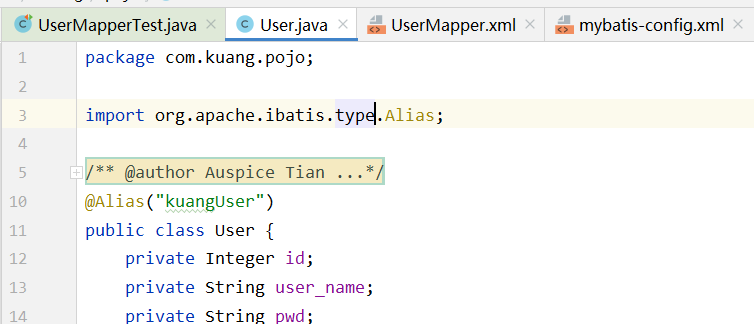
MyBatis默认配置的别名
| Alias | Mapped Type |
|---|---|
_普通数据类型 | 普通数据类型(int,short,long,byte,double,float,boolean) |
| 小写首字母(数据类型名) | 首字母大写的数据类型(基本数据类型 + Date,Object,Map,HashMap,List,ArrayList,Collection,Iterator) |
| Integer,int | BigDecimal |
| decimal,bigdecimal | Integer |
插件plugins
mybatis-generator-core
mybatis-plus

通用mapper
映射器mapper
接口实现(mapper.xml)必须在configuration中注册才可被发现
第一种方式:资源路径【推荐】
1 | <!-- Using classpath relative resources --> |
第二种方式:类名
1 | <!-- Using mapper interface classes --> |
第三种方式:包内全导入
1 | <!-- Register all interfaces in a package as mappers --> |
第二、三种方式的问题
- 接口和Mapper配置文件必须同名
- 接口和Mapper配置资源必须在同一包下
Mapper.xml(Dao实现类)
resultMap– The most complicated and powerful element that describes how to load your objects from the database result sets.- javaType:class——POJO| ArrayList
- ofType:list 或 set 中的POJO
insert– A mapped INSERT statement.update– A mapped UPDATE statement.delete– A mapped DELETE statement.select– A mapped SELECT statement.
解决属性名和字段名不一致问题——resultMap
简单的例子
1 | public class User { |
解决思路:起别名
在 sql 中,用 as 关键字,可以给某一字段起别名
1 | select *from user where id=#{id} |
在 Mybatis 中,使用 ResultMap 做结果映射,只需要将有差异的属性与字段映射即可
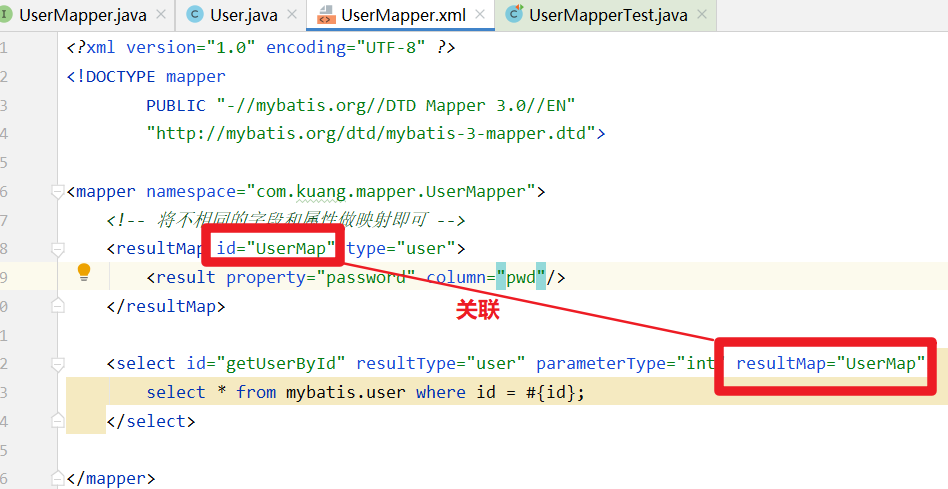
- property:POJO中的属性
- column:数据库中的字段
复杂查询
实体间的复杂关系&环境搭建
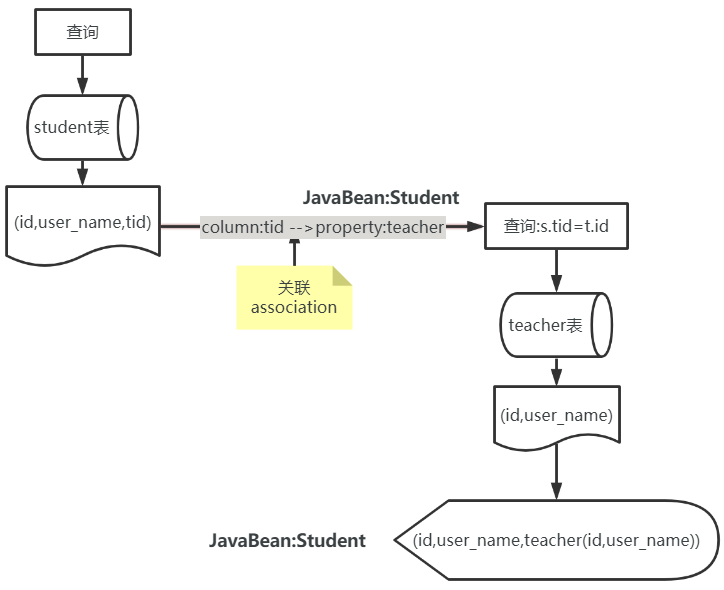
关联association:多对一
- 查到的是结果是满足某种关系的个体集
集合collection:一对多
- 返回的结果是一个个体,其中某个属性是个体集

1 | create table teacher( |
- 导入lombok
- 新建实体类
- 建立Mapper接口
- 建立Mapper.xml资源
- 在核心配置文件中绑定注册Mapper
- 测试查询成功
Association
联表查询

1 | select s.id as sid,s.user_name as sname,t.id as tid,t.user_name as tname |

接口
1
List<Student> getStudent2();
接口实现
1
2
3
4
5
6
7
8
9
10
11
12
13
14
15<!--BFS:联表查询,处理结果-->
<select id="getStudent2" resultMap="StudentTeacher2">
select s.id as sid,s.user_name as sname,t.id as tid,t.user_name as tname
from student as s,teacher as t
where s.tid=t.id
</select>
<resultMap id="StudentTeacher2" type="student">
<result property="id" column="sid"/>
<result property="user_name" column="sname"/>
<association property="teacher" javaType="teacher">
<result property="id" column="tid"/>
<result property="user_name" column="tname"/>
</association>
</resultMap>测试
嵌套查询
1 | select * |
定义接口
1
2//查询学生对应的老师信息
List<Student> getStudent();实现接口
1
2
3
4
5
6
7
8
9
10
11
12
13
14
15
16
17
18
19
20
21
22
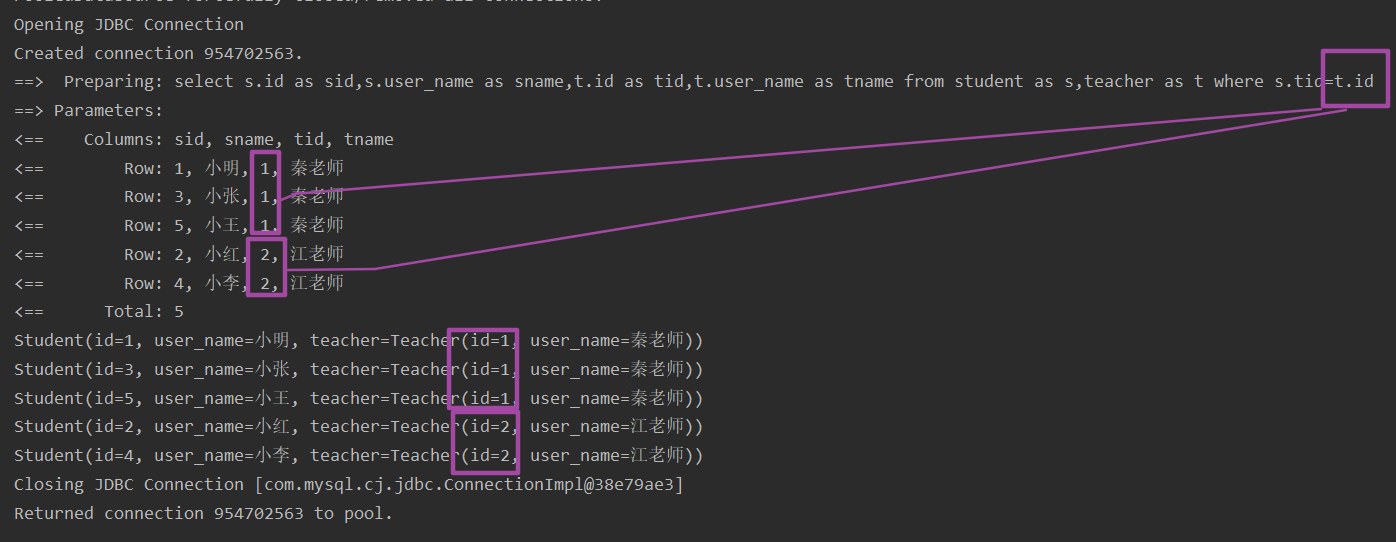
23<!--思路:DFS 查询嵌套,
1. 查询所有学生信息
2. 根据查出来学生的tid,查找对应的teacher
-->
<select id="getStudent" resultMap="StudentTeacher">
select *from mybatis.student;
</select>
<resultMap id="StudentTeacher" type="student">
<!--
简单属性用 <result property="" column=""/>映射即可
-->
<!--复杂属性
多对*————关联association
一对*————集合collection
-->
<association property="teacher" column="tid" javaType="teacher" select="getTeacher"/>
</resultMap>
<select id="getTeacher" resultType="teacher">
select *from mybatis.teacher where id=#{tid};
</select>
Collection
1 |
|
实现根据teacher.id查找该老师对应的所有学生
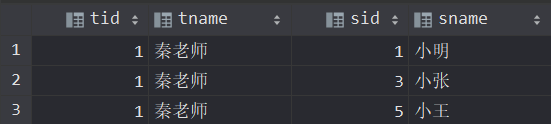
联表查询
1 | select t.id tid,t.user_name tname, s.id sid,s.user_name sname |

定义接口
1
2//获取某个老师下所有的学生信息
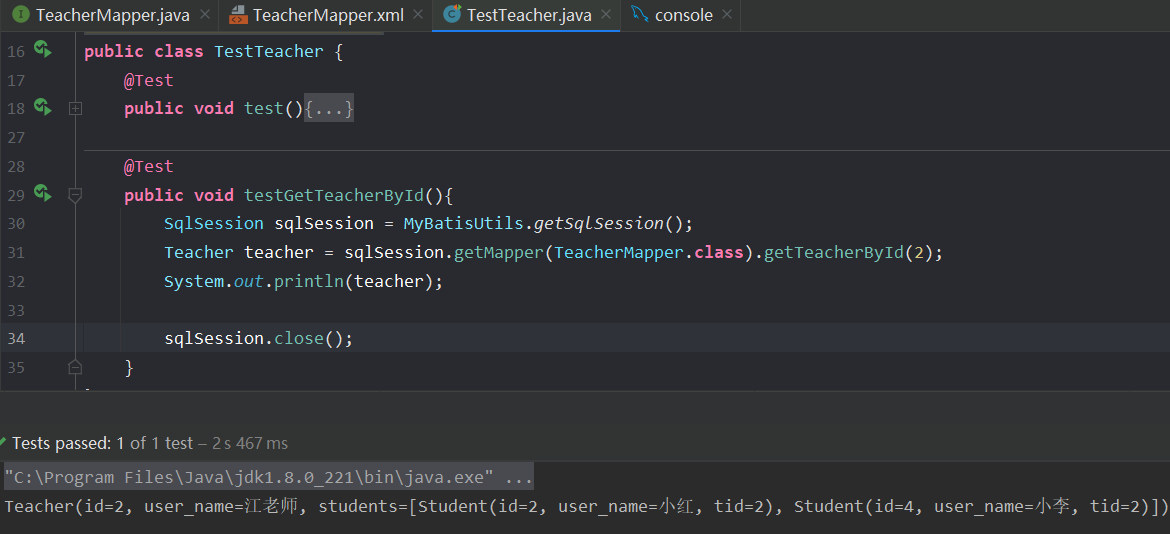
Teacher getTeacherById( Integer id);实现接口
1
2
3
4
5
6
7
8
9
10
11
12
13
14
15<select id="getTeacherById" resultMap="StudentTeacher">
select t.id tid,t.user_name tname, s.id sid,s.user_name sname
from teacher t,student s
where t.id=s.tid and t.id=#{tid};
</select>
<resultMap id="StudentTeacher" type="Teacher">
<result property="id" column="tid"/>
<result property="user_name" column="tname"/>
<!-- 集合中的泛型用ofType指定 -->
<collection property="students" ofType="student">
<result property="id" column="sid"/>
<result property="user_name" column="sname"/>
<result property="tid" column="tid"/>
</collection>
</resultMap>测试
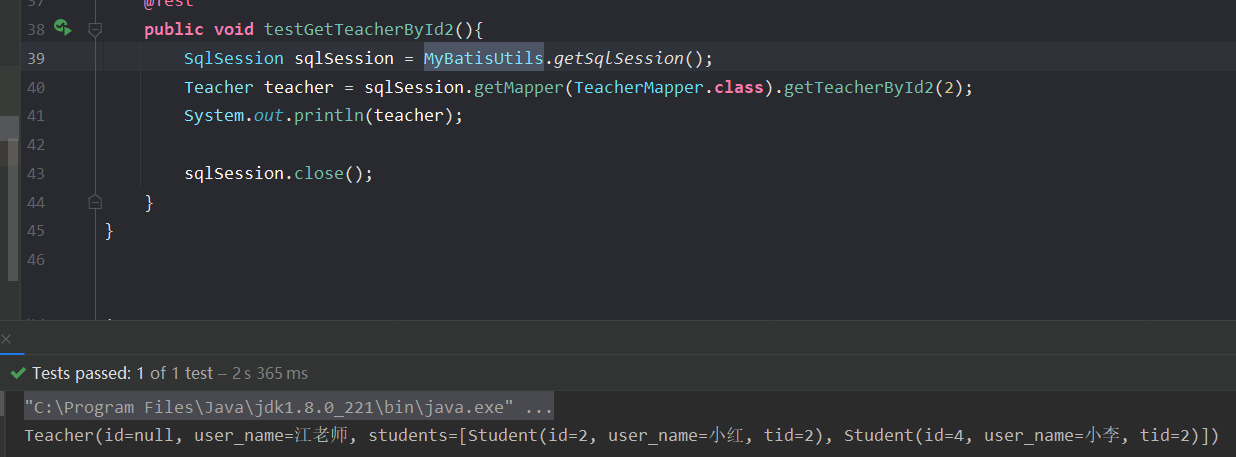
嵌套查询
1 | select tid,(select user_name from teacher where id=1) tname,id sid,user_name sname |

定义接口
1
Teacher getTeacherById2( Integer id);
实现接口
1
2
3
4
5
6
7
8
9
10
11<select id="getTeacherById2" resultMap="StudentTeacher2">
select *from mybatis.teacher where id=#{tid}
</select>
<resultMap id="StudentTeacher2" type="teacher">
<collection property="students" column="id" javaType="ArrayList" ofType="student" select="GetStudentByTid" />
</resultMap>
<select id="GetStudentByTid" resultType="student">
select *
from mybatis.student
where tid=#{tid};
</select>测试
动态sql
根据不同的条件生成不同的sql语句
搭建环境
1 | create table blog( |
1 |
|
1 | //抑制所有警告 |
查询
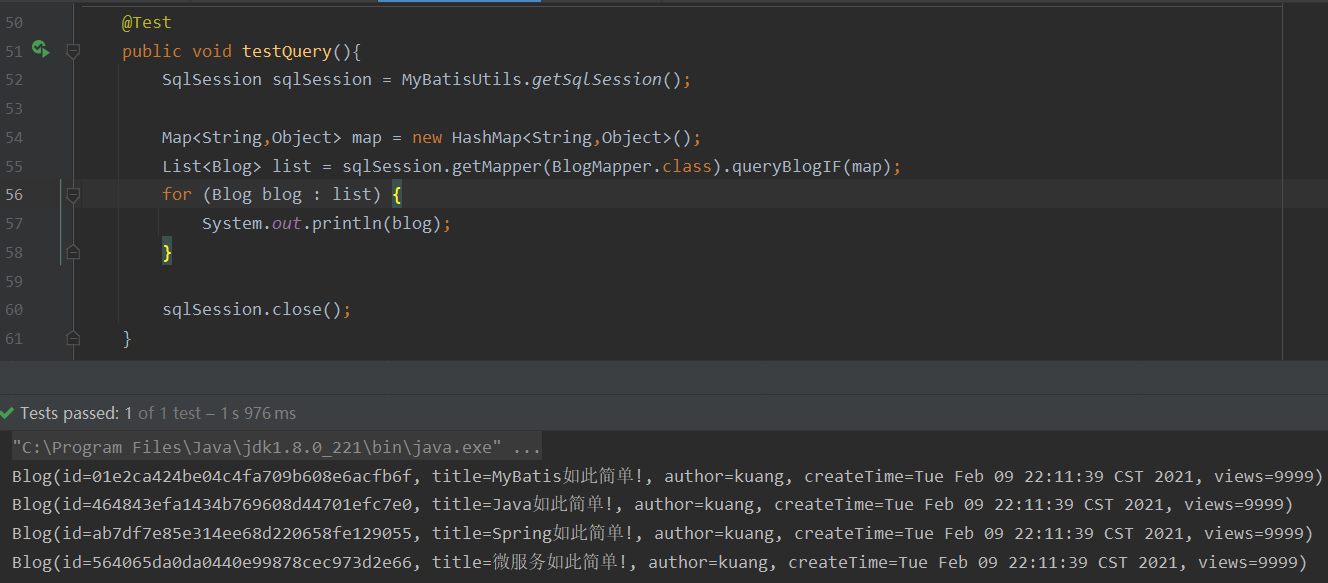
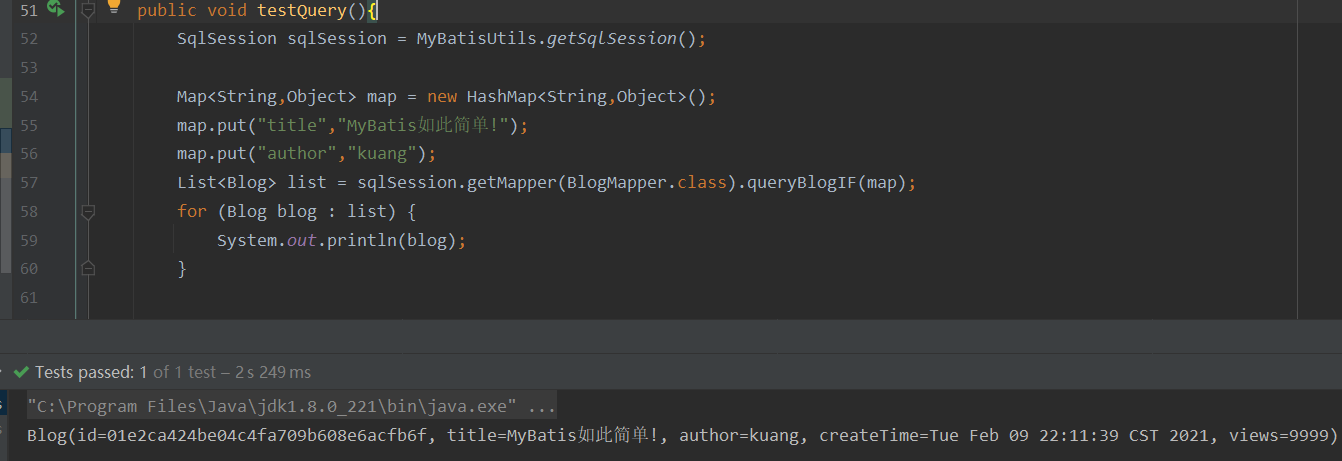
IF

接口
1
2//查询blog信息
List<Blog> queryBlogIF(Map map);接口实现
1
2
3
4
5
6
7
8
9<select id="queryBlogIF" resultType="blog" parameterType="map">
select *from mybatis.blog where 1=1
<if test="title!= null">
and titie=#{title}
</if>
<if test="author!= null">
and author = #{author}
</if>
</select>测试
where优化
1 | <select id="queryBlogIF" resultType="blog" parameterType="map"> |
- The where element knows to only insert “WHERE” if there is any content returned by the containing tags. (满足条件插入)
- Furthermore, if that content begins with “AND” or “OR”, it knows to strip it off.(保证第一个 where前没有逻辑判断)
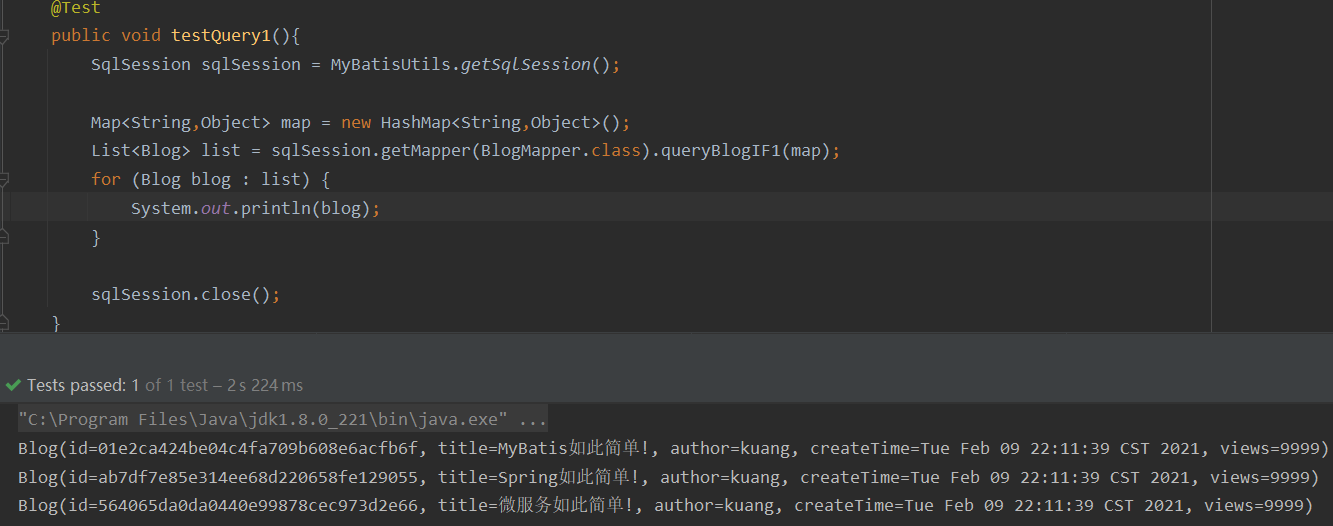
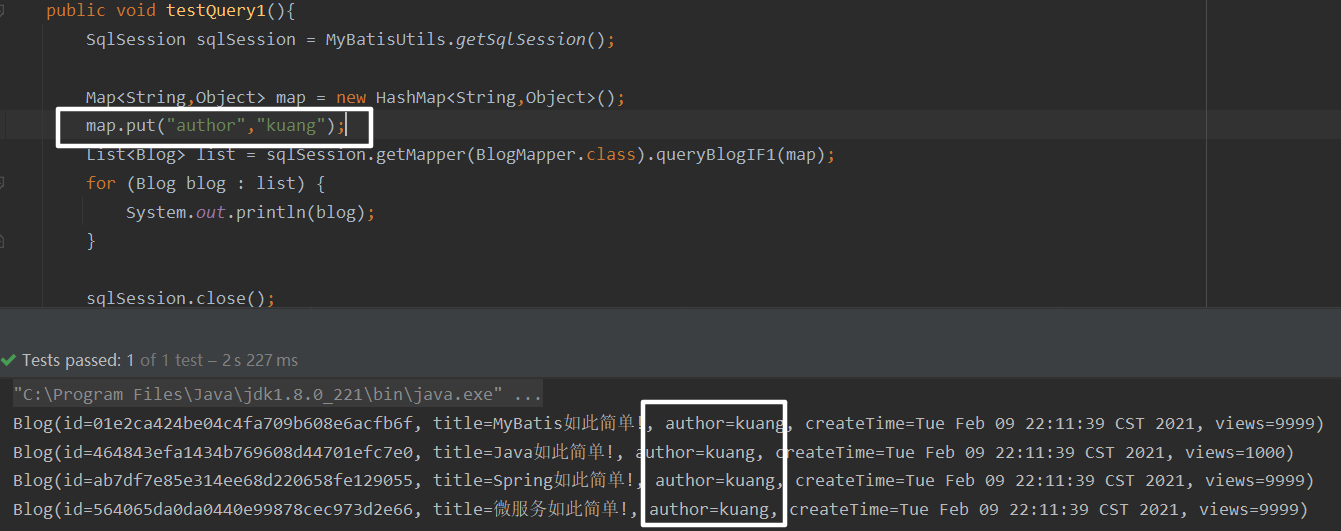
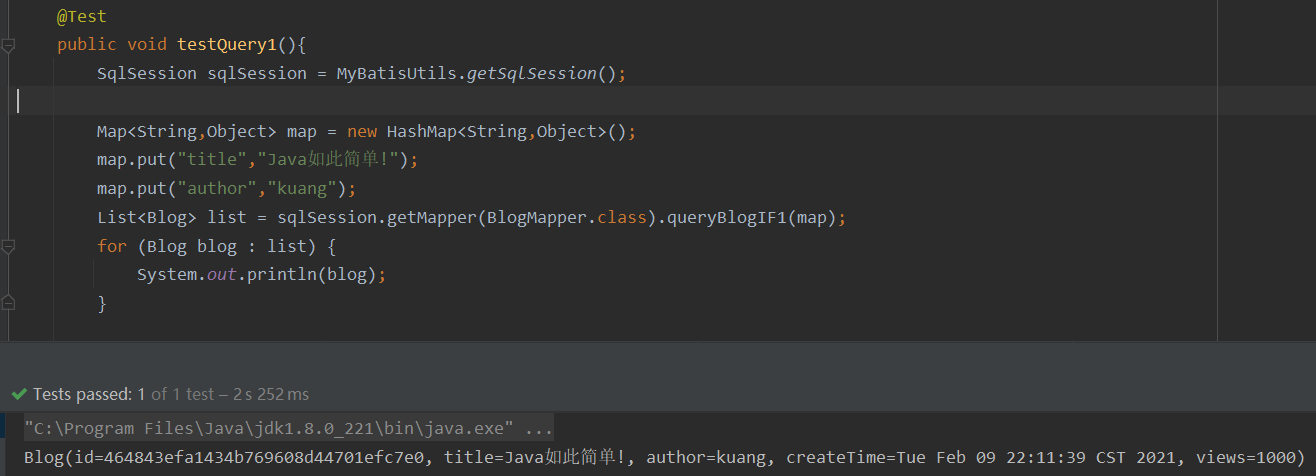
choose-when-otherwise&where
switch-case-default | if-else if - else
定义接口
1
List<Blog> queryBlogIF1(Map map);
实现接口
1
2
3
4
5
6
7
8
9
10
11
12
13
14
15
16
17
18
19<select id="queryBlogIF1" parameterType="map" resultType="blog">
select *from mybatis.blog
<where>
<choose>
<when test="id!=null">
id=#{id}
</when>
<when test="title != null">
title=#{title}
</when>
<when test="author != null">
author=#{author}
</when>
<otherwise>
views>1000
</otherwise>
</choose>
</where>
</select>测试
更新
set
- The set element can be used to dynamically include columns to update, and leave out others.(选目标字段,删除无关字符)
- the set element will dynamically prepend the SET keyword,(前置)
- and also eliminate any extraneous commas that might trail the value assignments after the conditions are applied.(删逗号)
定义接口
1
2//更新信息
int updateBlog(Map map);实现接口
1
2
3
4
5
6
7
8
9
10<update id="updateBlog" parameterType="map">
update mybatis.blog
<set>
<if test="title!=null">title=#{title},</if>
<if test="author!=null">author=#{author},</if>
<if test="views!=null">views=#{views},</if>
create_time =#{createTime}
</set>
where id=#{id}
</update>测试

trim替换
前缀后缀都是 prefix,XXOverrides决定替换的位置
1 | <select id="queryBlogIFByTrim" resultType="blog" parameterType="map"> |
- The _prefixOverrides_ attribute takes a pipe delimited list of text to override, where whitespace is relevant.前缀Overrides 属性采用管道分隔文本列表来重写,其中空白是相关的。(最好写上,替换后可能会出问题)
- The result is the removal of anything specified in the _prefixOverrides_ attribute
- and the insertion of anything in the _prefix_ attribute
1
2
3<trim prefix="SET" suffixOverrides=",">
...
</trim>
sql片段
公共部分抽取出来,方便复用
<sql id=""></sql>抽取<include refid="" />引用
1 | <sql id="if-title-author"> |
- 基于单表查询
- 不要存在
<where>标签
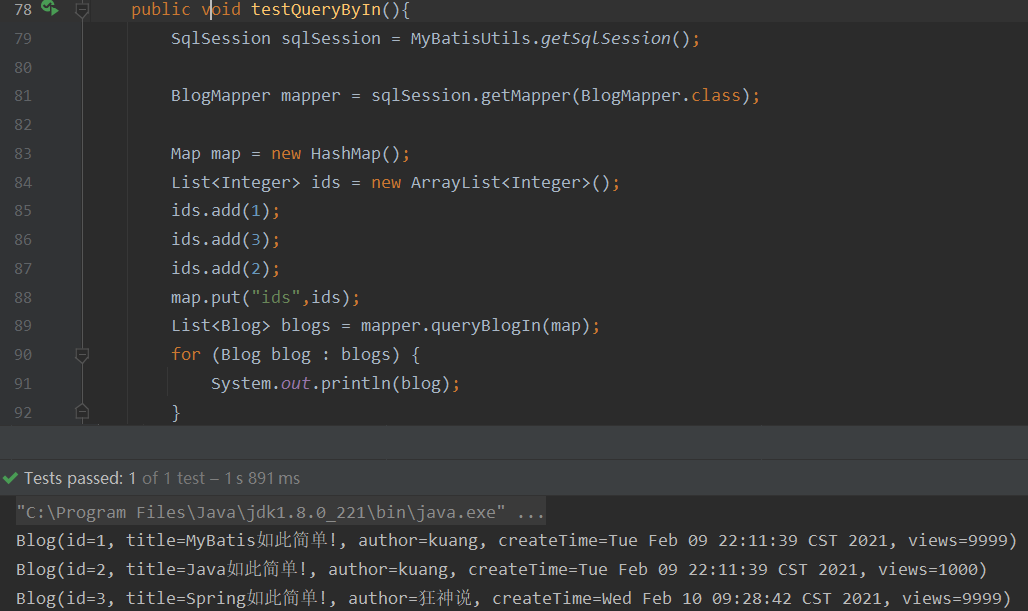
foreach
sql
in的动态范围查询
1 | select *from user where 1=1 and |
- open:开始符
- separator:分隔符
- close:结束符
- item:项
- colloetion:遍历集合
定义接口
1
List<Blog> queryBlogIn(Map map);
实现接口
1
2
3
4
5
6
7
8<select id="queryBlogIn" parameterType="map" resultType="blog">
select *from mybatis.blog
<where>
<foreach collection="ids" item="id" open="(" separator="or" close=")">
id=#{id}
</foreach>
</where>
</select>测试
分页
limit实现分页
sql语句
1 | select *from [table_name] limit [offset],[limit]; |
MyBatis方式
接口
1
2//分页查询用户信息
List<User> getUserWithLimit(Map<String,Integer> map);接口配置
1
2
3<select id="getUserWithLimit" resultMap="UserMap" resultType="user" parameterType="map">
select *from mybatis.user limit #{offset},#{limit};
</select>测试
1
2
3
4
5
6
7
8
9
10
11
12
13
14
15
16
public void testGetUserWithLimit(){
SqlSession sqlSession = MyBatisUtils.getSqlSession();
UserMapper mapper = sqlSession.getMapper(UserMapper.class);
Map<String, Integer> map = new HashMap<String, Integer>();
map.put("offset",1);
map.put("limit",2);
List<User> userList = mapper.getUserWithLimit(map);
for (User user : userList) {
System.out.println(user);
}
sqlSession.close();
}
RowBounds实现分页[不建议使用]
不在sql进行分页,通过sqlSession对象实现分页——RowBounds
接口
1
List<User> getUserWithLimit2();
配置Mapper
1
2
3<select id="getUserWithLimit2" resultMap="UserMap" resultType="user">
select *from mybatis.user;
</select>测试
1
2
3
4
5
6
7
8
9
10
11
12
13
14
public void testGetUserWithLimit2(){
SqlSession sqlSession = MyBatisUtils.getSqlSession();
UserMapper mapper = sqlSession.getMapper(UserMapper.class);
RowBounds rowbounds = new RowBounds(1,2);
List<User> userList = sqlSession.selectList("com.kuang.mapper.UserMapper.getUserWithLimit2",null,rowbounds);
for (User user : userList) {
System.out.println(user);
}
sqlSession.close();
}
插件——pageHelper
缓存
简介
问题:连接数据库消耗资源
解决:一次查询,保存到高速存储——> 内存
缓存:
- 放在内存中的临时数据
- 将 经常查询且不常改变 的数据存放在缓存,直接从服务器内存取比从服务器磁盘IO速度快,提高查询效率,解决高并发系统的性能问题
使用缓存,减少与数据库交互次数,减少系统开销,提高系统效率
graph LR A[缓存merCached缓存服务器]-->B[读写分离,主从复制]
MyBatis缓存
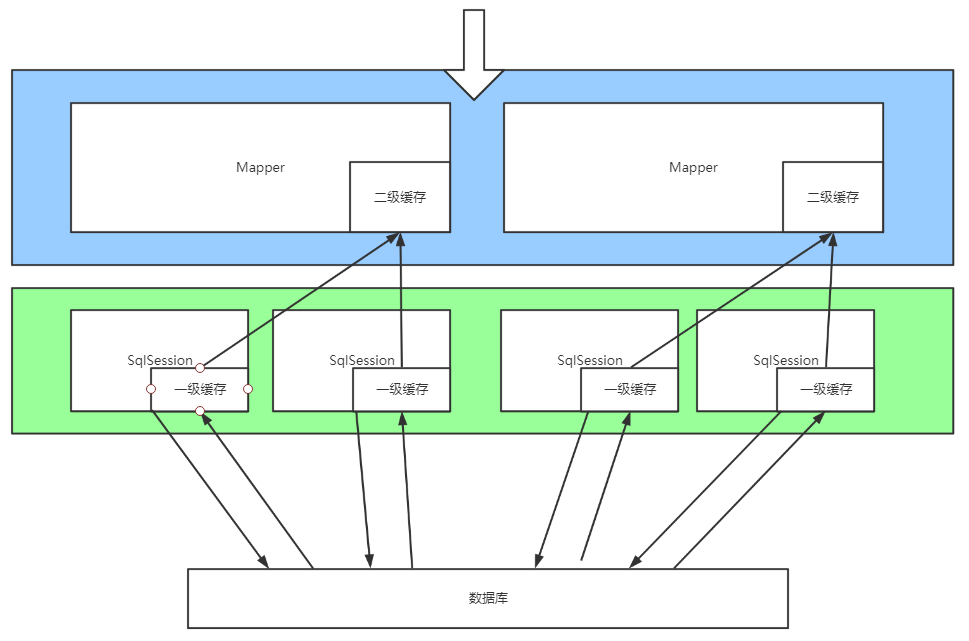
系统默认定义两级缓存:一级缓存和二级缓存
- 一级缓存:SqlSession级,本地缓存
- 二级缓存:手动开启和配置,namespace级缓存
- MyBatis自定义缓存接口Cache,通过实现接口自定义二级缓存
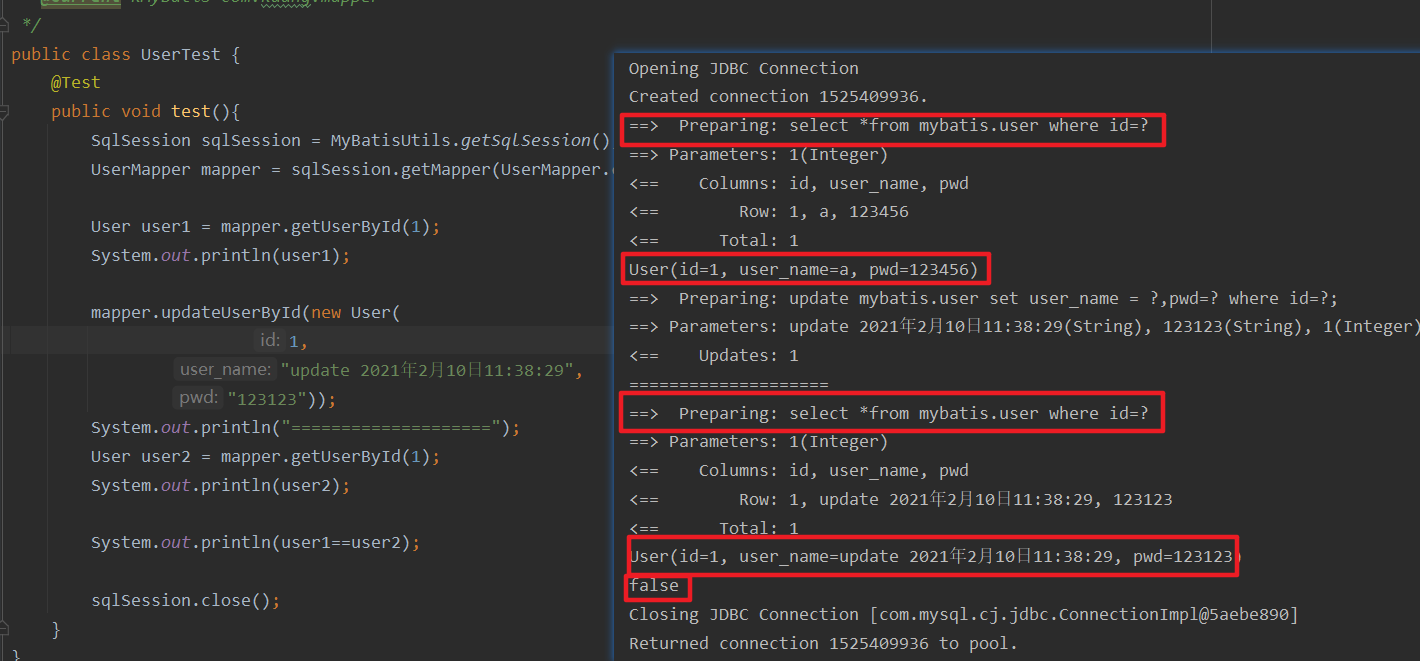
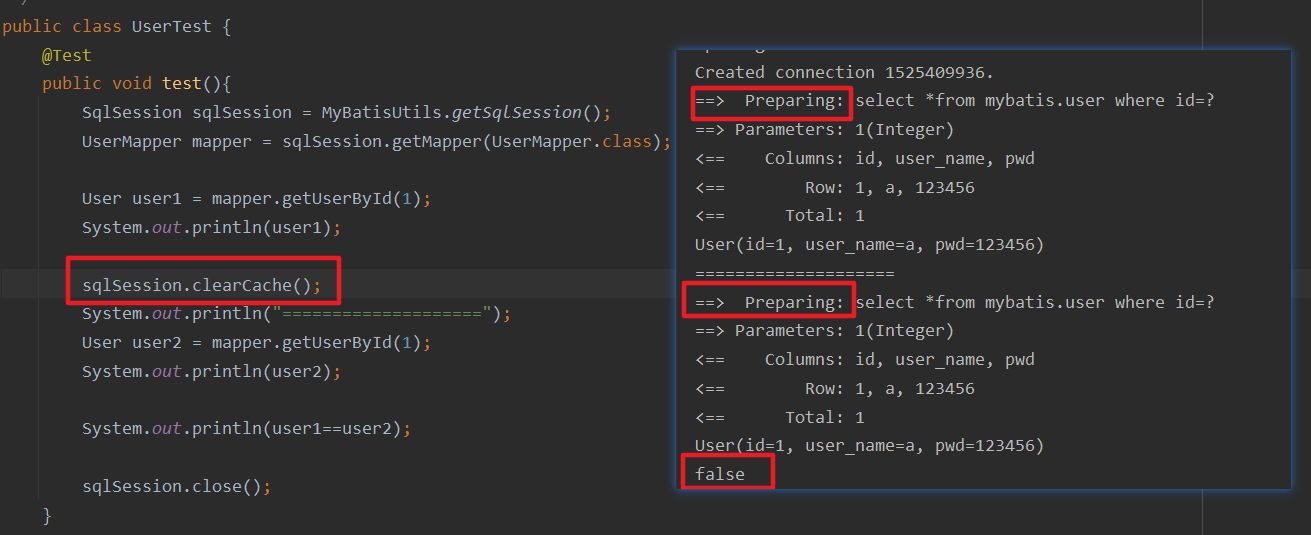
一级缓存——Map
一级缓存默认开启,在一次SESSION期间有效
开启日志
测试一个Session中查询两次相同记录
1
2
3
4
5
6
7
8
9
10
11
12
13
14
15
16
public void test(){
SqlSession sqlSession = MyBatisUtils.getSqlSession();
UserMapper mapper = sqlSession.getMapper(UserMapper.class);
User user1 = mapper.getUserById(1);
System.out.println(user1);
System.out.println("====================");
User user2 = mapper.getUserById(1);
System.out.println(user2);
System.out.println(user1==user2);
sqlSession.close();
}查看日志输出
两次查找一次查表
两次结果引用同一对象
缓存失效
R不同的东西
CUD必定刷新缓存
不同的Mapper
手动清理缓存
二级缓存
工作机制:
一个Session期间的数据会被放到一级缓存,当Session关闭或提交,对应的一级缓存中的数据被保存到二级缓存中
- 新的Session查询信息,从二级缓存中获取内容
- 不同的mapper查出的数据会放到自己对应的缓存中
mybatis-config.xml 开启二级缓存
1
2<!--开启二级缓存-->
<setting name="cacheEnabled" value="true"/>配置mapper.xml
1
2
3
4
5
6<!--在当前mapper中使用二级缓存-->
<cache
eviction="FIFO"
flushInterval="60000"
size="512"
readOnly="true"/>- mapper.xml中的所有 select 语句的结果将会被缓存。
- mapper.xml中的所有 insert、update 和 delete 语句会刷新缓存。
- eviction:替换策略
LRU:默认FIFO
- flushInterval:刷新间隔
- 以毫秒为单位
- 不设置,也就是没有刷新间隔,缓存仅仅会在调用语句时刷新
- size:引用数目
- 默认值是 1024
- readOnly:只读
- 只读的缓存会给所有调用者返回缓存对象的相同实例。 因此这些对象不能被修改
- 可读写的缓存会(通过序列化)返回缓存对象的拷贝。 速度上会慢一些,但是更安全,因此默认值是 false
测试

问题
- 将实体类序列化,否则保错
1
java.io.NotSerializableException: com.kuang.pojo.User
1
2
3
4
5
6
7
8
9
10
11
12
13
14
15
16package com.kuang.pojo;
import lombok.AllArgsConstructor;
import lombok.Data;
import lombok.NoArgsConstructor;
import java.io.Serializable;
public class User implements Serializable {
private Integer id;
private String user_name;
private String pwd;
}
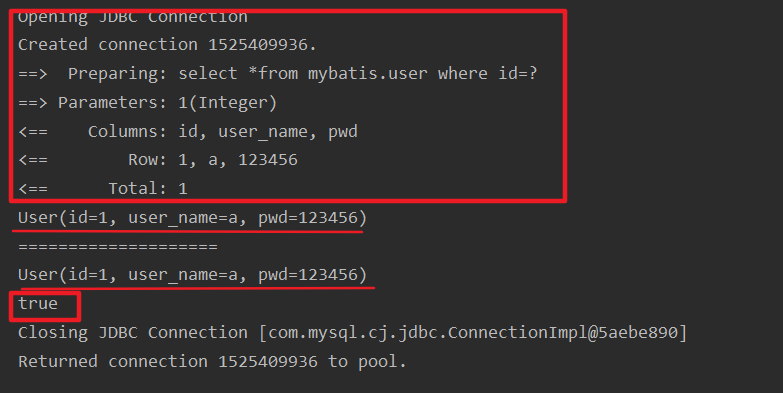
缓存原理
查找顺序:
- 二级缓存
- 一级缓存
- 数据库
1 |
|

- 由Cache Hit Ratio的计算,可知cache机制是先查二级缓存,再数据库
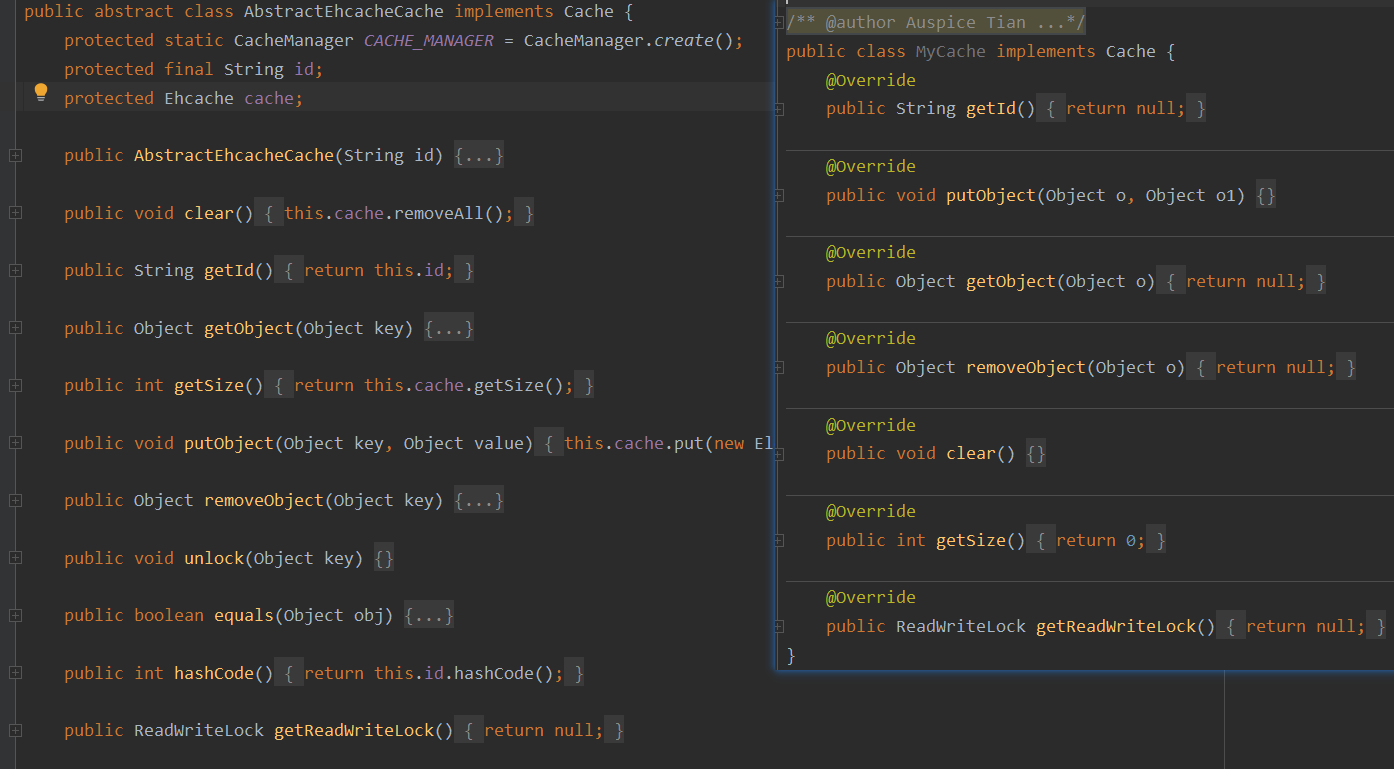
自定义缓存——Ehcache
开源Java分布式缓存
1 | <dependency> |
1 | <!--mapper.xml--> |
1 | public interface Cache { |
注解开发
面向接口编程
目的:解耦
接口的理解
- 定义 与 实现 分离
- 接口反映系统设计人员对系统的抽象理解
- 接口分类:
- 一个个体的抽象——抽象体(abstract class)
- 一个个体的某一方面的抽象——抽象面(Interface)
- 接口设计更多体现对系统整体的架构
使用注解开发
本质:反射机制
底层:动态代理
Java Annotations are both limited and messier for more complicated statements.
注解在接口上实现
1
2
3
4public interface UserMapper {
List<User> getUsers();
}绑定接口
1
2
3
4
5<!--mybatis-config.xml-->
<!-- 绑定接口 -->
<mappers>
<mapper class="com.kuang.mapper.UserMapper"/>
</mappers>测试
1
2
3
4
5
6
7
8
9
10
11
12
public void test(){
SqlSession sqlSession = MyBatisUtils.getSqlSession();
UserMapper mapper = sqlSession.getMapper(UserMapper.class);
List<User> users = mapper.getUsers();
for (User user : users) {
System.out.println(user);
}
sqlSession.close();
}
参数
当有多个参数,基本数据类型或String的参数前加注解 @param关联参数
引用类型不需要加
sql中使用的是@Param()中设定的属性名

#{} 与 ${} 的区别
- ${}是字符串替换,,Mybatis 在处理${}时,就是把他替换成变量的值
- #{}是预编译处理,会将 #{}替换为?号,调用 PreparedStatement 的 set 方法来赋值;
- 使用#{}可以有效的防止 SQL 注入,提高系统安全性
自动提交事务
1 | public class MyBatisUtils{ |
CRUD
Create
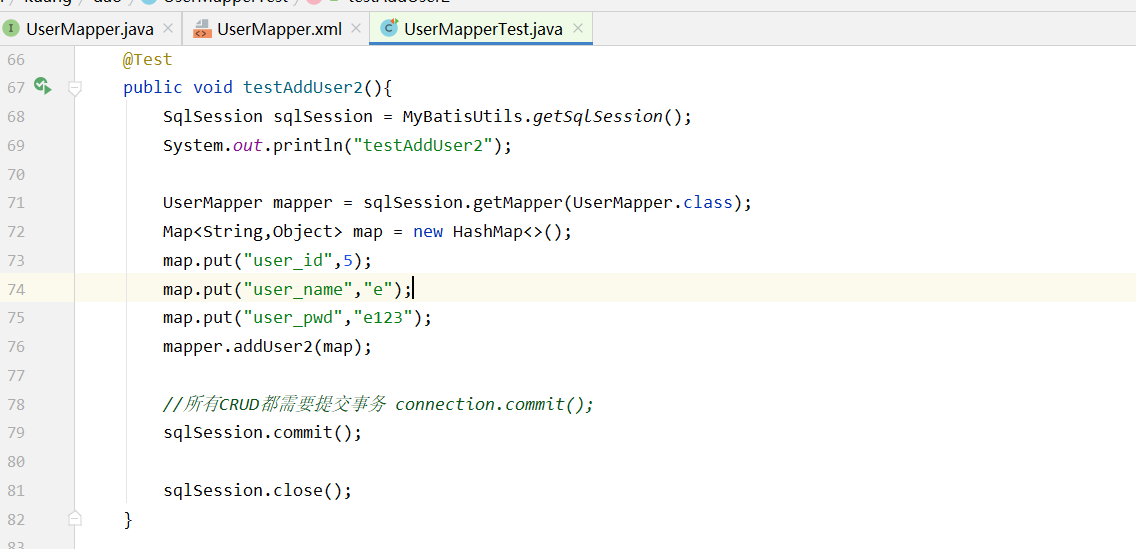
1 | //UserMapper.java |
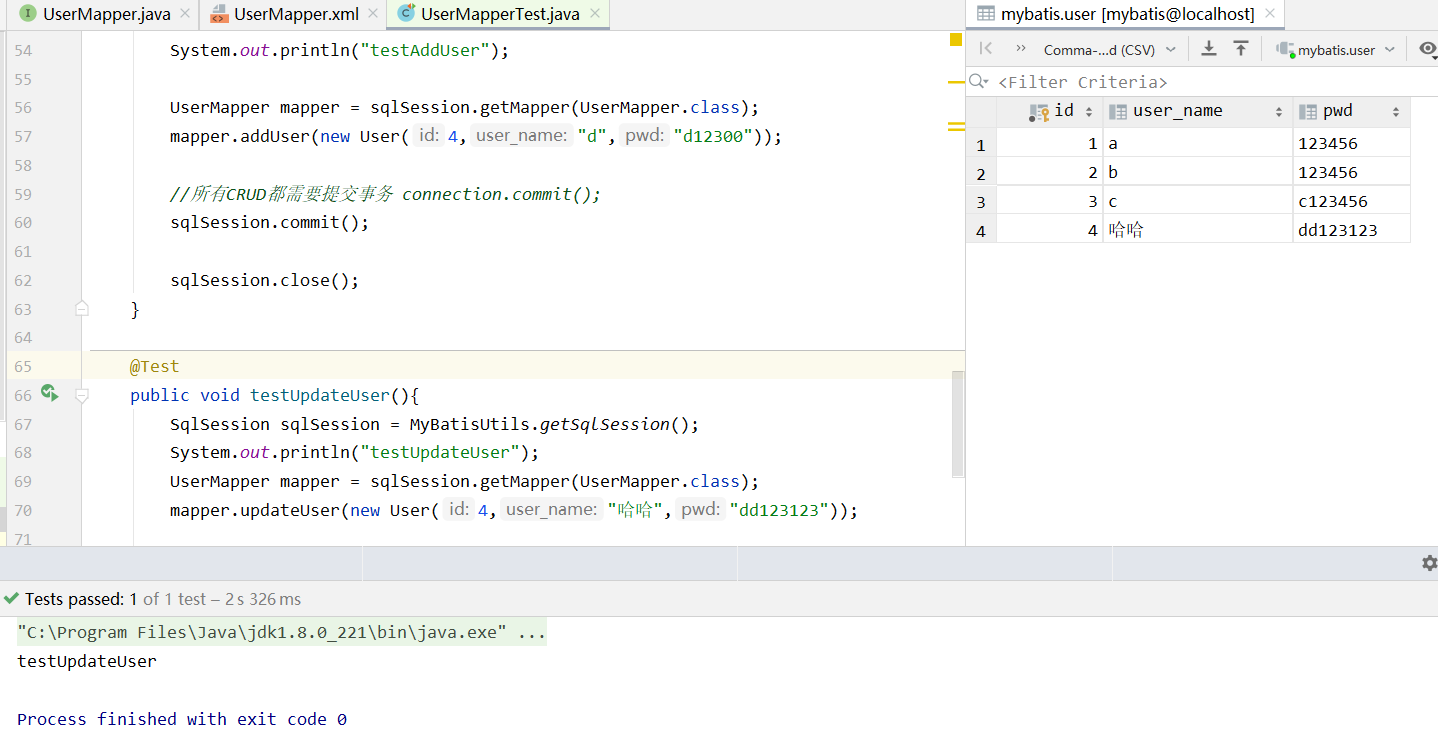
Update
1 | //UserMapper.java |
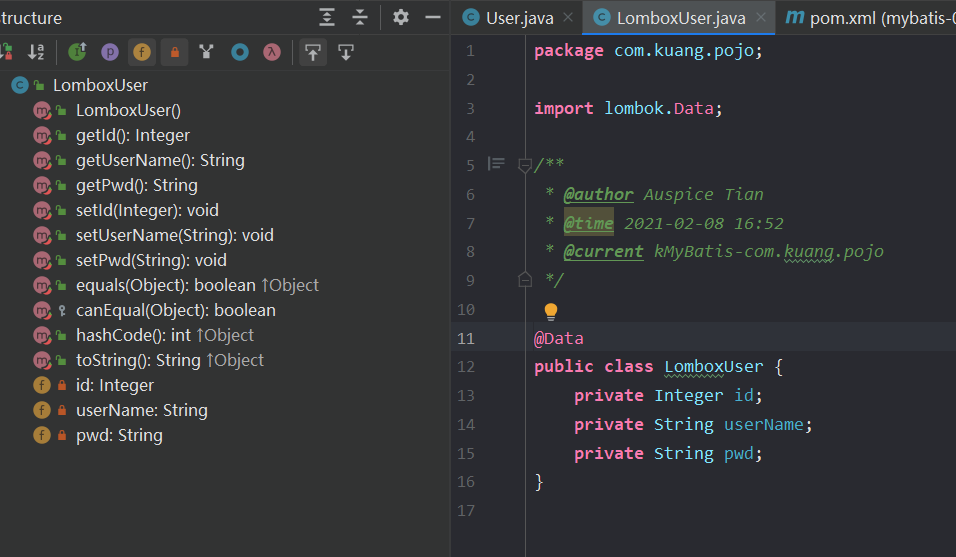
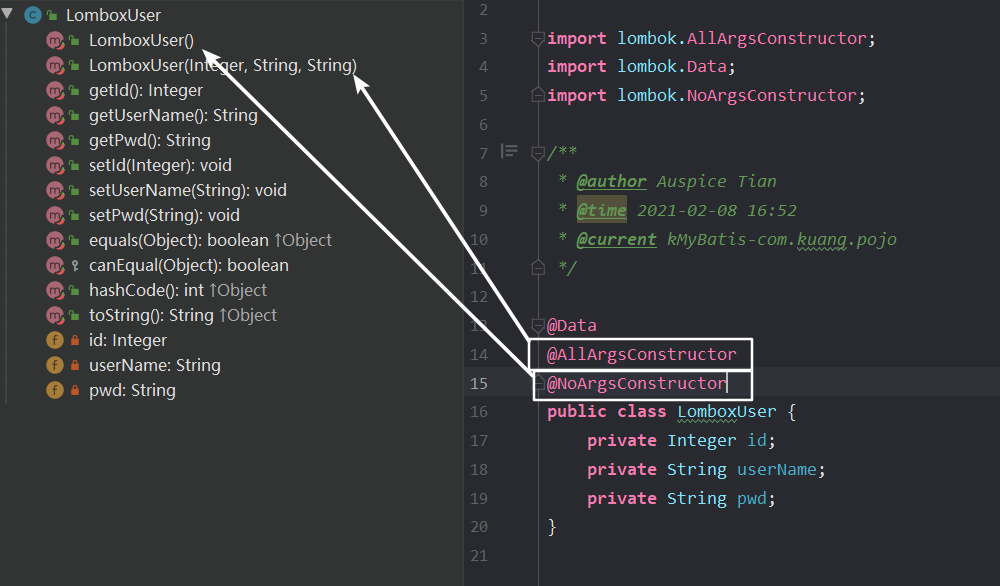
POJO方法的简化——Lombok
IDEA中安装插件
项目中导入依赖
1
2
3
4
5
6<dependency>
<groupId>org.projectlombok</groupId>
<artifactId>lombok</artifactId>
<version>1.18.12</version>
<scope>provided</scope>
</dependency>使用注解简化
1
2
3
4
5
6and
, and
, , , , , , , ,@Data,@AllArgsConstructor,@NoArgsConstructor
MybatisPlus
简介
在MyBatis基础上,只做增强不做改变,为简化开发、提高效率而生
- 无侵入
- 损耗小:启动即会自动注入基本 CURD,性能基本无损耗,直接面向对象操作
- CRUD:内置通用 Mapper、通用 Service
- 支持主键自动生成
- 支持 XML 热加载 :Mapper 对应的 XML 支持热加载,对于简单的 CRUD 操作,甚至可以无 XML 启动
- 支持 ActiveRecord 模式
- 支持自定义全局通用操作:支持全局通用方法注入
- 内置代码生成器 :采用代码或者 Maven 插件可快速生成 Mapper 、 Model 、 Service 、 Controller 层代码,支持模板引擎
- 内置分页插件 、性能分析插件
- 全局拦截(提供全表 delete 、 update 操作智能分析阻断,也可自定义拦截规则,预防误操作)
- 内置 Sql 注入剥离器:支持 Sql 注入剥离,有效预防 Sql 注入攻击
MtbatisPlus架构
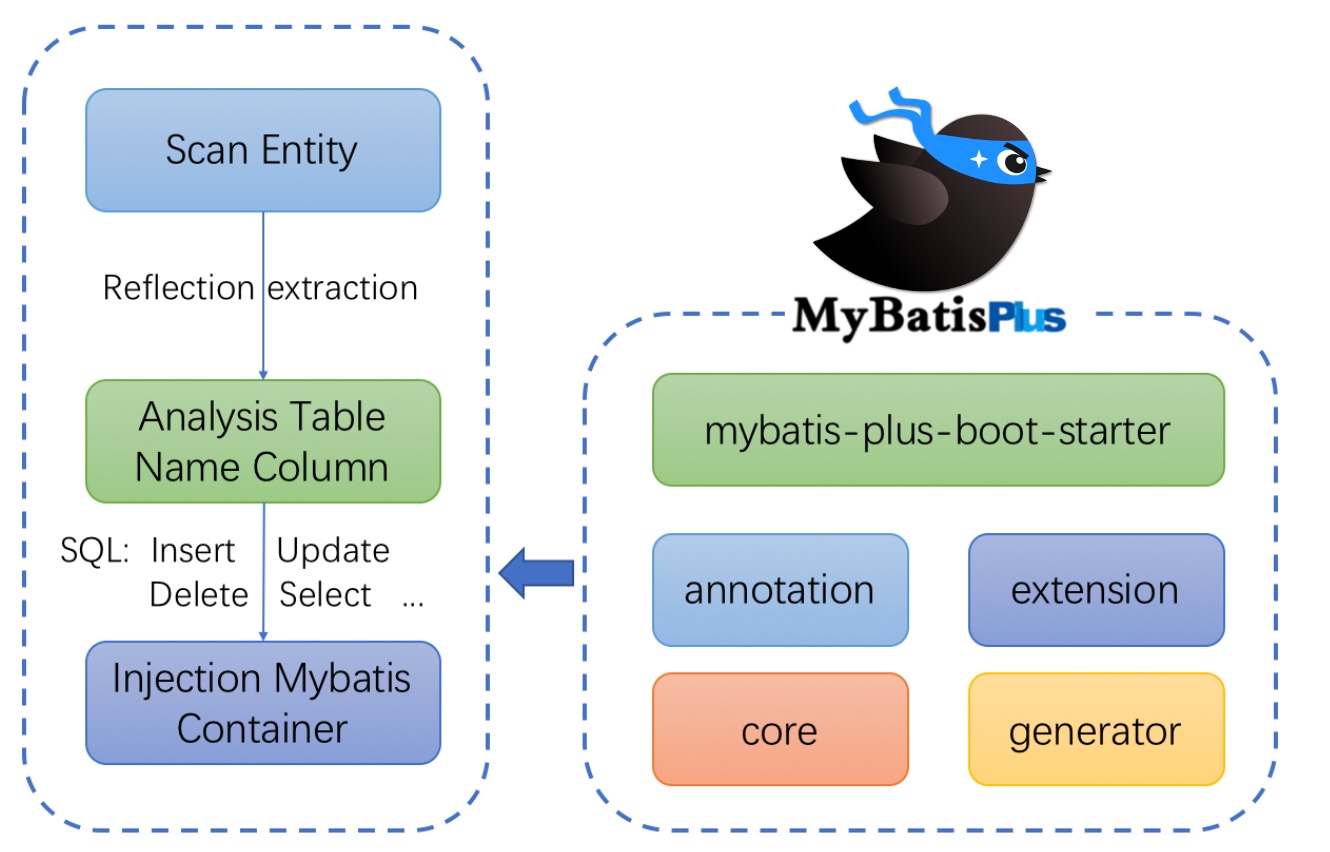
通过简单语句,生成SQL语句,交给MyBatis执行
使用
1. 建库建表
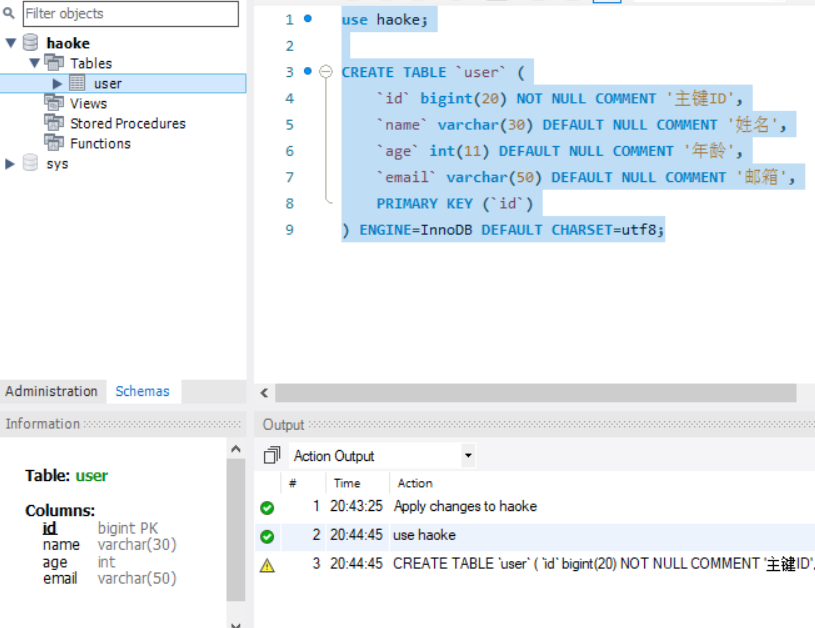
创建数据库 haoke
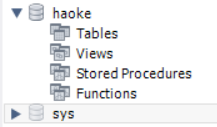
1 | use haoke; |

2. 创建工程及导入依赖
1 | <parent> |
3. 编写application.properties文件
1 | spring.application.name = mybatis-plus |
4. 创建User对象
1 | package com.mybatisplus.pojo; |
5. 编写UserMapper
1 | package com.mybatisplus.mapper; |
6. 编写SpringBoot启动类
1 | package com.mybatisplus; |
7. 编写SpringBoot启动类
1 | package com.mybatisplus; |
8. 编写单元测试用例
1 | package com.mybatisplus; |

通用Mapper
在MybatisPlus中,BaseMapper中定义了一些常用的CRUD方法,当我们自定义的Mapper接口继承BaseMapper后即可拥有了这些方法 【这些方法仅适合单表操作】
1 | /** |
通过id查询——selectById
1 |
|

模糊查询——like
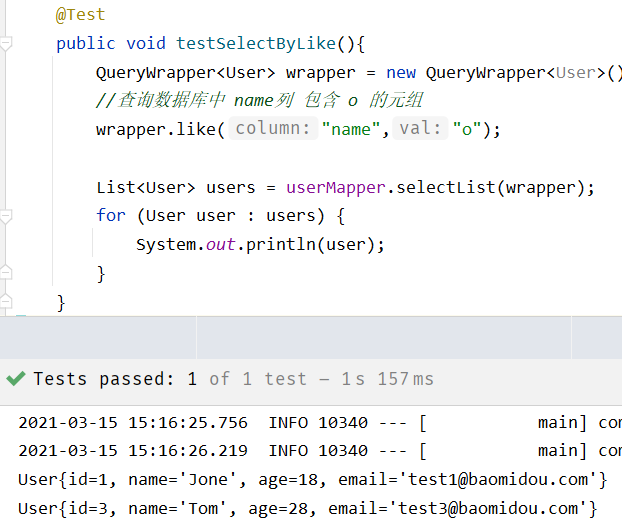
条件查询
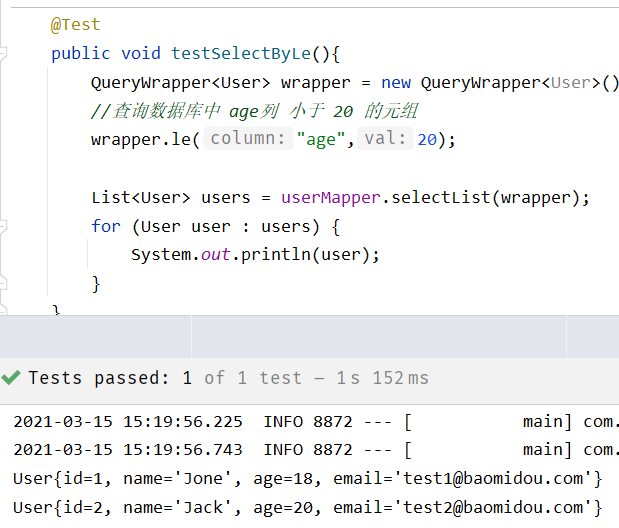
https://mp.baomidou.com/guide/wrapper.html#abstractwrapper
插入数据
1 |
|
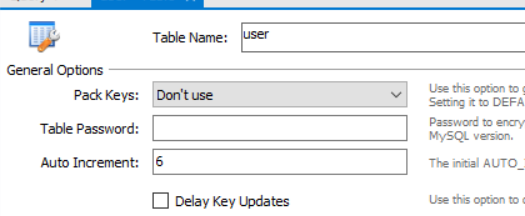
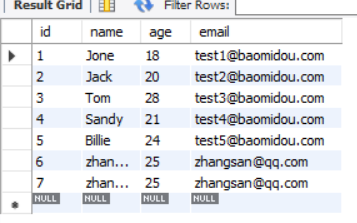
id自增问题
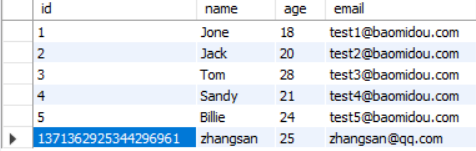
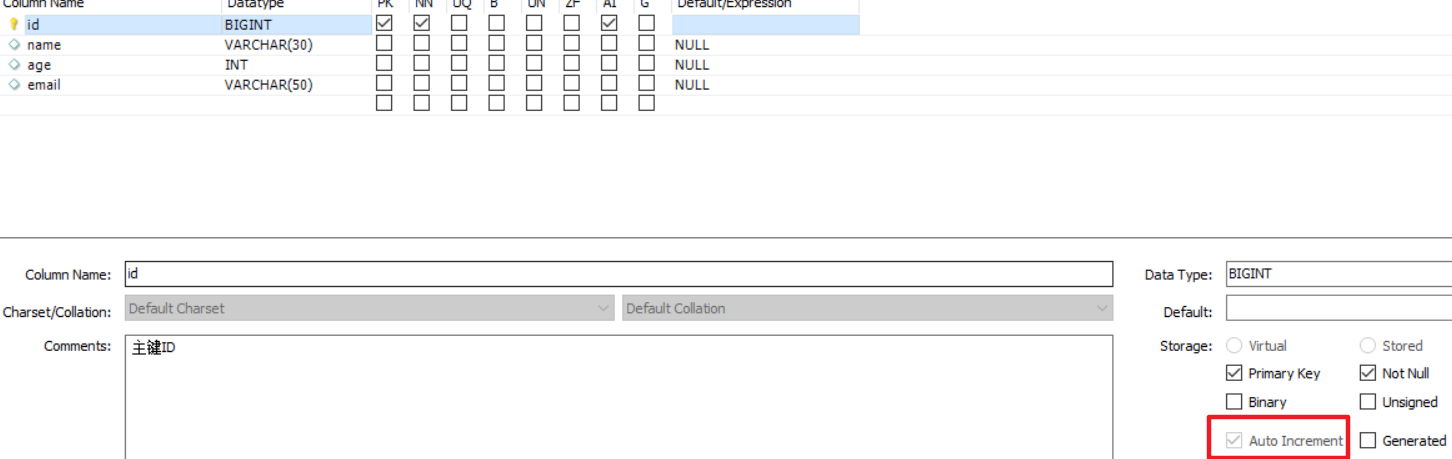
所以自增问题出现在java参数传递中
1 | public class User { |
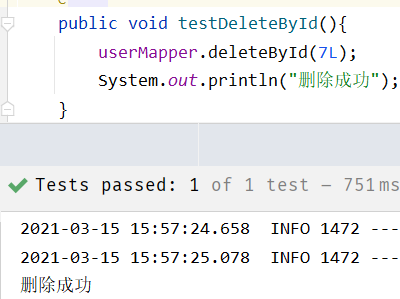
删除数据
修改数据
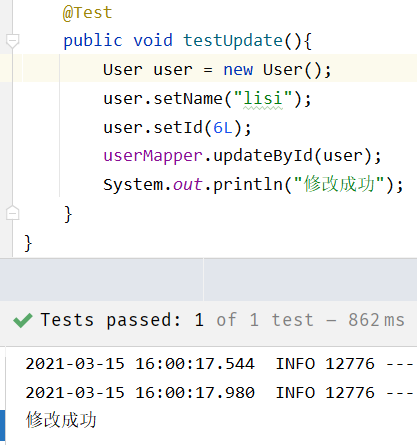
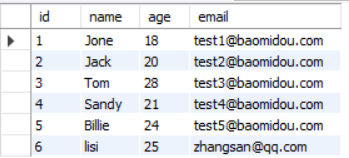
根据id修改,只修改指定的字段
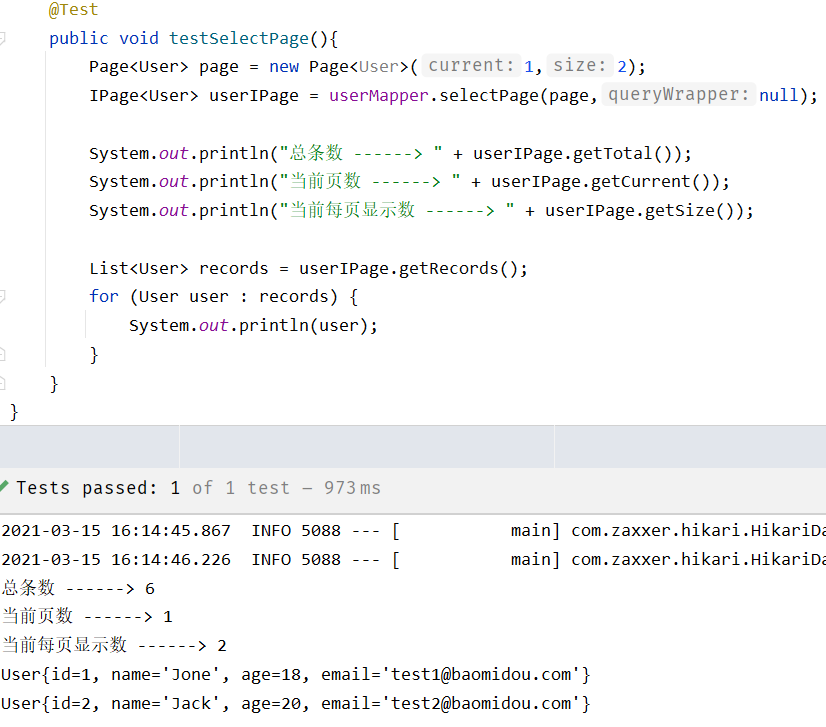
分页查询
1 | /** |
配置
使用MyBatis原生配置文件
1 | # 指定全局配置文件 |
若指定配置文件,无需配置环境,只需要
1 |
|
https://mp.baomidou.com/guide/config.html#%E5%9F%BA%E6%9C%AC%E9%85%8D%E7%BD%AE
Lombok
- @Data:注解在类上;提供类所有属性的 getting 和 setting 方法,此外还提供了equals、canEqual、hashCode、toString 方法
- @Setter:注解在属性上;为属性提供 setting 方法
- @Getter:注解在属性上;为属性提供 getting 方法
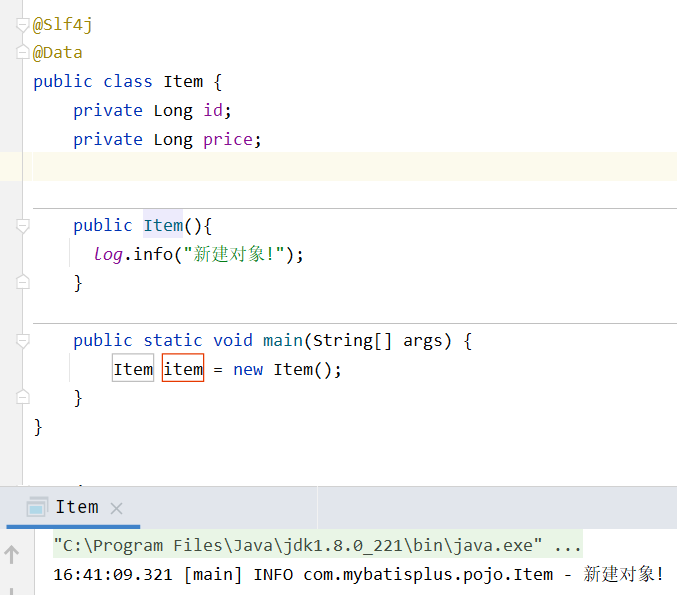
- @Slf4j:注解在类上;为类提供一个 属性名为log 的 slf4j日志对象
- @NoArgsConstructor:注解在类上;为类提供一个无参的构造方法
- @AllArgsConstructor :注解在类上;为类提供一个全参的构造方法
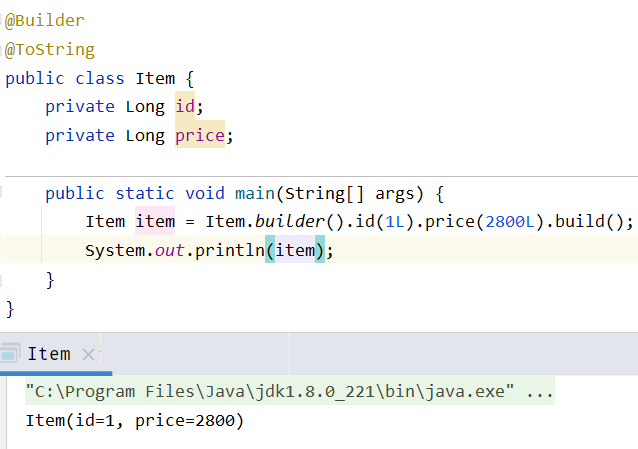
- @Builder :使用Builder模式构建对象