前置知识:JSP&Servlet
学习视频:https://www.bilibili.com/video/BV1WE411d7Dv?spm_id_from=333.999.0.0
IoC:控制反转
IoC的理解:IoC思想,IoC怎么创建对象,IoC是Spring的核心
依赖注入三种方式:构造器、set方法、第三方
Bean的作用域:2+4
单例与原型
request,session,appication=websocket
Bean属性的自动装配:四种
xml显示配置
隐式自动配置(ByName——参数名,ByType——参数类型)
注解
实现配置类:不用xml配置,把配置项作为类属性
Bean的生命周期
代理模式
AOP
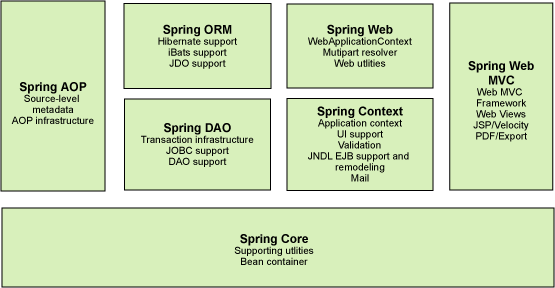
Spring
Spring简介
解决企业级应用开发的复杂性创建,简化开发
轻量级控制反转(IOC)和面向切面编程(AOP)的容器框架
- 2002,interface21 Spring框架雏形
- Spring理念:整合现有的框架
- SSH:Struct2 + Spring + Hibernate
- SSM:SpringMVC + Spring + MyBatis
官网
1 | <dependency> |
优点
- 开源的框架
- 轻量级的、非入侵式的框架
- 控制反转(IOC)、面向切面编程(AOP)
- 支持事务处理
- 对框架整合的支持
弊端:发展太久,配置十分繁琐
- 配置地狱
组成
拓展
- Spring Boot:快速开发脚手架
- 快速开发单个微服务
- 约定大于配置
- Spring Cloud:协调
- 基于Spring Boot实现
- 微服务的整合
IoC容器
为什么有IoC思想
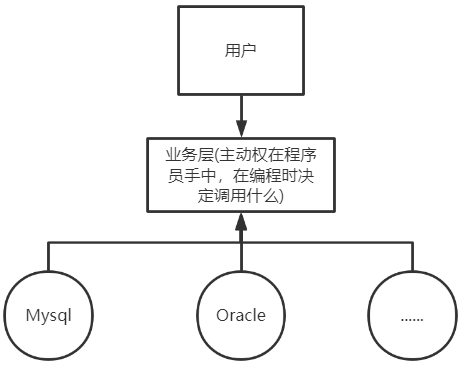
以JDBC连接数据库为例
原先
UserDao接口
1
2
3public interface UserDao {
public void getUser();
}UserDaoImpl实现类
1
2
3
4
5
6
7
8
9
10
11
12
13
14
15
16
17
18
19
20//UserDaoImpl.class
public class UserDaoImpl implements UserDao{
public void getUser(){
System.out.println("获取用户数据");
}
}
//UserDaoMysqlImpl
public class UserDaoMysqlImpl implements UserDao{
public void getUser(){
System.out.println("MySql获取用户数据");
}
}
//UserDaoOracleImpl
public class UserDaoOracleImpl implements UserDao{
public void getUser(){
System.out.println("Oracle实现获取用户数据");
}
}UserService业务接口
1
2
3
public interface UserService {
public void getUser();
}UserServicelmpl业务实现类
1
2
3
4
5
6
7
8public class UserServiceImpl implements UserService{
private UserDao userDao = new UserDaoMysqlImpl();
// = new UserDaoOracleImpl();
// = new UserDaoImpl();
public void getUser(){
userDao.getUser();
}
}MyTest
1
2
3
4
5
6
7public class MyTest {
public static void main(String[] args) {
//用户实际调用的是业务层
UserService userService = new UserServiceImpl();
userService.getUser();
}
}
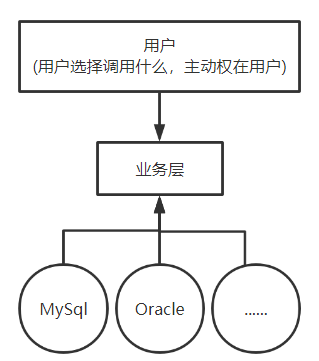
IoC雏形
UserDao接口
1
2
3public interface UserDao {
public void getUser();
}UserDaoImpl实现类
1
2
3
4
5
6
7
8
9
10
11
12
13
14
15
16
17
18
19
20
//UserDaoImpl.class
public class UserDaoImpl implements UserDao{
public void getUser(){
System.out.println("获取用户数据");
}
}
//UserDaoMysqlImpl
public class UserDaoMysqlImpl implements UserDao{
public void getUser(){
System.out.println("MySql获取用户数据");
}
}
//UserDaoOracleImpl
public class UserDaoOracleImpl implements UserDao{
public void getUser(){
System.out.println("Oracle实现获取用户数据");
}
}UserService业务接口
1
2
3
public interface UserService {
public void getUser();
}_UserServicelmpl业务实现类_
1
2
3
4
5
6
7
8
9
10
11public class UserServiceImpl implements UserService{
private UserDao userDao;
public void setUserDao(UserDao userDao){
this.userDao = userDao;
}
public void getUser(){
userDao.getUser();
}
}MyTest
1
2
3
4
5
6
7
8
9public class MyTest {
public static void main(String[] args) {
//用户实际调用的是业务层
UserService userService = new UserServiceImpl();
((UserServiceImpl)userService).setUserDao(new UserDaoOracleImpl());
userService.getUser();
}
}
控制反转关键
1 | public void setUserDao(UserDao userDao){ |
之前,程序主动创建对象,控制权在程序
使用set注入,程序变成了被动接收对象
- 程序员不用再去管理对象的创建
- 系统的耦合性降低,更加专注在业务实现上,这是IOC的原型
IoC是Spring框架的核心
控制反转是一种通过描述(XML或注解)及第三方去生产或获取特定对象的方式
可使用XML配置
采用XML方式配置Bean,Bean的定义与实现分离
使用注解配置
采用注解方式将Bean的定义和实现合为一体
Bean的定义信息直接以注解的形式定义在实现类中,从而达到零配置目的
IOC是一种设计思想,DI(依赖注入)是实现IOC的一种方法,在Spring中实现IoC的是IoC容器
控制反转:获得对象的方式反转
- 程序由主动创建对象变为被动接收对象
依赖注入
- 利用set方法进行注入
Spring通过IoC容器完成对实例的创建,装配,管理
- 不再需要改动程序,要实现不同的操作,只需在xml配置文件中进行修改
相关jar包
Theorg.springframework.beansandorg.springframework.contextpackages are the basis for Spring Framework’s IoC container.
1 | <dependency> |
xml方式
beans.xml
1 |
|
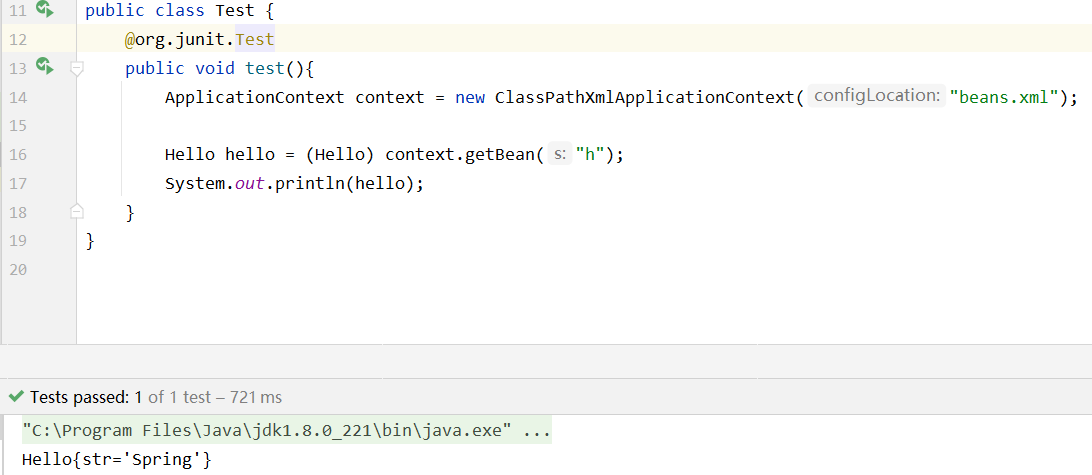
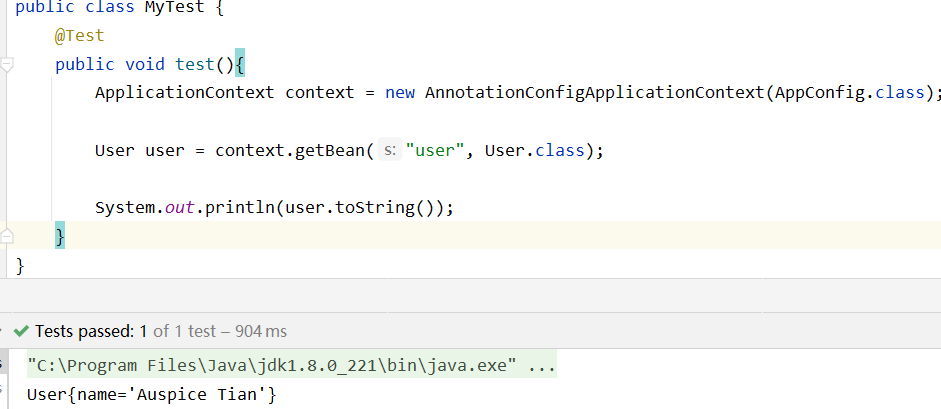
获取IoC容器(Spring的Context对象)中类资源
The BeanFactory interface provides an advanced configuration mechanism capable of managing any type of object. ApplicationContext is a sub-interface of BeanFactory.
BeanFactory 定义了能够管理所有类的配置机制,ApplicationContext 是其子接口
1 | ApplicationContext applicationContext = new ClassPathXmlApplicationContext(""); |
The ApplicationContext is the interface for an advanced factory capable of maintaining a registry of different beans and their dependencies. By using the method T getBean(String name, Class<T> requiredType), you can retrieve instances of your beans.
ApplicationContext 是维护不同bean及其相关依赖的注册工厂
test
1 |
|
Spring配置
bean
1 | <bean id="hello" class="com.kuang.pojo.Hello" name="hello2,u2"> |
<bean> 中配置的是交给IoC容器管理的类资源
- The
property nameelement refers to the name of the JavaBean property - and the
refelement refers to the name of another bean definition.
The id attribute is a string that identifies the individual bean definition.
The class attribute defines the type of the bean and uses the fully qualified classname.
全限定名:包名.类型
If you want to introduce other aliases for the bean, you can also specify them in the name attribute, separated by a comma (,), semicolon (;), or white space
bean别名——alias
1 | <bean id="hello" class="com.kuang.pojo.Hello"> |
import
将多个配置文件导入到一个,便于统一管理
1 | <!--applicationContext.xml--> |
依赖注入
- 依赖:bean对象的创建依赖于IoC容器
- 注入:bean对象中的所有属性,由容器来注入
1. IoC创建对象方式——构造器注入
在配置文件加载时,容器中管理的对象就已被初始化
默认使用无参构造器创建对象
使用有参构造器构造对象
下标赋值-index
1
2
3<bean id="hello" class="com.kuang.pojo.Hello">
<constructor-arg index="0" value="Spring"/>
</bean>参数类型匹配-type
1
2
3<bean id="hello" class="com.kuang.pojo.Hello">
<constructor-arg type="java.lang.String" value="Spring"/>
</bean>直接通过参数名设置-name
1
2
3<bean id="hello" class="com.kuang.pojo.Hello">
<constructor-arg name="str" value="Spring"/>
</bean>
2. set注入
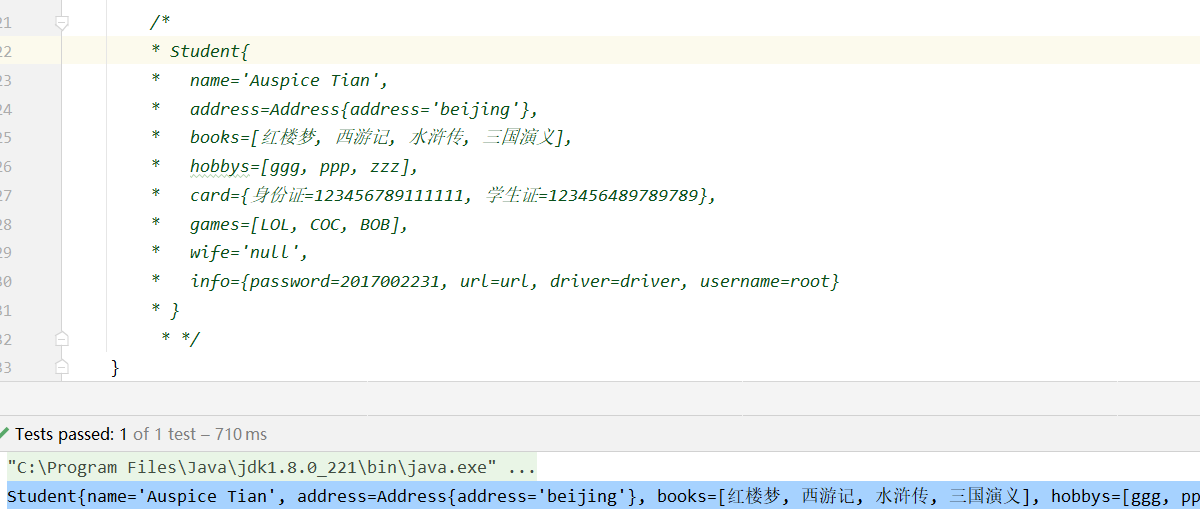
1 | public class Student { |
基本数据类型
1 | <bean id="student" class="com.kuang.pojo.Student"> |
bean
1 | <bean id="beijing" class="com.kuang.pojo.Address"> |
array
1 | <property name="books"> |
list
1 | <property name="hobbys"> |
map
1 | <property name="card"> |
set
1 | <property name="games"> |
null
1 | <property name="wife"> |
property
1 | <property name="info"> |
第三方注入
可直接注入基本数据类型和bean
p-namespace(set注入)
导入约束:xmlns:p=”http://www.springframework.org/schema/p“
1 | <beans xmlns="http://www.springframework.org/schema/beans" |
c-namespace(constructor注入)
导入约束:xmlns:c=”http://www.springframework.org/schema/c“
1 | <beans xmlns="http://www.springframework.org/schema/beans" |
Bean Scopes(作用域)
1 | <bean id="student" class="com.kuang.pojo.Student" scope="singleton | prototype"> |
| Scope | Description |
|---|---|
| singleton | (Default) Scopes a single bean definition to a single object instance for each Spring IoC container.全局唯一 |
| prototype | Scopes a single bean definition to any number of object instances. |
| request | Scopes a single bean definition to the lifecycle of a single HTTP request. That is, each HTTP request has its own instance of a bean created off the back of a single bean definition. Only valid in the context of a web-aware Spring ApplicationContext. |
| session | Scopes a single bean definition to the lifecycle of an HTTP Session. Only valid in the context of a web-aware Spring ApplicationContext. |
| application | Scopes a single bean definition to the lifecycle of a ServletContext. Only valid in the context of a web-aware Spring ApplicationContext. |
| websocket | Scopes a single bean definition to the lifecycle of a WebSocket. Only valid in the context of a web-aware Spring ApplicationContext. |
Singleton(单例模式)-单线程
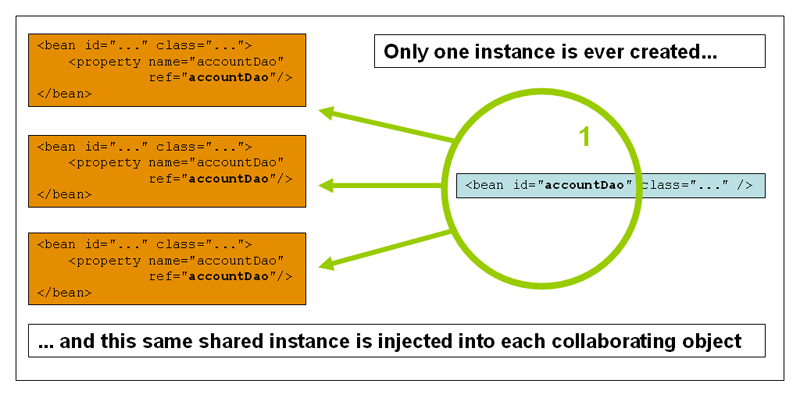
- 全局唯一,共享同一对象
prototype(原型模式)-多线程
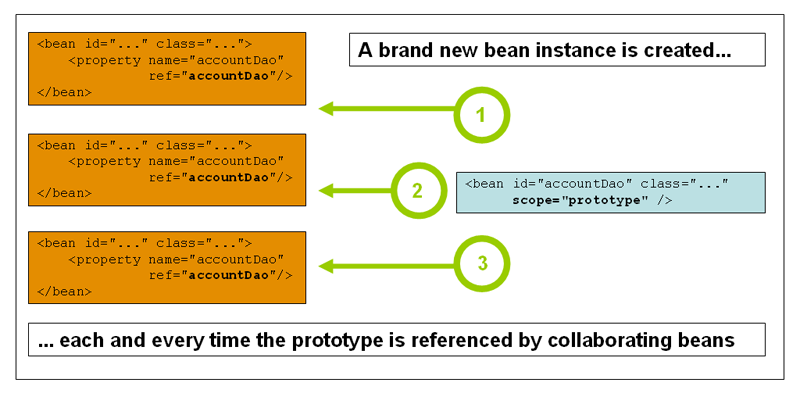
- 每次getBean()都会得到新的对象
Bean的自动装配
Spring会在上下文中自动寻找,自动装配属性
在xml中显式配置
1 | <bean id="cat" class="com.kuang.pojo.Cat" /> |
隐式自动装配Bean
ByName自动装配
setter的形参名与容器中的bean.id相同
bean的id唯一
- java.lang.NullPointerException
1 | <bean id="person" class="com.kuang.pojo.Person" autowire="byName" /> |
ByType自动装配
属性类型与bean类型相同
与属性类型相同的Bean唯一
- expected single matching bean but found 2: cat1,cat2
1 | <bean id="person" class="com.kuang.pojo.Person" autowire="byType" /> |
使用注解自动装配
最佳实践:XML用于管理Bean,注解用于管理属性注入
Spring 2.5开始支持注解开发,JDK1.5支持注解
在Spring4之后,若使用注解开发,还必须保证 aop包 导入
导入约束
xmlns:context=”http://www.springframework.org/schema/context“
xsi:schemaLocation=”http://www.springframework.org/schema/beans https://www.springframework.org/schema/beans/spring-beans.xsd http://www.springframework.org/schema/context https://www.springframework.org/schema/context/spring-context.xsd“
配置注解的支持
<context:annotation-config/>指定要扫描的包,该包下的注解会生效
<context:component-scan base-package="com.kuang.pojo"/>
1 |
|
@Component——bean
组件,放在类上,说明这个类被Spring管理,就是Bean
1 | /* |
衍生注解
在Web开发中,会按照MVC分层,与@Component等价
- Dao
@Repository
- Service
@Service
- Controller
@Controller
@Value("")——属性
通过注解注入,在属性与属性的setters()上注入等价
1 |
|
注解实现自动装配
@AutoWired
- 相当于byType
- 在 bean属性 或 setters 上注解
@AutoWired(required=false):表示该注解修饰的内容可以为空- CONSTRUCTOR、METHOD、PARAMETER、FIELD、ANNOTATION_TYPE
@Qualifier(value="cat1111")
- 通过bean.id指定容器中装配的Bean
- 当IoC Container环境复杂,搭配使用
@Nullable:表示这个注解修饰的内容允许为Null
- METHOD、PARAMETER、FIELD
@Resource
@Resource(name="指定bean.id")- 当 ByName失效,通过ByType找到唯一的类型匹配的Bean
作用域
@Scope("")
- singleton
- prototype
在java中显式配置——零配置xml
JavaConfig是Spring的子项目,Spring4后,称为核心功能

1 | //com.config.AppConfig.java |

代理模式
对目标类的调用由直接调用变为间接调用
为什么引入代理模式
在代理类调用目标类之前和之后做一些预处理和后处理操作,用来扩展一些不属于目标类的功能

比如:可以在方法开始和结束前记录日志;在方法执行前进行额外的参数校验;进行事务管理,权限校验
- 抽象角色:接口或抽象类表示
- 真实角色:被代理角色
- 代理角色:代理真实角色
- 客户:访问代理对象
静态代理(静态生成代理类)
在程序运行之前,就为给真实角色编写并编译了代理角色的代码,生成代理角色的字节码文件,在程序运行时,直接运行这些字节码文件
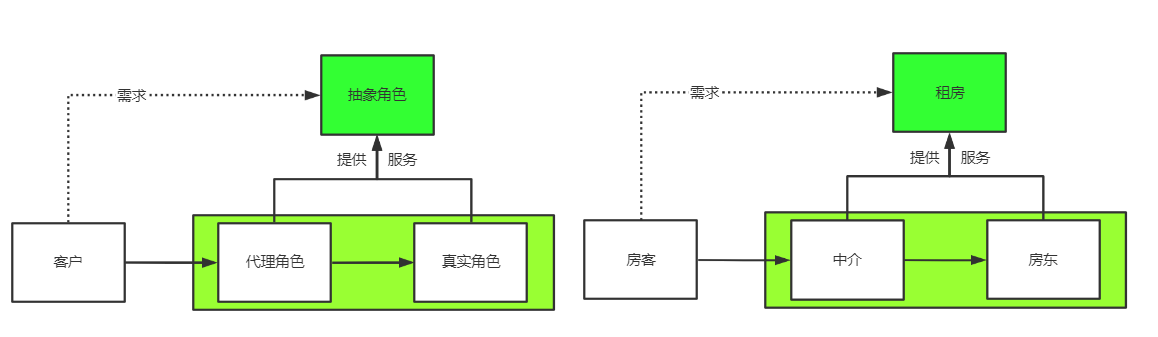
如在租房的服务中:
抽象角色
1
2
3
4/* 抽象角色 */
public interface Rent {
public void rent();
}真实角色
1
2
3
4
5
6/* 真实角色 */
public class Host implements Rent{
public void rent(){
System.out.println("房东出租房子");
}
}代理角色
1
2
3
4
5
6
7
8
9
10
11
12
13
14
15
16
17
18
19
20
21
22
23
24
25
26
27/* 代理角色 */
public class Agent implements Rent{
Host host;
public Agent(Host host) {
this.host = host;
}
public void rent(){
visit();
host.rent();
assign();
fare();
}
public void visit(){
System.out.println("预约看房");
}
public void assign(){
System.out.println("签合同");
}
public void fare(){
System.out.println("收中介费");
}
}客户访问代理角色
1
2
3
4
5
6
7
8
9/* 客户 */
public class Client {
public static void main(String[] args) {
Host host = new Host();
Agent agent = new Agent(host);
agent.rent();
}
}
在实现日志功能时
抽象角色
1
2
3
4
5
6
7/*用户服务:抽象角色*/
public interface UserDao {
public void add();
public void delete();
public void update();
public void query();
}真实角色
1
2
3
4
5
6
7
8
9
10
11
12
13
14
15
16
17
18
19
20
21
22
23/*实现用户服务功能:真实角色*/
public class UserDaoImpl implements UserDao {
public void add() {
System.out.println("实现新增用户");
}
public void delete() {
System.out.println("实现删除用户");
}
public void update() {
System.out.println("实现更新用户");
}
public void query() {
System.out.println("实现查询用户");
}
}代理角色
1
2
3
4
5
6
7
8
9
10
11
12
13
14
15
16
17
18
19
20
21
22
23
24
25
26
27
28
29
30
31
32
33
34
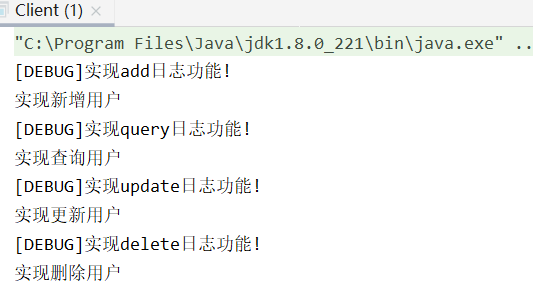
35public class Proxy implements UserDao{
UserDaoImpl user;
public void setUser(UserDaoImpl user) {
this.user = user;
}
public void add() {
log("add");
user.add();
}
public void delete() {
log("delete");
user.delete();
}
public void update() {
log("update");
user.update();
}
public void query() {
log("query");
user.query();
}
public void log(String msg){
System.out.println("[DEBUG]实现"+msg+"日志功能!");
}
}用户
1
2
3
4
5
6
7
8
9
10
11
12
13/*使用用户功能:客户*/
public class Client {
public static void main(String[] args) {
UserDaoImpl user = new UserDaoImpl();
Proxy proxy = new Proxy();
proxy.setUser(user);
proxy.add();
proxy.query();
proxy.update();
proxy.delete();
}
}
静态代理特点
优点:
- 真实角色操作更为简单,不用关注公共业务
- 公共业务交给代理角色,实现业务分工
- 公共业务发生扩展,方便集中管理
缺点:
- 每个真实角色都会产生一个代理角色,代码量增多 —> 动态代理
动态代理(反射生成代理类)
在运行态,通过反射自动生成代理角色
- 动态代理的代理类利用反射动态生成
- 代理的是接口
分类
- 基于接口的动态代理——JDK动态代理
- 基于类的动态代理——cglib
- java字节码——Javasist
代理类与调用处理接口
java.lang.reflect.Proxy ,实现 InvocationHandler 接口,实现它的 invoke() 方法
获取代理类
1
2
3
4
5
6
7
8
9
10
11public static Object newProxyInstance
(ClassLoader loader,
Class<?>[] interfaces,
reflect.InvocationHandler h)
//params
loader – the class loader to define the proxy class
interfaces – the list of interfaces for the proxy class to implement
h – the invocation handler to dispatch method invocations to
//return
a proxy instance with the specified invocation handler of a proxy class that is defined by the specified class loader and that implements the specified interfacesInterface InvocationHandler:When a method(抽象角色—>接口) is invoked on a proxy instance, the method invocation is encoded and dispatched to the invoke method of its invocation handler.每个被代理实例都有一个关联的调用处理程序
静态代理对应的动态代理
抽象角色
1
2
3public interface Rent {
public void rent();
}真实角色
1
2
3
4
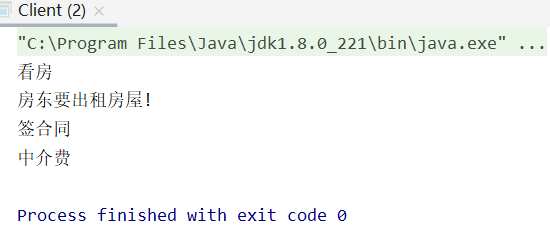
5public class Host implements Rent{
public void rent(){
System.out.println("房东要出租房屋!");
}
}动态代理角色
调用处理程序动态生成代理角色、绑定真实角色
1
2
3
4
5
6
7
8
9
10
11
12
13
14
15
16
17
18
19
20
21
22
23
24
25
26
27
28
29
30
31
32
33
34
35
36
37
38
39
40
41
42
43
44//代理处理程序:自动生成代理类
public class ProxyInvocationHandler implements InvocationHandler {
//需要被代理的抽象角色-->接口
Rent rent;
//通过DI注入真实角色
public void setRent(Rent rent) {
this.rent = rent;
}
//生成代理角色
public Object getProxy(){
return Proxy.newProxyInstance(
//抽象角色的类加载器
rent.getClass().getClassLoader(),
//抽象角色的接口
rent.getClass().getInterfaces(),
//该抽象角色的代理处理程序
this);
}
//处理代理类实例;返回结果
public Object invoke(Object proxy, Method method, Object[] args) throws Throwable {
visit();
Object result = method.invoke(rent,args);
assign();
fare();
return result;
}
/*公共业务*/
public void visit(){
System.out.println("看房");
}
public void assign(){
System.out.println("签合同");
}
public void fare(){
System.out.println("中介费");
}
}客户
1
2
3
4
5
6
7
8
9
10
11
12
13
14
15public class Client {
public static void main(String[] args) {
//真实角色
Host host = new Host();
//通过InvocationHandler处理要被调用的抽象角色
ProxyInvocationHandler pih = new ProxyInvocationHandler();
//调用处理程序与真实角色的绑定
pih.setRent(host);
//生成代理角色
Rent proxy = (Rent)pih.getProxy();
proxy.rent();
}
}

抽象角色—>接口
1
2
3
4
5
6public interface UserDao {
public void add();
public void delete();
public void update();
public void query();
}真实角色—>被代理类
1
2
3
4
5
6
7
8
9
10
11
12
13
14
15
16
17
18
19
20
21public class UserDaoImpl implements UserDao{
public void add() {
System.out.println("add");
}
public void delete() {
System.out.println("delete");
}
public void update() {
System.out.println("update");
}
public void query() {
System.out.println("query");
}
}动态代理角色
调用处理程序—>动态生成代理类的程序
1
2
3
4
5
6
7
8
9
10
11
12
13
14
15
16
17
18
19
20
21
22
23
24
25
26
27
28
29
30public class ProxyInvocationHandler implements InvocationHandler {
//被调用的接口——>抽象角色
private Object target;
//注入真实角色
public void setTarget(Object target) {
this.target = target;
}
//返回代理类
public Object getProxy(){
return Proxy.newProxyInstance(
target.getClass().getClassLoader(),
target.getClass().getInterfaces(),
this);
}
public Object invoke(Object proxy, Method method, Object[] args) throws Throwable {
log(target.getClass().getName());
Object result = method.invoke(this.target,args);
return result;
}
/*公共业务*/
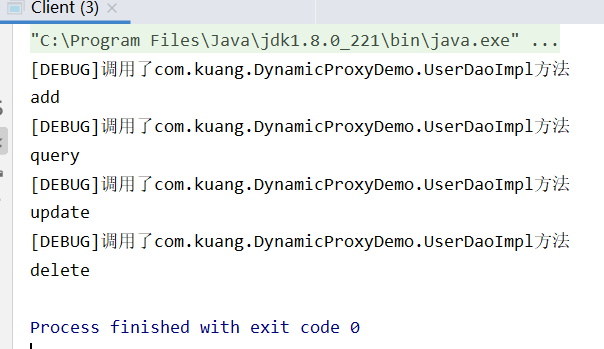
public void log(String msg){
System.out.println("[DEBUG]调用了"+msg+"方法");
}
}客户
1
2
3
4
5
6
7
8
9
10
11
12
13
14
15public class Client {
public static void main(String[] args) {
//定义调用处理程序
ProxyInvocationHandler pih = new ProxyInvocationHandler();
//调用处理程序与将代理角色与真实角色绑定
pih.setTarget(new UserDaoImpl());
//获取代理角色,,代理的是接口
UserDao proxy = (UserDao) pih.getProxy();
proxy.add();
proxy.query();
proxy.update();
proxy.delete();
}
}
好处
- 一个动态代理类代理的是一个接口,对应的是一类业务
- 一个动态代理类可以代理实现同一接口多个类
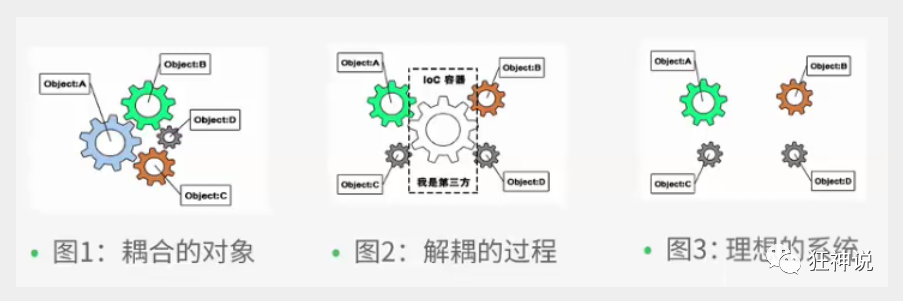
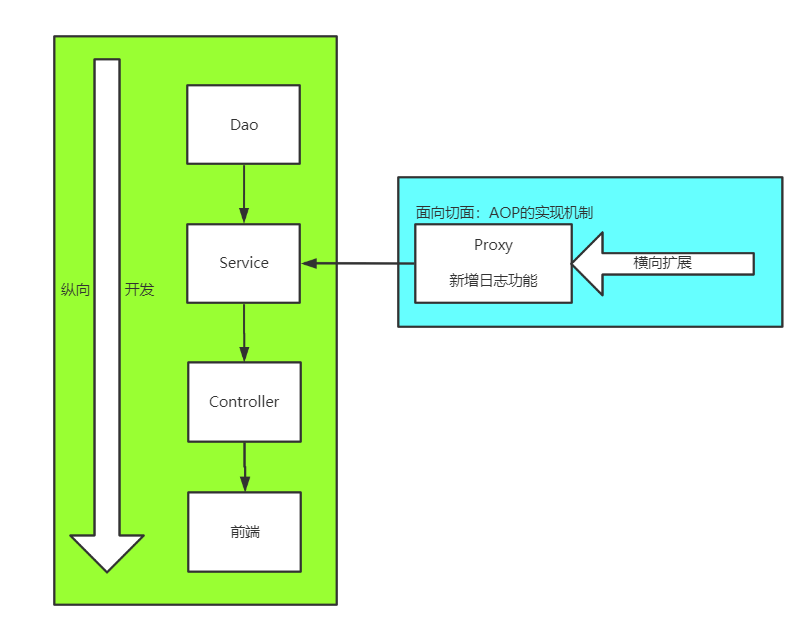
Spring AOP
AOP简介
(Aspect Oriented Programming):面向切面编程
通过 预编译方式和动态代理 实现程序功能的统一维护的技术,就是 Spring对动态代理的实现
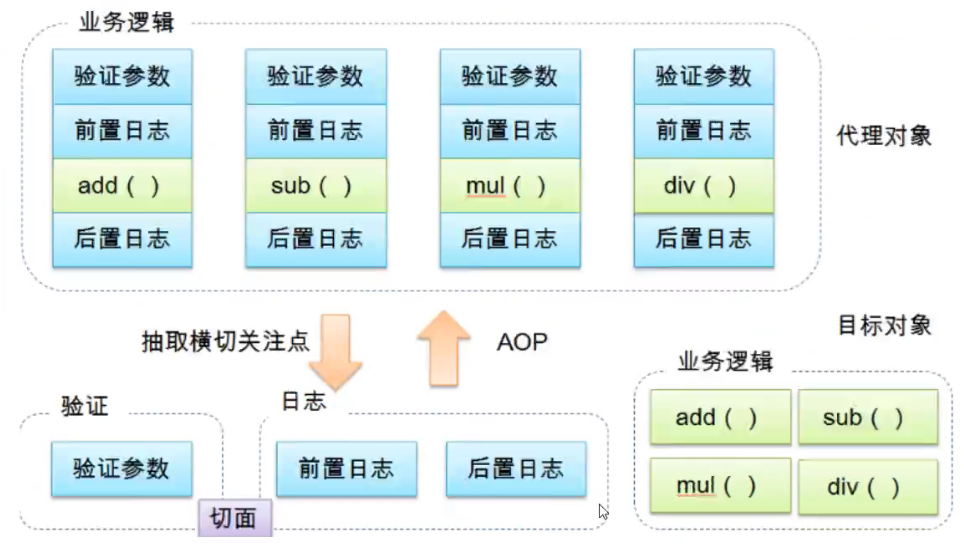
提供声明式事务;允许用户自定义切面
- 横切关注点 公共业务 :跨越应用程序多个模块的方法或功能(公共业务),与业务逻辑无关,但需要关注的部分。如:日志,安全,缓存,事务
- 切面(aspect) 代理角色 :横切关注点被模块化的对象—>类
- 通知(advisor) 真实角色中的invoke()实现的公共业务 :切面必须完成的工作—>类中的方法
- 目标(impl) 真实角色 :被通知对象—>真实角色
- 切入点(pointcut) 通知的插入位置 :切面指定地点
- 连接点(JointPoint):切入点对应的执行点

AOP与动态代理的对应
将Service层抽象为的接口作为 抽象角色 ,Service的实现类作为 真实角色 。Spring为我们完成了动态代理中 代理角色(即 Aspect 可以理解为一个代理)的创建,我们需要做的是
- 实现代理角色中的公共业务,即
invoke()方法中公共函数,对应于 通知Advice - 用xml的方式将真实角色与代理角色绑定
- 通过实现切点接口或者在xml配置通知对应的切点表达式确定通知的位置
若使用自定义切面,则只需要在切面中实现通知,切入点由注解定义,然后将切面注册到IoC容器中
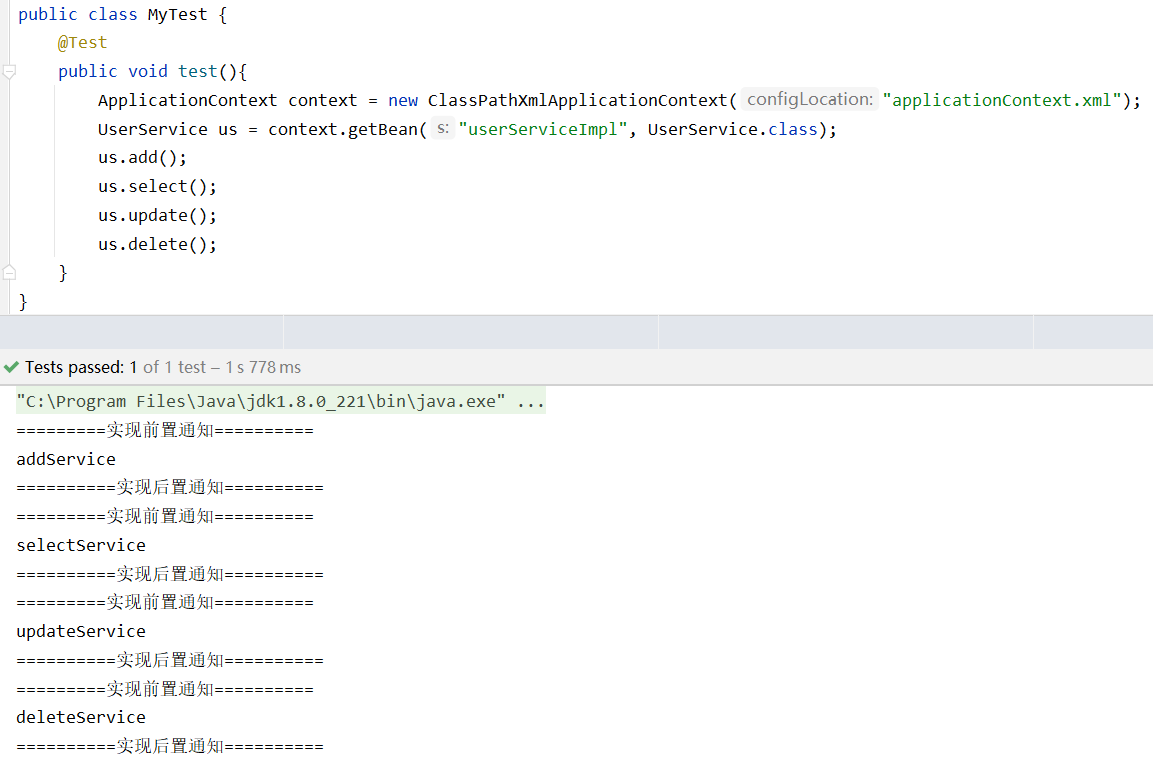
日志切面
方法一:实现切入点通知
实现这些切点通知,在配置文件中配置这些切点通知作用在哪些Bean上
| 通知类型 | 连接点 | 需实现的接口 |
|---|---|---|
| 前置通知 | 方法前 | org.springframework.aop.MethodBeforeAdvice; |
| 后置通知 | 方法后 | org.springframework.aop.AfterReturningAdvice |
| 环绕通知 | 方法前后 | org.aopalliance.intercept.MethodInterceptor |
| 异常抛出通知 | 方法抛出异常时 | org.springframework.aop.ThrowsAdvice |
| 引介通知 | 类中新增方法或属性 | org.springframework.aop.IntroductionInterceptor |
定义接口—>抽象角色
1 | public interface UserService { |
接口实现—>真实角色
1 | public class UserServiceImpl implements UserService{ |
实现通知接口—>代理中的公共业务
1 | /*代理要做的公共业务 通知 Log.java |
1 | /*代理对象的一个公共业务-->通知 AfterLog.java |
IoC配置——applicationContext.xml
1 |
|
aop:expression
格式
1 | execution( modifiers-pattern? |
- ret-type-pattern、name-pattern、param-pattern是必须的
- ret-type-pattern:该方法的返回类型必须是什么才能使连接点匹配
- param-pattern:
- ()匹配不带参数的方法
- (..)匹配任意数量(零个或多个)的参数
- (*)模式与采用任何类型的一个参数的方法匹配
- (*,String)与采用两个参数的方法匹配。第一个可以是任何类型,而第二个必须是字符串
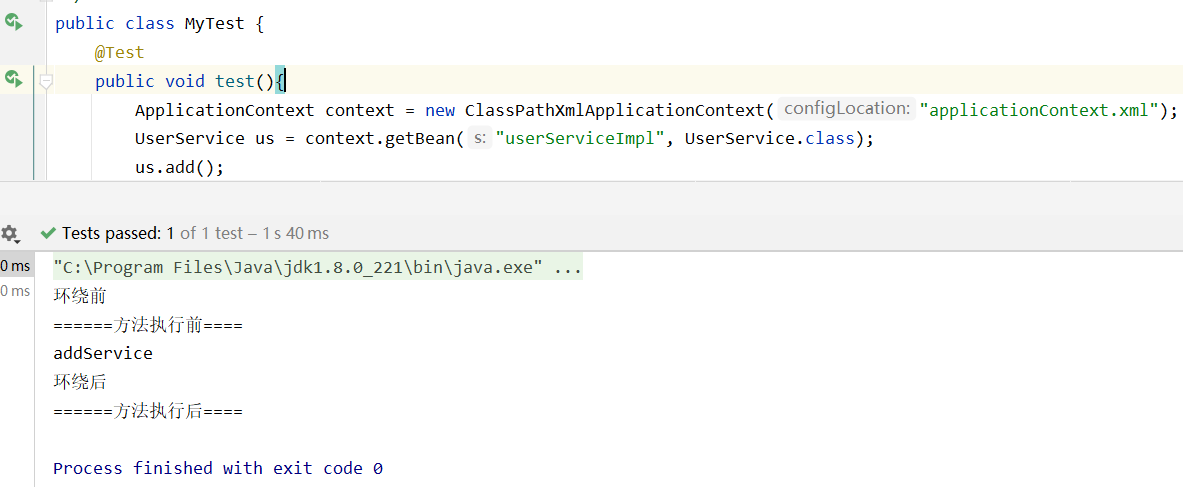
测试

方法二:自定义通知接口
自定义切面,在配置文件中将切面中的通知与切点表达式绑定
自定义切面
1 | public class DiyAspect { |
定义切入点&切面绑定
1 | <!--方式二:配置aop--> |
Test
方法三:注解实现AOP
利用内置注解,实现切面内的通知
由注解决定通知相对于主逻辑切点的位置
- @Before:前置通知
- @After:后置通知
- @AfterReturn:返回后通知
- @AfterThrowing:出现异常后通知
- @Around:环绕通知
自定义切面
1 |
|
开启注解支持 <aop:aspectj-autoproxy/>
切面注册到IoC容器
1 | <bean id="diyaspect" class="com.kuang.Aspect.AnnotationAspect" /> |
Test
Bean的生命周期
Spring Bean从创建到被销毁的过程,叫Bean的生命周期
定义Bean,创建BeanDefinition实例,BeanDefinition类中定义了很多属性用于描述Bean,如beanClass(Bean的类型),scope(一个Bean的作用范围),primary,islazy,dependsOn(创建之前所依赖的其他Bean),initMethodName(初始化方法)等
构造方法推断,最终选出一个构造方法
实例化,利用构造方法反射得到一个实例。在Spring中,可以通过
PostProcessor对Bean的实例化过程进行干预属性填充,被
@AutoWired或者@Resource注解的属性,需要进行属性填充初始化前,由
@PostConstruct注解的方法进行初始化前操作初始化:Spring提供了初始化机制,可以通过实现
InitializingBean接口中的afterpropertiesSet()方法或 由@Bean中initMethod属性指出初始化方法,完成Bean的自定义赋值或校验初始化后处理
如果当前Bean实现了
ApplicationListener接口,把它添加到事件监听器列表中若开启了AOP,则判断当前实例的中的方法是否是某一切面的切点,若是,则生成代理对象作为Bean,注册到Spring容器中
在初始化后,生成真正的Bean,将Bean注册到Spring容器以及缓存中
当Spring上下文销毁时,会将其中所有的Bean一并销毁
其中重要的部分是Bean的创建过程
Bean的创建大体步骤
1)利用Class的构造方法,反射得到对应的对象
graph LR
Class--实例化-->对象--?-->Bean
1 | //定义一个Bean |
2)给Bean中的属性赋值
graph LR
Class--实例化-->对象-->属性填充--?-->Bean
1 | //新定义一个 |
3)自定义部分属性的初始化
graph LR
C[Bean]
Class--实例化-->对象-->A["属性填充"]
A-->B["重写InitializingBean接口的afterProperties(初始化)"]
B--?-->C
A-->D["@PostConstruct注解的方法(初始化)"]
D--?-->C
1 | public class User{} |
4)若开启AOP且是切面的一个切点,则生成一个代理对象
graph LR
C[AOP]
Class--实例化-->对象-->A["属性填充"]
A-->B["重写InitializingBean接口的afterProperties(初始化)"]
B--?-->C
A-->D["@PostConstruct注解的方法(初始化)"]
D--?-->C
C-->代理对象--?-->Bean
1 |
|
判断是否进行AOP:
在定义一个切面时,会用 @Aspect ,@Component 注解切面,此时将切面的切点与当前实例进行比较。
若切点匹配成功,则进行动态代理,产生代理对象
1 | UserserviceProxy extends Userservice{ |
代理对象不做属性填充
Bean创建的完整步骤
- 推断构造方法——AutowiredAnnotationBeanPostProcessor
- 通过反射机制和构造器,生成实例
- 处理beanDefinition,找出可被填充的属性
- 属性填充
- 若有
@PostConstruct注解的方法,则进行相应的初始化前操作 - 初始化时:先调用实现了
InitializingBean接口的afterPropertiesSet()方法 ,再调用@Bean中的initMethod属性配置的初始化方法 - 初始化后会进行一些后处理,将实现了
ApplicationListener接口的Bean添加到事件监听器列表中 - 若开启了AOP,则判断当前实例是否是某一切面的切点,若是,则生成代理对象作为Bean,注册到Spring容器中
构造器推断
若有被 @Autowired 注解的构造器,则调用该构造器
若有参和无参构造方法同时存在,优先选无参构造器
若只有一个构造器,则使用唯一的构造器
若没有声明构造器,则用无参构造器
若没有无参构造器且有多个有参构造器,则抛出异常
单例Bean和单例模式
Spring容器中同一个类可以有多个不同名称的Bean
单例模式:一个类只有一个实例
单例Bean:一个Spring容器只有一个同类型的同名Bean
applicationContext.getBean("orderService")执行多次,得到的是同一个Bean
1 | //配置类 |
执行后,

属性填充
被 @Autowired 注解的属性,从Spring容器中找合适的Bean给属性赋值
- 先根据类型找(ByType)找到同类型的Bean
- 第一轮筛选,会剔除
@Bean(autowiredCandidate=false)的Bean - 若被
@Qualifier("")注解中指明Bean所在的目标分组,第二轮筛选会剔除不在该分组的Bean - 若有
@Primary注解的Bean,则选择主Bean注入 - 若
@Priority()设置了Bean的不同优先级,选择优先级最高的Bean注入 - 若ByType找到多个同类型的Bean,但ByName找不到Bean,则会报错
整合MyBatis
方式一
导包

1 | <dependencies> |
pojo
配置mybatis-config.xml
1 |
|
mapper.xml(数据访问层)
1 |
|
Spring整合Mybatis——spring-mybatis.xml
1 |
|
+从properties文件导入
1 | #db.properties |
1 | <beans xmlns:context="http://www.springframework.org/schema/context" |
mapperImpl
1 | public class UserMapperImpl implements UserMapper{ |
spring-mapper.xml——mapper层bean注入Spring
1 |
|
applicationContext.xml——Bean整合
1 |
|
测试
1 | ApplicationContext context = new ClassPathXmlApplicationContext("applicationContext.xml"); |
方式二
导包
1 | <dependencies> |
配置mybatis-config.xml
1 | <?xml version="1.0" encoding="UTF-8" ?> |
pojo
db.properties—>spring-mybatis.xml
1 | mysqlDriver=com.mysql.cj.jdbc.Driver |
1 |
|
mapper.java
mapper.xml
1 |
|
mapperImpl.java
继承 Spring的SqlSession类
1 | public class UserMapperImpl extends SqlSessionDaoSupport implements UserMapper { |
mapperImpl注册到Spring——springMapper.xml
1 |
|
整合Beans——applicationContext.xml
1 |
|
测试

声明式事务
事务
- 原子性
- 数据一致性、完整性问题
ACID:
原子性(Atom)
一致性(Consistent)
隔离性(Isolation):多个事务并发执行,防止数据损坏
持久性(durablity):事务一旦提交,无论系统发生什么问题,结果都不会被影响
1 | <!--userMapper.xml--> |
1 | public void op(){ |
- 虽然op执行失败,但addUser成功
声明式事务——AOP
1 | <bean id="transaction" class="org.springframework.jdbc.datasource.DataSourceTransactionManager"> |