前置知识:
Spring
Mybatis
学习视频:https://www.bilibili.com/video/BV1aE41167Tu?spm_id_from=333.999.0.0
SpringMVC执行流程
SpringMVC 传统MVC 导入依赖 1 2 3 4 5 6 7 8 9 10 11 12 13 14 15 16 17 18 19 20 21 22 23 24 25 26 <dependency > <groupId > junit</groupId > <artifactId > junit</artifactId > <version > 4.13</version > <scope > test</scope > </dependency > <dependency > <groupId > org.springframework</groupId > <artifactId > spring-webmvc</artifactId > <version > 5.3.3</version > </dependency > <dependency > <groupId > javax.servlet</groupId > <artifactId > servlet-api</artifactId > <version > 2.5</version > </dependency > <dependency > <groupId > javax.servlet.jsp</groupId > <artifactId > jsp-api</artifactId > <version > 2.1.3-b06</version > </dependency > <dependency > <groupId > javax.servlet</groupId > <artifactId > jstl</artifactId > <version > 1.2</version > </dependency >
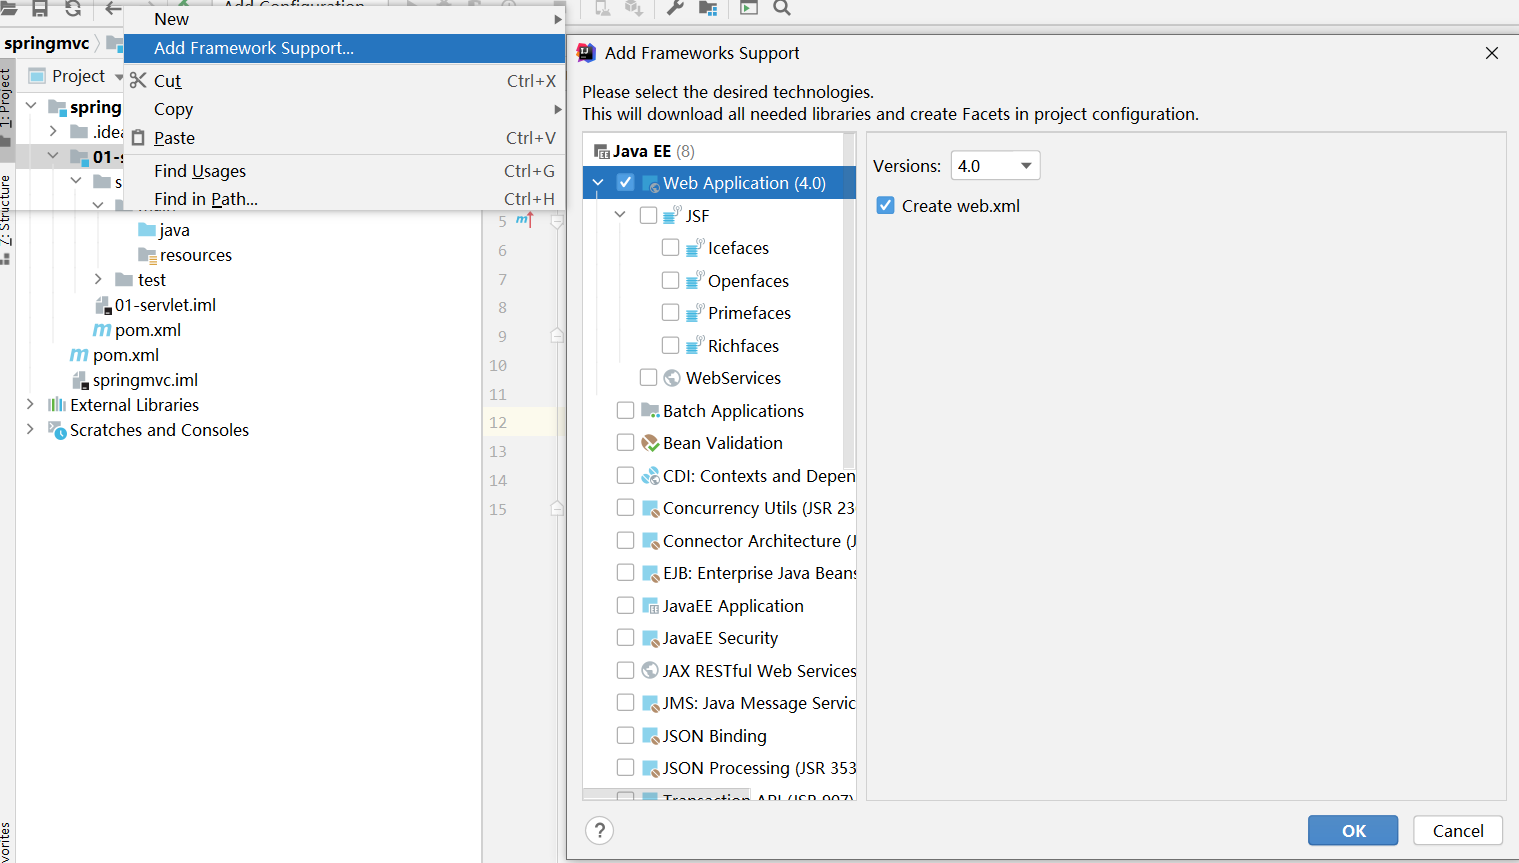
标记为web项目
代码 1 2 3 4 5 6 7 8 9 10 11 12 13 14 15 16 17 18 19 20 public class Hello extends HttpServlet { @Override protected void doGet (HttpServletRequest req, HttpServletResponse resp) throws ServletException, IOException { String method = req.getParameter("method" ); if (method.equals("add" )){ req.setAttribute("msg" ,"执行了add方法" ); } if (method.equals("delete" )){ req.setAttribute("msg" ,"执行了delete方法" ); } req.getRequestDispatcher("/WEB-INF/jsp/result.jsp" ).forward(req,resp); } @Override protected void doPost (HttpServletRequest req, HttpServletResponse resp) throws ServletException, IOException { doGet(req, resp); } }
1 2 3 4 5 6 7 8 9 10 11 12 13 14 15 16 17 18 19 20 21 22 23 <?xml version="1.0" encoding="UTF-8" ?> <web-app xmlns ="http://xmlns.jcp.org/xml/ns/javaee" xmlns:xsi ="http://www.w3.org/2001/XMLSchema-instance" xsi:schemaLocation ="http://xmlns.jcp.org/xml/ns/javaee http://xmlns.jcp.org/xml/ns/javaee/web-app_4_0.xsd" version ="4.0" > <servlet > <servlet-name > hello</servlet-name > <servlet-class > com.kuang.servlet.Hello</servlet-class > </servlet > <servlet-mapping > <servlet-name > hello</servlet-name > <url-pattern > /hello</url-pattern > </servlet-mapping > </web-app >
1 2 3 4 5 6 7 8 9 10 11 12 13 <!--index.jsp--> <%@ page contentType="text/html;charset=UTF-8" language="java" %> <html> <head> <title>Title</title> </head> <body> <form action="${pageContext.request.contextPath}/hello" method="post" > <input type="text" name="method" value="add" ></input> <input type="submit" /> </form> </body> </html>
1 2 3 4 5 6 7 8 9 10 <!--result.jsp--> <%@ page contentType="text/html;charset=UTF-8" language="java" %> <html> <head> <title>Title</title> </head> <body> ${msg} </body> </html>
MVC模式做的事:
将url映射到java类或java类的方法 ——servlet 封装用户提交的数据 ——DAO 处理请求—调用相关的业务处理—封装响应数据——Service 将相应的数据进行渲染,jsp/hetml等表示层数据——View SpringMVC简介 文档
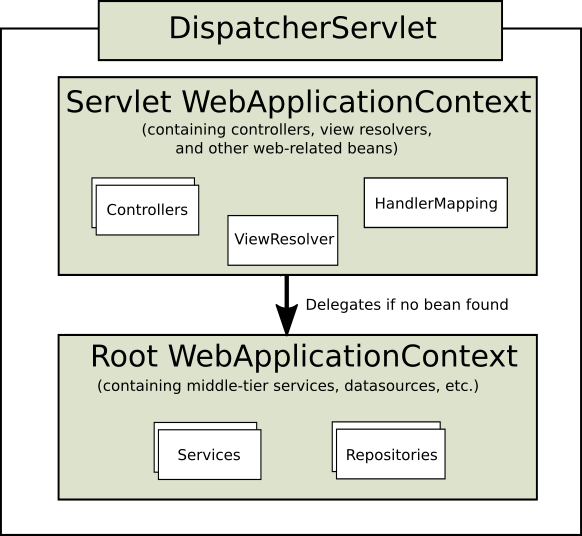
轻量级 基于请求响应的MVC框架 约定大于配置 功能强大:RESTful,数据验证,格式化,本地化,主体 Typical context hierarchy in Spring Web MVC
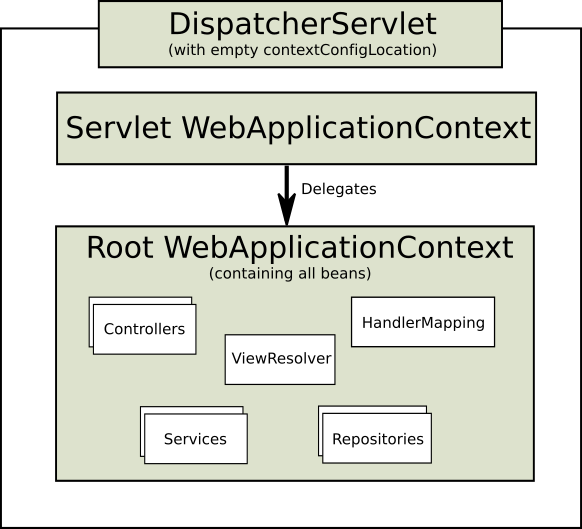
Single root context in Spring Web MVC
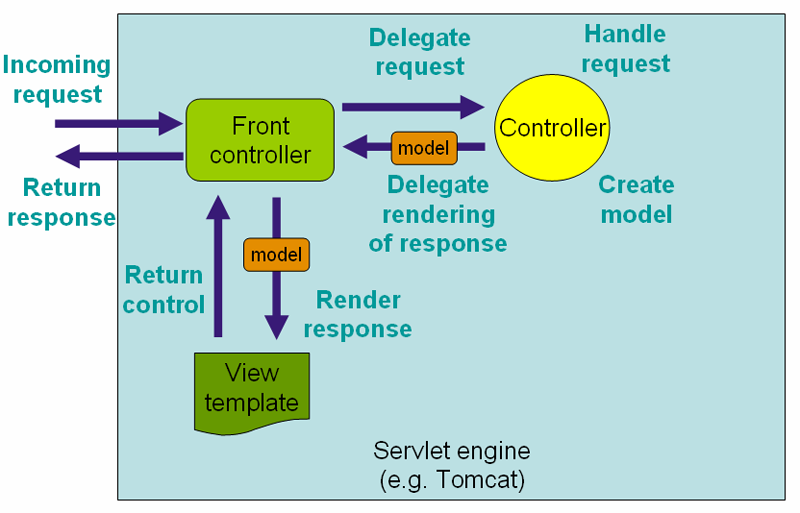
SpringMVC原理
Spring的web框架围绕 DispatcherServlet 设计,DispatcherServlet 将请求分发到不同的处理器
以请求为驱动,围绕一个中心Servlet(DispatcherServlet)分派请求及提供其他功能,DispatcherServlet继承自HttpServlet基类
用户发出请求,前置控制器DispatcherServet 接受请求,并根据配置信息拦截相应请求
DispatcherServlet 调用处理器映射器 HandlerMapping ,根据url找对应的处理器 HandlerExecution,并返回给 DispatcherServlet
HandlerExecution 表示具体的控制器
HandlerAdapter 表示处理器适配器,其 按照特定的规则去执行Handler ,适配Controller
Handler让具体的Controller执行
Controller将具体的执行信息封装为 ModelAndView实例 返回给 HandlerAdapter
调用业务层 封装对象,调用ModelAndView实例的addObject(attributeName:"",attributeValue:""); 将数据以键值对方式封装为Model 封装要跳转的视图,调用ModelAndView实例的 setViewName(viewName:""); 方法 设置视图层 View HandlerAdapter 将 ModelAndView实例 传递给 DispatcherServlet
DispatcherServlet 调用 视图解析器ViewResolver 来解析 HandlerAdapter 传递的 逻辑视图名 ,
1 2 3 4 5 6 7 <bean class ="org.springframework.web.servlet.view.InternalResourceViewResolver" id ="InternalResourceViewResolver" > <property name ="prefix" value ="/WEB-INF/jsp/" /> <property name ="suffix" value =".jsp" /> </bean >
视图解析器VierResolver 根据配置信息加前后缀变为 真实视图路径 并传给 DispatcherServlet
DispatcherServlet 根据视图解析器解析返回的结果,调用具体的视图,最终视图呈现给用户
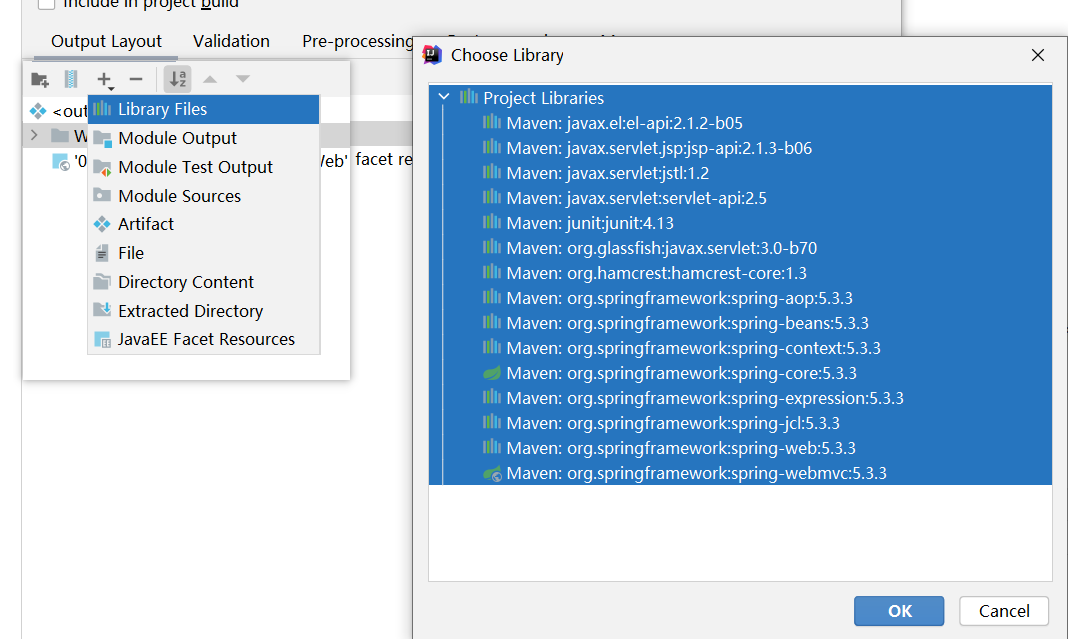
HelloSpringMVC 1. 新建项目&添加web支持&确保打包导入所依赖的lib文件
服务器端程序只有识别到war类型的压缩包才能部署
2. 导出rescoures下的xml文件 1 2 3 4 5 6 7 8 9 10 11 12 13 14 15 16 17 18 19 20 21 22 23 24 25 26 <build > <resources > <resource > <directory > src/main/java</directory > <includes > <include > **/*.properties</include > <include > **/*.xml</include > </includes > <filtering > true</filtering > </resource > <resource > <directory > src/main/resources</directory > <includes > <include > **/*.propertes</include > <include > **/*.xml</include > </includes > <filtering > true</filtering > </resource > </resources > </build >
3. 将项目标记为Web项目
4. 配置web.xml 1 2 3 4 5 6 7 8 9 10 11 12 13 14 15 16 17 18 19 20 21 22 23 24 25 26 27 28 29 30 31 32 33 34 35 36 37 <servlet > <servlet-name > dispatcherServlet</servlet-name > <servlet-class > org.springframework.web.servlet.DispatcherServlet</servlet-class > <init-param > <param-name > contextConfigLocation</param-name > <param-value > classpath:springmvc-servlet.xml</param-value > </init-param > <load-on-startup > 1</load-on-startup > </servlet > <servlet-mapping > <servlet-name > dispatcherServlet</servlet-name > <url-pattern > /</url-pattern > </servlet-mapping > <filter > <filter-name > encoding</filter-name > <filter-class > org.springframework.web.filter.CharacterEncodingFilter</filter-class > <init-param > <param-name > encoding</param-name > <param-value > utf-8</param-value > </init-param > </filter > <filter-mapping > <filter-name > encoding</filter-name > <url-pattern > /*</url-pattern > </filter-mapping >
xml配置版 1. SpringMVC的配置文件:resources/springmvc-servlet.xml : [servletname]-servlet.xml 1 2 3 4 5 6 7 8 9 10 11 12 13 14 15 16 17 18 19 20 21 22 <?xml version="1.0" encoding="UTF-8" ?> <beans xmlns ="http://www.springframework.org/schema/beans" xmlns:xsi ="http://www.w3.org/2001/XMLSchema-instance" xsi:schemaLocation ="http://www.springframework.org/schema/beans http://www.springframework.org/schema/beans/spring-beans.xsd" > <bean class ="org.springframework.web.servlet.handler.BeanNameUrlHandlerMapping" /> <bean class ="org.springframework.web.servlet.mvc.SimpleControllerHandlerAdapter" /> <bean class ="org.springframework.web.servlet.view.InternalResourceViewResolver" id ="InternalResourceViewResolver" > <property name ="prefix" value ="/WEB-INF/jsp/" /> <property name ="suffix" value =".jsp" /> </bean > </beans >
2. 编写操作业务Controller 1 2 3 4 5 6 7 8 9 10 11 12 13 14 15 16 17 18 19 package com.kuang.controller;import org.springframework.web.servlet.ModelAndView;import org.springframework.web.servlet.mvc.Controller;import javax.servlet.http.HttpServletRequest;import javax.servlet.http.HttpServletResponse;public class HelloController implements Controller { public ModelAndView handleRequest (HttpServletRequest request, HttpServletResponse response) throws Exception { ModelAndView mv = new ModelAndView (); mv.addObject("msg" ,"HelloSpringMVC!" ); mv.setViewName("hello" ); return mv; } }
3. springmvc-servlet.xml 1 2 <bean id ="/hello" class ="com.kuang.controller.HelloController" />
xml配置版弊端 每写一个Controller都要将对应的Bean添加到配置文件中 一个控制器中只有一个方法 注解版 1.配置控制器和处理器的自动装配 1 2 3 4 5 6 7 8 9 10 11 12 13 14 15 16 17 18 19 20 21 22 23 24 25 26 <?xml version="1.0" encoding="UTF-8" ?> <beans xmlns ="http://www.springframework.org/schema/beans" xmlns:xsi ="http://www.w3.org/2001/XMLSchema-instance" xmlns:context ="http://www.springframework.org/schema/context" xmlns:mvc ="http://www.springframework.org/schema/mvc" xsi:schemaLocation ="http://www.springframework.org/schema/beans http://www.springframework.org/schema/beans/spring-beans.xsd http://www.springframework.org/schema/context https://www.springframework.org/schema/context/spring-context.xsd http://www.springframework.org/schema/mvc https://www.springframework.org/schema/mvc/spring-mvc.xsd" > <context:component-scan base-package ="com.kuang.controller" /> <mvc:default-servlet-handler /> <mvc:annotation-driven /> <bean class ="org.springframework.web.servlet.view.InternalResourceViewResolver" > <property name ="prefix" value ="/WEB-INF/jsp/" /> <property name ="suffix" value =".jsp" /> </bean > </beans >
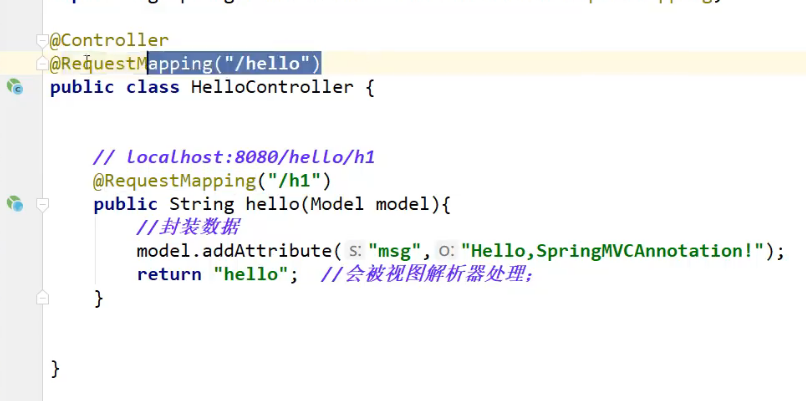
2. 统一配置控制器 1 2 3 4 5 6 7 8 9 10 11 12 13 14 15 16 17 18 19 20 21 22 23 24 25 26 27 package com.kuang.controller;import org.springframework.stereotype.Controller;import org.springframework.ui.Model;import org.springframework.web.bind.annotation.RequestMapping;@Controller public class FrontController { @RequestMapping("/hello1") public String hello1 (Model model) { model.addAttribute("msg" ,"Hello SpringMVC annotation!" ); return "hello1" ; } @RequestMapping("/hello2") public String hello2 (Model model) { model.addAttribute("msg" ,"Hello SpringMVC annotation!" ); return "hello2" ; } }
@Component
@Service
@Controller
@Repository
@RequestMapping用于映射url到控制器类或一个特定的处理程序方法 用于类上,表示类中所有响应的请求都是以该地址作为父路径
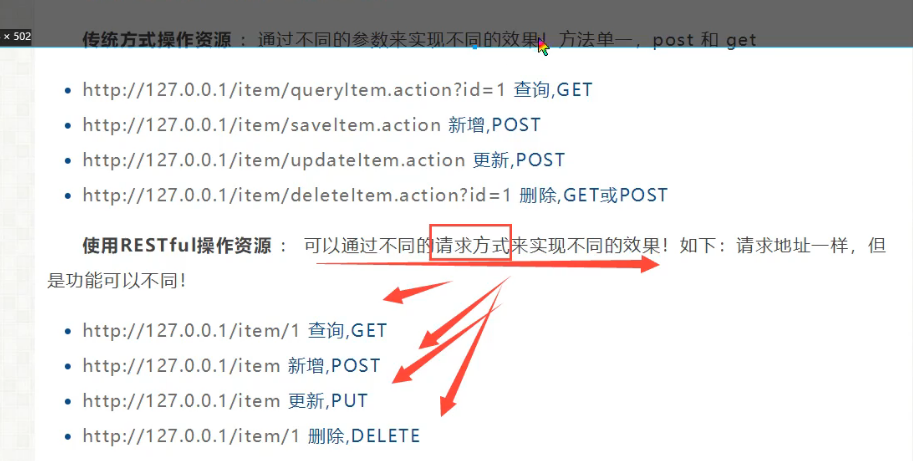
RestFul风格——参数传递 Restful是一个资源定位及资源操作的风格
功能 资源操作:使用POST,DELETE,PUT,GET不同方法对资源进行操作 对比 传统传参 :通过链接 中的参数判断操作类型
localhost:8090/method?flag= &
restful风格 :通过 请求方式 实现不同类型操作
localhost:8090/method/1/2/3/4
Restful传参 参数列表中的参数用@PathVariable注解,对应URI的参数
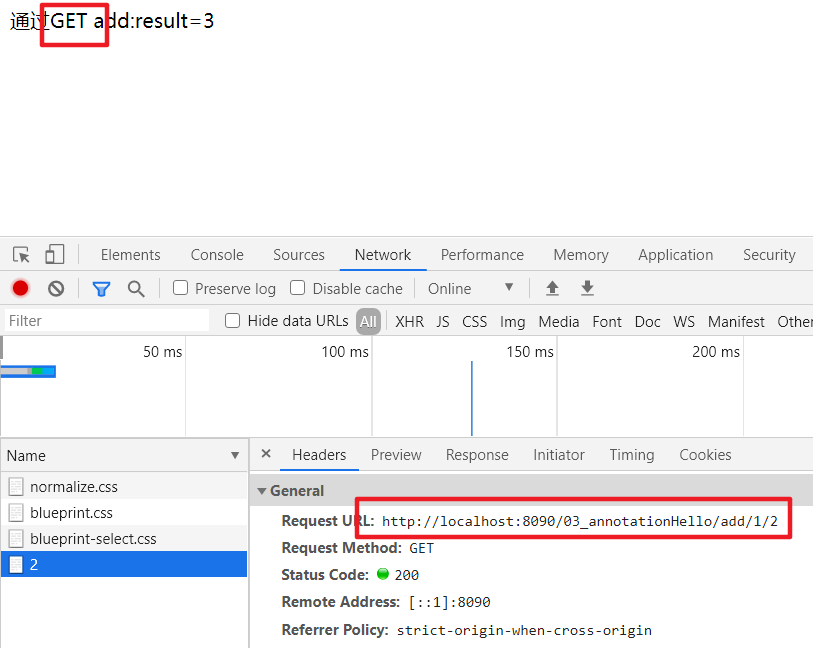
1 2 3 4 5 6 7 8 9 10 @RequestMapping("add/{a}/{b}") public String deliverParam (@PathVariable int a,@PathVariable int b, Model model) { model.addAttribute("result" ,a+b); return "result" ; }
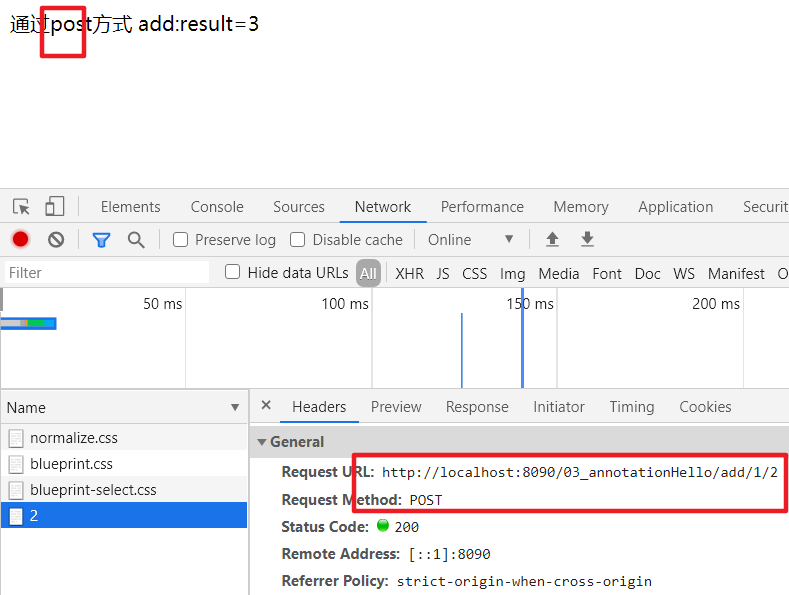
通过不同的请求方式传参 @[请求方式]Mapping(“[restful]”)
<==> @RequestMapping(value="[restful]",method=RequestMethod.[请求方式])
1 2 3 4 5 6 7 8 9 10 11 12 13 @RequestMapping(value = "add/{a}/{b}",method = RequestMethod.GET) public String deliverParam (@PathVariable int a,@PathVariable int b, Model model) { model.addAttribute("result" ,"通过GET add:result=" +(a+b)); return "result" ; } @PostMapping("add/{a}/{b}") public String deleverParam (@PathVariable int a,@PathVariable int b,Model model) { model.addAttribute("result" ,"通过post方式 add:result=" +(a+b)); return "result" ; }
接收参数 URI参数与Controller参数列表参数同名 提交数据:localhost:8090/hello?name=kuangshen
处理方法
1 2 3 4 5 @RequestMapping("/hello") public String hello (String name) { System.out.println(name); return "hello" ; }
URI参数与Controller参数列表参数不同名 提交数据:localhost:8090/hello?username=kuangshen
处理方法 @RequestParam("[域名称]")
1 2 3 4 5 @RequestMapping("/hello") public String hello (@RequestParam("username") String name) { System.out.println(name); return "hello" ; }
参数是对象 要求提交的表单域和对象的属性名一致
假设传递的是一个对象,逐一匹配对象中的字段名
实体类 1 2 3 4 5 public class User { private int id; private String name; private int age; }
提交数据
localhost:8090/hello?id=1&age=15&name=kuangshen
处理方法
1 2 3 4 5 @RequestMapping("/user") public String hello (User user) { System.out.println(user); return "hello" ; }
数据回显 Model :只适用于存储数据,简化了对于Model 对象的操作和理解
ModelMap :继承了LinkedMap,除了实现自身的一些方法,同时继承LinkedMap
ModelAndView :可以在存储数据的同时,进行设置返回的逻辑视图,进行控制展示层的跳转
Model 1 2 3 4 5 6 @PostMapping("add/{a}/{b}") public String deleverParam (@PathVariable int a,@PathVariable int b,Model model) { model.addAttribute("result" ,"通过post方式 add:result=" +(a+b)); return "result" ; }
ModelMap 1 2 3 4 5 6 @PostMapping("add/{a}/{b}") public String deleverParam (@PathVariable int a,@PathVariable int b,ModelMap modelMap) { modelMap.addAttribute("result" ,"通过post方式 add:result=" +(a+b)); return "result" ; }
ModelAndView 1 2 3 4 5 6 7 8 9 public class ControllerTest1 implements Controller { public ModelAndView handlerRequest (HttpServletRequest req,HttpServletResponse res) { ModelAndView mv = new ModelAndView (); mv.addObject("msg" ,"ControllerTest1" ); mv.setViewName("test" ); return mv; } }
结果跳转方式 设置ModelAndView对象,根据view的名称和视图解析器跳到指定的页面
页面:{视图解析器前缀} + viewName + {视图解析器后缀}
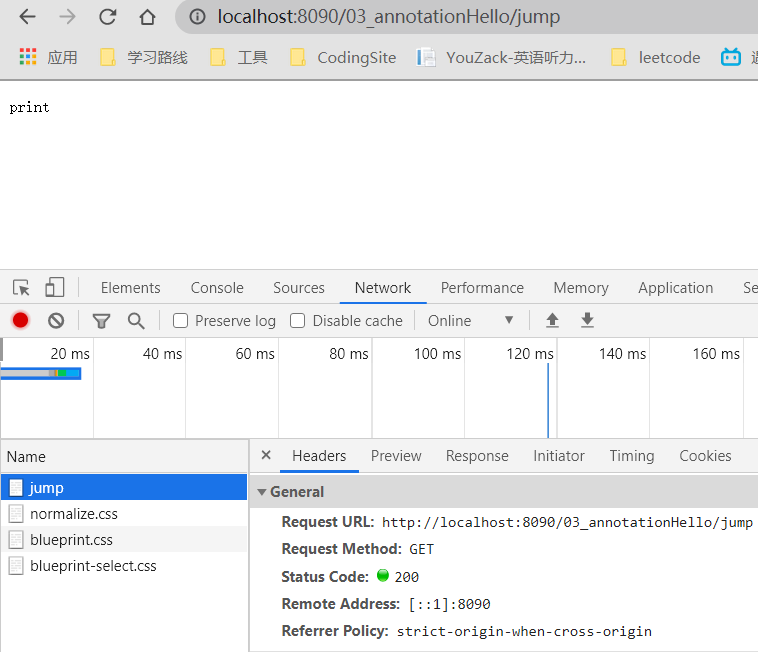
原生ServletAPI——不配置视图解析器 HttpServletResponse进行输出
1 2 3 4 @RequestMapping("/jump") public void test2 (HttpServletRequest request, HttpServletResponse response) throws IOException { response.getWriter().println("print" ); }
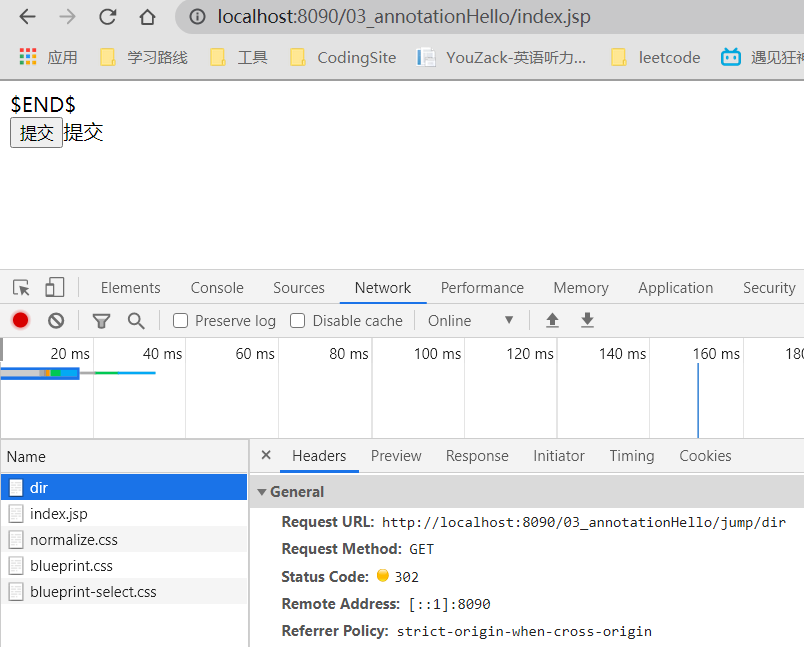
HttpServletResponse重定向
1 2 3 4 5 @RequestMapping("/jump/dir") public void test1 (HttpServletRequest request, HttpServletResponse response) throws IOException { response.sendRedirect("/03_annotationHello/index.jsp" ); }
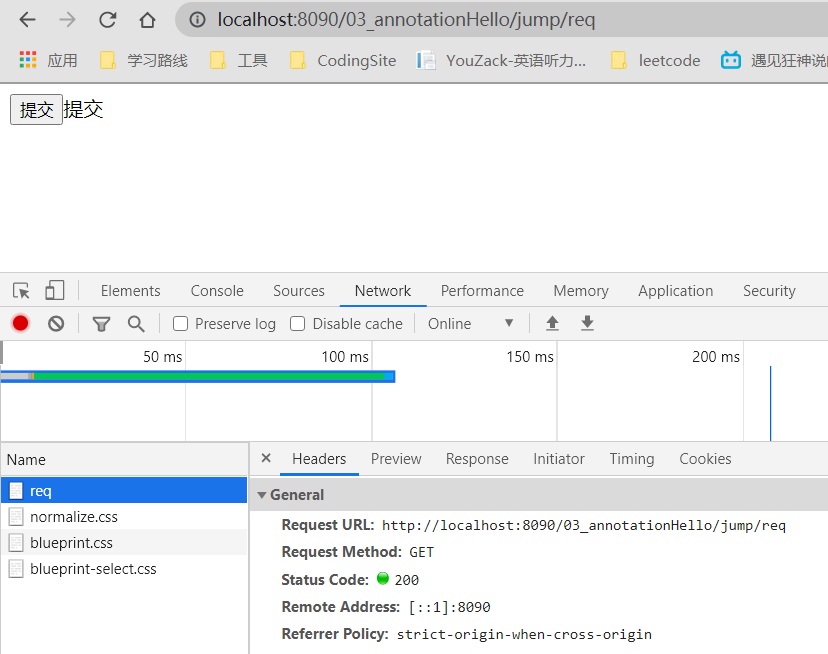
HttpServletResponse实现请求转发
1 2 3 4 5 @RequestMapping("/jump/req") public void test (HttpServletRequest request, HttpServletResponse response) throws ServletException, IOException { request.getRequestDispatcher("/WEB-INF/jsp/form.jsp" ).forward(request,response); }
SpringMVC配置视图解析器后 重定向
1 2 3 4 5 6 @RequestMapping("/mvcjump/res") public String test2 (Model model) { model.addAttribute("msg" ,"MVC Jump,sendRedirect" ); return "redirect:/index.jsp" ; }
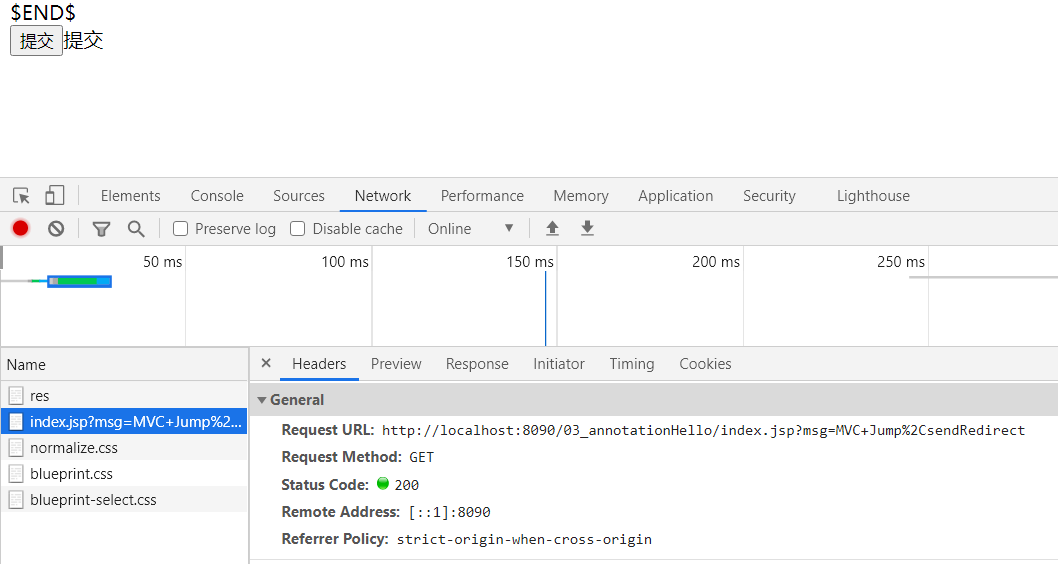
请求转发
1 2 3 4 5 @RequestMapping("/mvcjump/req") public String test1 (Model model) { model.addAttribute("msg" ,"MVC Jump,request dispatcher" ); return "forward:/WEB-INF/jsp/form.jsp" ; }
乱码问题 form表单传递的编码是 ISO8859,一旦传递就会出现乱码,所以需要过滤器 Filter 对请求的参数进行预处理
过滤器 1 2 3 4 5 6 7 @Override public void doFilter (ServletRequest request, ServletResponse response, FilterChain chain) throws IOException, ServletException { request.setCharacterEncoding("utf-8" ); response.setCharacterEncoding("utf-8" ); chain.doFilter(request, response); }
1 2 3 4 5 6 7 8 9 <filter > <filter-name > encoding</filter-name > <filter-class > com.kuang.filter.EncodingFilter</filter-class > </filter > <filter-mapping > <filter-name > encoding</filter-name > <url-pattern > /</url-pattern > </filter-mapping >
SringMVC实现的过滤器 1 2 3 4 5 6 7 8 9 10 11 12 13 <filter > <filter-name > encoding</filter-name > <filter-class > org.springframework.web.filter.CharacterEncodingFilter</filter-class > <init-param > <param-name > encoding</param-name > <param-value > utf-8</param-value > </init-param > </filter > <filter-mapping > <filter-name > encoding</filter-name > <url-pattern > /*</url-pattern > </filter-mapping >
Java生成JSON数据 Json JSON:JavaScript Object Notation 纯文本类型
轻量级数据交换格式——与XML相比
完全独立于编程语言的文本格式来存储和表示数据 简洁清晰的层次结构 易于人阅读和编写,同时也易于及其解析和生成,提升网络传输效率 1 2 3 4 5 6 7 8 9 <!--js对象--> var 变量名 = {key :value,key :value}基本数据类型,数组,对象 var student = {lastName :"张三" ,age :18 }<!--转换方法--> JSON = JSON .stringify (var )var = JSON .parse (JSON )
前后端分离:
后端部署后端:提供接口,提供数据
JSON
前端独立部署:渲染后端的数据
JSON本质上就是一个字符串
1 2 3 4 5 6 7 8 @RequestMapping("/j1") @ResponseBody public String test (Model model) { User user = new User ("啊1" ,12 ,"男" ); return user.toString(); }
@RestController使控制器转化为接口,直接返回JSON1 2 3 4 5 6 @RestController public class Json { @RequestMapping(value = "/j1") }
Jackson 导入Maven依赖 1 2 3 4 5 <dependency > <groupId > com.fasterxml.jackson.core</groupId > <artifactId > jackson-databind</artifactId > <version > 2.9.8</version > </dependency >
1 2 public String writeValueAsString (Object value) throws com.fasterxml.jackson.core.JsonProcessingException
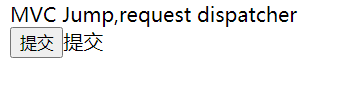
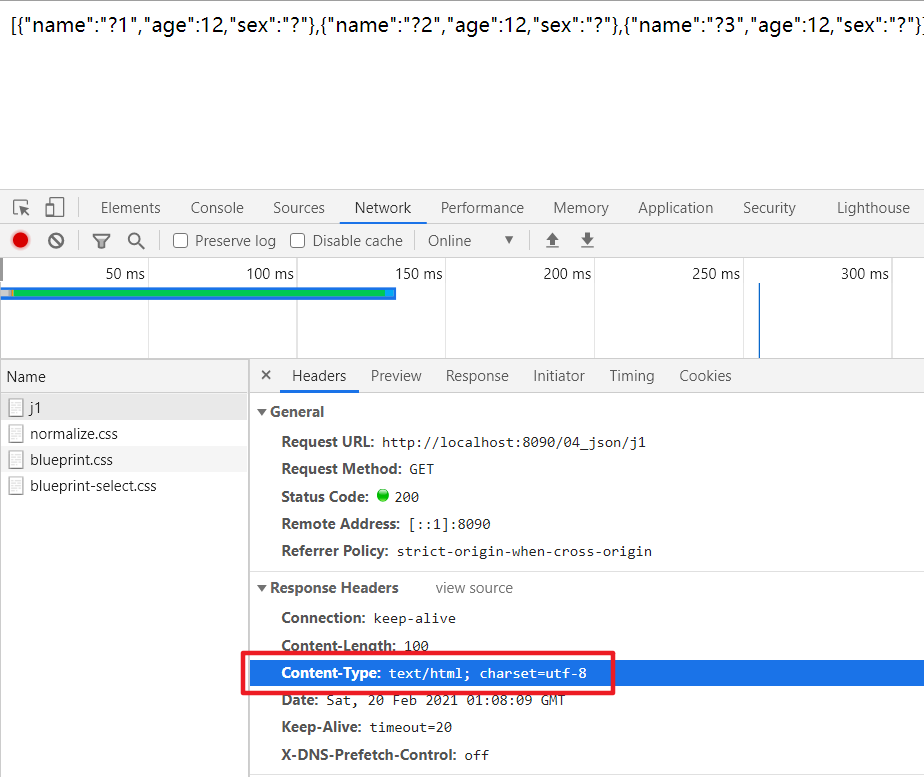
1 2 3 4 5 6 7 8 9 10 11 12 13 14 15 16 17 18 @RequestMapping("/j1") @ResponseBody public String test (Model model) throws JsonProcessingException { ObjectMapper objectMapper = new ObjectMapper (); User user = new User ("啊1" ,12 ,"男" ); User user1 = new User ("啊2" ,12 ,"男" ); User user2 = new User ("啊3" ,12 ,"男" ); List<User> list = new ArrayList <>(); list.add(user); list.add(user1); list.add(user2); String str = objectMapper.writeValueAsString(list); return str; }
解决中文乱码 设置响应体内容的类型
1 @RequestMapping(value = "/j1",produces = "application/json;charset=utf-8")
直接使用Jackson封装的转换器 1 2 3 4 5 6 7 8 9 10 11 12 13 14 <mvc:annotation-driven > <mvc:message-converters register-defaults ="true" > <bean class ="org.springframework.http.converter.StringHttpMessageConverter" > <constructor-arg value ="UTF-8" /> </bean > <bean class ="org.springframework.http.converter.json.MappingJackson2HttpMessageConverter" > <property name ="objectMapper" > <bean class ="org.springframework.http.converter.json.Jackson2ObjectMapperFactoryBean" > <property name ="failOnEmptyBeans" value ="false" /> </bean > </property > </bean > </mvc:message-converters > </mvc:annotation-driven >
封装工具类 1 2 3 4 5 6 7 8 9 @RequestMapping("/j2") public String test2 () throws JsonProcessingException { ObjectMapper objectMapper = new ObjectMapper (); SimpleDateFormat sdf = new SimpleDateFormat ("yyyy-MM-dd HH:mm:ss" ); return objectMapper.writeValueAsString(sdf.format(new Date ())); }
1 2 3 4 5 6 7 8 9 10 @RequestMapping("/j2") public String test2 () throws JsonProcessingException { ObjectMapper objectMapper = new ObjectMapper (); objectMapper.configure(SerializationFeature.WRITE_DATES_AS_TIMESTAMPS,false ); return objectMapper.writeValueAsString(new Date ()); }
JSONUtils 1 2 3 4 5 6 7 8 9 10 11 12 13 14 15 16 17 18 19 20 21 public class JSONUtils { public static String getJson (Object object) { return getJson(object,"yyyy-MM-dd HH:mm:ss" ); } public static String getJson (Object object,String dateFormat) { ObjectMapper objectMapper = new ObjectMapper (); objectMapper.configure(SerializationFeature.WRITE_DATES_AS_TIMESTAMPS,false ); SimpleDateFormat sdf = new SimpleDateFormat (dateFormat); objectMapper.setDateFormat(sdf); try { return objectMapper.writeValueAsString(object); } catch (JsonProcessingException e) { e.printStackTrace(); } return null ; } }
FastJson 阿里开发的专用于java开发的包,方便的实现json与JavaBean对象的相互转换,实现js对象与json的转换
Maven依赖 1 2 3 4 5 <dependency > <groupId > com.alibaba</groupId > <artifactId > fastjson</artifactId > <version > 1.2.60</version > </dependency >
JSONObject代表json对象JSONObject实现了Map接口 通过各种形式的get()方法可以获取json对象中的额数据,也可利用size(),isEmpty()等方法获取”键”:”值”对的个数和判断是否为空,其本质是实现Map接口并调用接口中的方法完成 JSONArrary代表json对象数组 JSON代表JSONObject和JSONArray的转化主要实现json对象,json对象数组,javabean对象,json字符串之间的相互转化 方法 JSON.toJSONString():java对象转JSON字符串 JSON.toJSON():java对象转js对象 JSON.parseObject(str,User.class):JSON字符串转java对象 JSON.toJavaObject(jsObject,User.class):JS对象转Java对象 SSM整合 JRE环境 问题:
java.sql.SQLException: No suitable driver
解决:
将mysql-connector-java-8.0.16.jar,放到 JAVA_HOME目录下的jre\lib\ext目录下
数据库环境 1 2 3 4 5 6 7 8 9 10 11 12 13 14 CREATE DATABASE `ssmbuild`; USE `ssmbuild`; DROP TABLE IF EXISTS `books`; CREATE TABLE `books` ( `bookID` INT(10) NOT NULL AUTO_INCREMENT COMMENT '书id', `bookName` VARCHAR(100) NOT NULL COMMENT '书名', `bookCounts` INT(11) NOT NULL COMMENT '数量', `detail` VARCHAR(200) NOT NULL COMMENT '描述', KEY `bookID` (`bookID`) ) ENGINE=INNODB DEFAULT CHARSET=utf8 INSERT INTO `books`(`bookID`,`bookName`,`bookCounts`,`detail`)VALUES (1,'Java',1,'从入门到放弃'), (2,'MySQL',10,'从删库到跑路'), (3,'Linux',5,'从进门到进牢');
Maven项目创建 1. 导入依赖 1 2 3 4 5 6 7 8 9 10 11 12 13 14 15 16 17 18 19 20 21 22 23 24 25 26 27 28 29 30 31 32 33 34 35 36 37 38 39 40 41 42 43 44 45 46 47 48 49 50 51 52 53 54 55 56 57 58 59 60 61 62 63 64 65 <dependencies > <dependency > <groupId > junit</groupId > <artifactId > junit</artifactId > <version > 4.13</version > </dependency > <dependency > <groupId > mysql</groupId > <artifactId > mysql-connector-java</artifactId > <version > 8.0.16</version > </dependency > <dependency > <groupId > com.mchange</groupId > <artifactId > c3p0</artifactId > <version > 0.9.5.5</version > </dependency > <dependency > <groupId > javax.servlet</groupId > <artifactId > servlet-api</artifactId > <version > 2.5</version > </dependency > <dependency > <groupId > javax.servlet.jsp</groupId > <artifactId > jsp-api</artifactId > <version > 2.1.3-b06</version > </dependency > <dependency > <groupId > javax.servlet</groupId > <artifactId > jstl</artifactId > <version > 1.2</version > </dependency > <dependency > <groupId > org.mybatis</groupId > <artifactId > mybatis</artifactId > <version > 3.5.6</version > </dependency > <dependency > <groupId > org.mybatis</groupId > <artifactId > mybatis-spring</artifactId > <version > 2.0.6</version > </dependency > <dependency > <groupId > org.springframework</groupId > <artifactId > spring-webmvc</artifactId > <version > 5.3.3</version > </dependency > <dependency > <groupId > org.springframework</groupId > <artifactId > spring-jdbc</artifactId > <version > 5.3.3</version > </dependency > </dependencies >
2. 静态资源配置 一些不在 resources文件夹下的配置文件,默认是不会被编译的,所以需要配置静态资源路径,讲这些文件添加到解析目录中
1 2 3 4 5 6 7 8 9 10 11 12 13 14 15 16 17 18 19 20 21 <build > <resources > <resource > <directory > src/main/java</directory > <includes > <include > **/*.properties</include > <include > **/*.xml</include > </includes > <filtering > false</filtering > </resource > <resource > <directory > src/main/resources</directory > <includes > <include > **/*.properties</include > <include > **/*.xml</include > </includes > <filtering > false</filtering > </resource > </resources > </build >
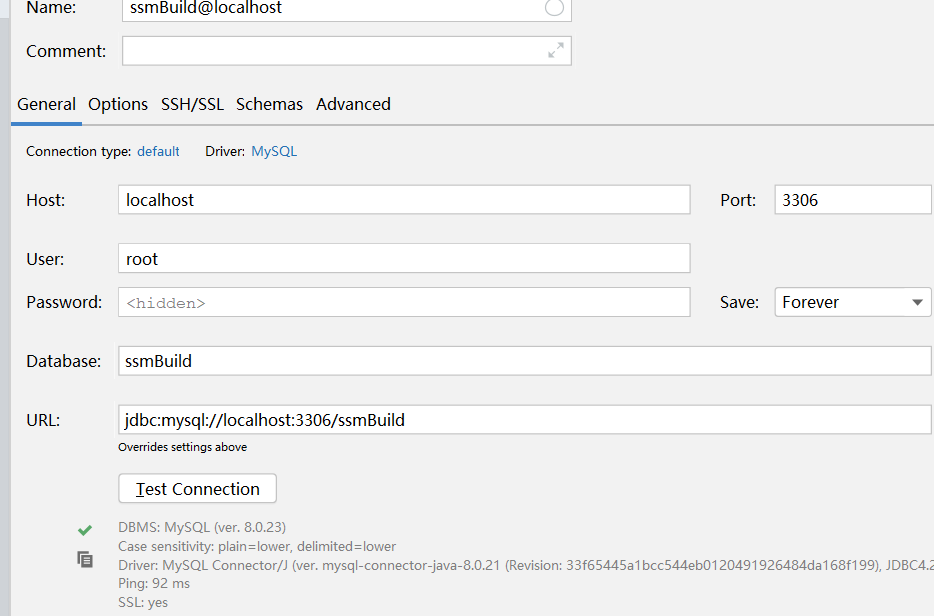
3. 连接数据库
4. 项目结构 1. pojo(entity) 1 2 3 4 5 6 7 8 9 @Data @AllArgsConstructor @NoArgsConstructor public class Books { private int bookID; private String bookName; private int bookCounts; private String detail; }
2. mapper 1 2 3 4 5 6 7 8 9 10 11 12 public interface BooksMapper { int addBook (Books books) ; int deleteBooksById (@Param("bookId") int id) ; int updateBook (Books books) ; Books selectBookById (@Param("bookId") int id) ; List<Books> selectAllBooks () ; }
1 2 3 4 5 6 7 8 9 10 11 12 13 14 15 16 17 18 19 20 <mapper namespace ="com.kuang.mapper.BooksMapper" > <insert id ="addBook" parameterType ="books" > insert into mybatis.ssmBuild (bookName,bookCounts,detail) values (#{bookName},#{bookCounts},#{detail}); </insert > <delete id ="deleteBooksById" > delete from mybatis.ssmBuild where bookID=#{bookId}; </delete > <update id ="updateBook" parameterType ="books" > update mybatis.ssmBuild set bookName=#{bookName},bookCounts=#{bookCounts},detail=#{detail} where bookID=#{bookID}; </update > <select id ="selectBookById" > select * from mybatis.ssmBuild where bookID=#{bookId}; </select > <select id ="selectAllBooks" resultType ="books" > select * from mybatis.ssmBuild; </select > </mapper >
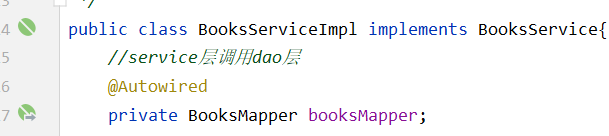
3. Service层调用mapper层 1 2 3 4 5 6 7 8 9 10 11 12 13 public interface BooksService { int addBook (Books books) ; int deleteBooksById (int id) ; int updateBook (Books books) ; Books selectBookById (int id) ; List<Books> selectAllBooks () ; }
1 2 3 4 5 6 7 8 9 10 11 12 13 14 15 16 17 18 19 20 21 22 23 24 25 26 27 28 29 30 31 32 33 34 public class BooksServiceImpl implements BooksService { private BooksMapper booksMapper; public void setBooksMapper (BooksMapper booksMapper) { this .booksMapper = booksMapper; } @Override public int addBook (Books books) { return booksMapper.addBook(books); } @Override public int deleteBooksById (int id) { return booksMapper.deleteBooksById(id); } @Override public int updateBook (Books books) { return booksMapper.updateBook(books); } @Override public Books selectBookById (int id) { return booksMapper.selectBookById(id); } @Override public List<Books> selectAllBooks () { return booksMapper.selectAllBooks(); } }
1 2 3 4 5 mysqlDriver =com.mysql.cj.jdbc.Driver mysqlUrl =jdbc:mysql://localhost:3306/mybatis?useSSL=true&useUnicode=true&characterEncoding=utf-8&serverTimezone=UTC root =root rootPassword =2017002231
1 2 3 4 5 6 7 8 9 10 11 12 13 14 15 16 <?xml version="1.0" encoding="UTF-8" ?> <!DOCTYPE configuration PUBLIC "-//mybatis.org//DTD Config 3.0//EN" "http://mybatis.org/dtd/mybatis-3-config.dtd" > <configuration > <typeAliases > <package name ="com.kuang.pojo" /> </typeAliases > </configuration >
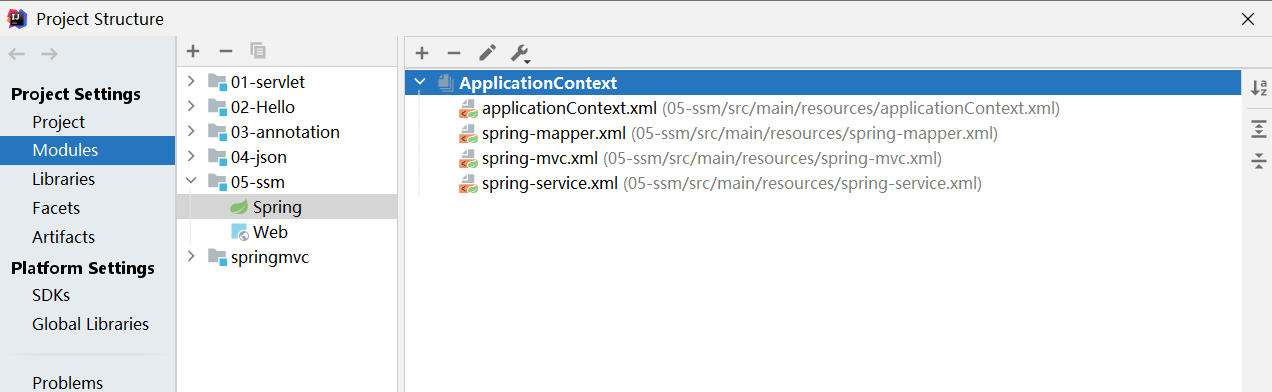
1 2 3 4 5 6 7 8 9 10 11 12 13 <?xml version="1.0" encoding="UTF-8" ?> <beans xmlns ="http://www.springframework.org/schema/beans" xmlns:xsi ="http://www.w3.org/2001/XMLSchema-instance" xsi:schemaLocation ="http://www.springframework.org/schema/beans http://www.springframework.org/schema/beans/spring-beans.xsd" > <import resource ="spring-mapper.xml" /> <import resource ="spring-service.xml" /> <import resource ="spring-mvc.xml" /> </beans >
Spring整合Mybatis 保证所有的spring配置文件属于同一Applicationcontext下 ,属于同一context下的资源可以被直接识别
spring-mapper.xml 1 2 3 4 5 6 7 8 9 10 11 12 13 14 15 16 17 18 19 20 21 22 23 24 25 26 27 28 29 30 31 32 33 34 35 36 37 38 39 40 41 42 43 44 45 46 47 48 49 <?xml version="1.0" encoding="UTF-8" ?> <beans xmlns ="http://www.springframework.org/schema/beans" xmlns:xsi ="http://www.w3.org/2001/XMLSchema-instance" xmlns:context ="http://www.springframework.org/schema/context" xsi:schemaLocation ="http://www.springframework.org/schema/beans http://www.springframework.org/schema/beans/spring-beans.xsd http://www.springframework.org/schema/context http://www.springframework.org/schema/context/spring-context.xsd" > <context:property-placeholder location ="db.properties" /> <bean id ="dataSource" class ="com.mchange.v2.c3p0.ComboPooledDataSource" > <property name ="dataSourceName" value ="${mysqlDriver}" /> <property name ="jdbcUrl" value ="${mysqlUrl}" /> <property name ="user" value ="${root}" /> <property name ="password" value ="${rootPassword}" /> <property name ="maxPoolSize" value ="30" /> <property name ="minPoolSize" value ="10" /> <property name ="autoCommitOnClose" value ="false" /> <property name ="checkoutTimeout" value ="10000" /> <property name ="acquireRetryAttempts" value ="2" /> </bean > <bean id ="sqlSessionFactory" class ="org.mybatis.spring.SqlSessionFactoryBean" > <property name ="dataSource" ref ="dataSource" /> <property name ="configLocation" value ="classpath:mybatis-config.xml" /> </bean > <bean class ="org.mybatis.spring.mapper.MapperScannerConfigurer" > <property name ="sqlSessionFactoryBeanName" value ="sqlSessionFactory" /> <property name ="basePackage" value ="com.kuang.mapper" /> </bean > </beans >
1. 关联数据库配置文件 1 2 <context:property-placeholder location ="db.properties" />
2. 连接池 1 2 3 4 5 6 7 8 9 10 11 12 13 14 15 16 17 18 19 20 21 22 23 24 25 26 27 28 29 <bean id ="datasource" class ="com.mchange.v2.c3p0.ComboPooledDataSource" > <property name ="dataSourceName" value ="${mysqlDriver}" /> <property name ="jdbcUrl" value ="${mysqlUrl}" /> <property name ="user" value ="${root}" /> <property name ="password" value ="${rootPassword}" /> <property name ="maxPoolSize" value ="30" /> <property name ="minPoolSize" value ="10" /> <property name ="autoCommitOnClose" value ="false" /> <property name ="checkoutTimeout" value ="10000" /> <property name ="acquireRetryAttempts" value ="2" /> </bean >
3. SqlSessionFactory(数据源+关联MyBatsi配置文件) 1 2 3 4 5 6 7 8 9 10 11 12 13 14 15 16 17 18 <bean id ="sqlSessionFactory" class ="org.mybatis.spring.SqlSessionFactoryBean" > <property name ="dataSource" ref ="datasource" /> <property name ="configLocation" value ="classpath:mybatis-config.xml" /> </bean >
4. 将Mapper层注入IoC容器 1 2 3 4 5 6 7 <bean class ="org.mybatis.spring.mapper.MapperScannerConfigurer" > <property name ="sqlSessionFactoryBeanName" value ="sqlSessionFactory" /> <property name ="basePackage" value ="com.kuang.mapper" /> </bean >
spring-service.xml 1 2 3 4 5 6 7 8 9 10 11 12 13 14 15 16 17 18 19 20 21 22 23 24 25 26 27 28 29 30 31 32 33 34 35 36 <?xml version="1.0" encoding="UTF-8" ?> <beans xmlns ="http://www.springframework.org/schema/beans" xmlns:xsi ="http://www.w3.org/2001/XMLSchema-instance" xmlns:context ="http://www.springframework.org/schema/context" xsi:schemaLocation ="http://www.springframework.org/schema/beans http://www.springframework.org/schema/beans/spring-beans.xsd http://www.springframework.org/schema/context http://www.springframework.org/schema/context/spring-context.xsd" > <context:component-scan base-package ="com.kuang.service" /> <bean id ="booksServiceImpl" class ="com.kuang.service.BooksServiceImpl" > <property name ="booksMapper" ref ="booksMapper" /> </bean > <bean class ="org.springframework.jdbc.datasource.DataSourceTransactionManager" id ="transactionManager" > <property name ="dataSource" ref ="dataSource" /> </bean > <tx:advice id ="txAdvice" transaction-manager ="transactionManager" > <tx:attributes > <tx:method name ="*" /> </tx:attributes > </tx:advice > <aop:config > <aop:pointcut id ="pc_tx" expression ="execution(* com.kuang.service.*.*(..))" /> <aop:advisor advice-ref ="txAdvice" pointcut-ref ="pc_tx" /> </aop:config > </beans >
1. 扫描service下的包 1 <context:component-scan base-package ="com.kuang.service" />
2. 将业务类注入到IoC容器 1 2 3 <bean id ="booksServiceImpl" class ="com.kuang.service.BooksServiceImpl" > <property name ="booksMapper" ref ="booksMapper" /> </bean >
自动装配booksMapper
3. 声明式事务配置 1 2 3 4 5 6 7 8 9 10 11 12 13 14 15 16 17 18 19 20 <bean class ="org.springframework.jdbc.datasource.DataSourceTransactionManager" id ="transactionManager" > <property name ="dataSource" ref ="datasource" /> </bean > <tx:advice id ="txAdvice" transaction-manager ="transactionManager" > <tx:attributes > <tx:method name ="*" /> </tx:attributes > </tx:advice > <aop:config > <aop:pointcut id ="pc_tx" expression ="execution(* com.kuang.service.*.*(..))" /> <aop:advisor advice-ref ="txAdvice" pointcut-ref ="pc_tx" /> </aop:config >
SpringMVC 1. 标记为web项目——web.xml 1 2 3 4 5 6 7 8 9 10 11 12 13 14 15 16 17 18 19 20 21 22 23 24 25 26 27 28 29 30 31 32 33 34 35 36 37 38 39 <?xml version="1.0" encoding="UTF-8" ?> <web-app xmlns ="http://xmlns.jcp.org/xml/ns/javaee" xmlns:xsi ="http://www.w3.org/2001/XMLSchema-instance" xsi:schemaLocation ="http://xmlns.jcp.org/xml/ns/javaee http://xmlns.jcp.org/xml/ns/javaee/web-app_4_0.xsd" version ="4.0" > <servlet > <servlet-name > dispatcherServlet</servlet-name > <servlet-class > org.springframework.web.servlet.DispatcherServlet</servlet-class > <init-param > <param-name > contextConfigLocation</param-name > <param-value > classpath:spring-mvc.xml</param-value > </init-param > <load-on-startup > 1</load-on-startup > </servlet > <servlet-mapping > <servlet-name > dispatcherServlet</servlet-name > <url-pattern > /</url-pattern > </servlet-mapping > <filter > <filter-name > encoding</filter-name > <filter-class > org.springframework.web.filter.CharacterEncodingFilter</filter-class > <init-param > <param-name > encoding</param-name > <param-value > utf-8</param-value > </init-param > </filter > <filter-mapping > <filter-name > encoding</filter-name > <url-pattern > /*</url-pattern > </filter-mapping > <session-config > <session-timeout > 15</session-timeout > </session-config > </web-app >
1. dispatcherServlet 2. 乱码过滤 3. session超时 2. spring-mvc配置 1 2 3 4 5 6 7 8 9 10 11 12 13 14 15 16 17 18 19 <?xml version="1.0" encoding="UTF-8" ?> <beans xmlns ="http://www.springframework.org/schema/beans" xmlns:xsi ="http://www.w3.org/2001/XMLSchema-instance" xmlns:mvc ="http://www.springframework.org/schema/mvc" xmlns:context ="http://www.springframework.org/schema/context" xsi:schemaLocation ="http://www.springframework.org/schema/beans http://www.springframework.org/schema/beans/spring-beans.xsd http://www.springframework.org/schema/mvc http://www.springframework.org/schema/mvc/spring-mvc.xsd http://www.springframework.org/schema/context http://www.springframework.org/schema/context/spring-context.xsd" > <mvc:default-servlet-handler /> <mvc:annotation-driven /> <context:component-scan base-package ="com.kuang.controller" /> <bean class ="org.springframework.web.servlet.view.InternalResourceViewResolver" > <property name ="suffix" value =".jsp" /> <property name ="prefix" value ="/WEB-INF/jsp/" /> </bean > </beans >
1. 默认的HandlerMapping,HandlerAdapter 2. 配置注解驱动 3. 扫描包:Controller 4. 视图解析器 CRUD 1 2 3 4 5 6 7 8 9 10 11 12 13 14 15 16 17 18 19 20 21 22 23 24 25 26 27 28 @Controller @RequestMapping("/book") public class BooksController { @Autowired @Qualifier("booksServiceImpl") private BooksService booksService; @RequestMapping("/allBook") public String list (Model model) { List<Books> list = booksService.selectAllBooks(); model.addAttribute("list" ,list); return "allBook" ; } @RequestMapping("/toAddBook") public String toAddBook () { return "addBook" ; } @RequestMapping("/addBook") public String addBook (Books book) { System.out.println(book); booksService.addBook(book); return "redirect:/book/allBook" ; } }
1 2 3 4 5 6 7 8 9 10 11 12 13 14 15 16 17 18 19 20 21 22 23 24 25 26 27 28 29 30 31 32 33 34 35 36 37 38 39 40 41 42 43 <%@ page contentType="text/html;charset=UTF-8" language="java" %> <html> <head> <title>Title</title> </head> <body> <c:forEach items="${list}" var ="it" > <div>${it.bookID}|《${it.bookName}》</div> <div>${it.bookCounts}</div> <div>${it.detail}</div> <div> <a href="${pageContext.request.contextPath}/book/toUpdateBook?id=${it.bookID}" >修改</a> | <a href="${pageContext.request.contextPath}/book/deleteBook/${it.bookID}" >删除</a> </div> <div>——————————————————————————————————————————</div> </c:forEach> </body> </html> <%@ page contentType="text/html;charset=UTF-8" language="java" %> <html> <head> <title>Title</title> </head> <body> <form action="${pageContext.request.contextPath}/book/addBook" method="post" > <div> <label for ="bkName" >书名</label> <input name="bookName" type="text" id="bkName" /> </div> <div> <label for ="cnt" >数量</label> <input name="bookCounts" type="text" id="cnt" /> </div> <div> <label for ="detail" >描述</label> <input name="detail" type="text" id="detail" /> </div> <input type="submit" /> </form> </body> </html>
1 2 3 4 5 6 7 8 9 10 11 12 13 14 15 16 17 18 19 20 21 @RequestMapping("/toUpdateBook") public String toupdateBook (int id,Model model) { Books book = booksService.selectBookById(id); model.addAttribute("book" ,book); return "updateBook" ; } @RequestMapping("/updateBook") public String updateBook (Books book) { booksService.updateBook(book); return "redirect:/book/allBook" ; } @RequestMapping("/deleteBook/{id}") public String deleteBook (@PathVariable int id) { booksService.deleteBooksById(id); return "redirect:/book/allBook" ; }
1 2 3 4 5 6 7 8 9 10 11 12 13 14 15 16 <!--updateBook.jsp--> <%@ page contentType="text/html;charset=UTF-8" language="java" %> <html> <head> <title>修改书籍信息</title> </head> <body> <form method="post" action="${pageContext.request.contextPath}/book/updateBook" > <input hidden name="bookID" value="${book.bookID}" /> <input name="bookName" value="${book.bookName}" /> <input name="bookCounts" value="${book.bookCounts}" /> <input name="detail" value="${book.detail}" /> <input type="submit" value="修改" /> </form> </body> </html>
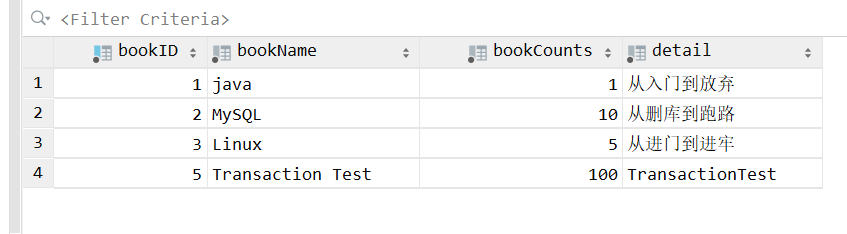
事务配置 1 2 3 4 5 6 7 8 9 10 11 12 @Override public int op () { Books newBook = new Books ("Transaction Test" ,100 ,"TransactionTest" ); booksMapper.addBook(newBook); booksMapper.errorDeleteBook(14 ); return 0 ; }
1 2 3 4 5 6 7 <delete id ="errorDeleteBook" > deletes from ssmBuild.books where bookID=#{bookId}; </delete >
错误的运行结果
事务织入——一般为service层配 1 2 3 4 5 <dependency > <groupId > org.aspectj</groupId > <artifactId > aspectjweaver</artifactId > <version > 1.9.4</version > </dependency >
哪一层需要事务支持,切入到那一层上 1 2 3 4 5 6 7 8 9 <tx:advice id ="txAdvice" transaction-manager ="transactionManager" > <tx:attributes > <tx:method name ="*" propagation ="REQUIRED" /> </tx:attributes > </tx:advice > <aop:config > <aop:pointcut id ="pc_tx" expression ="execution(* com.kuang.service.*.*(..))" /> <aop:advisor advice-ref ="txAdvice" pointcut-ref ="pc_tx" /> </aop:config >
注解配置声明式事务 1 <tx:annotation-driven transaction-manager ="c3transactionManager" />
哪一个方法涉及事务,注解到那个方法上 1 @Transactional(readOnly=false, propagation=Propagation.REQUIRED)
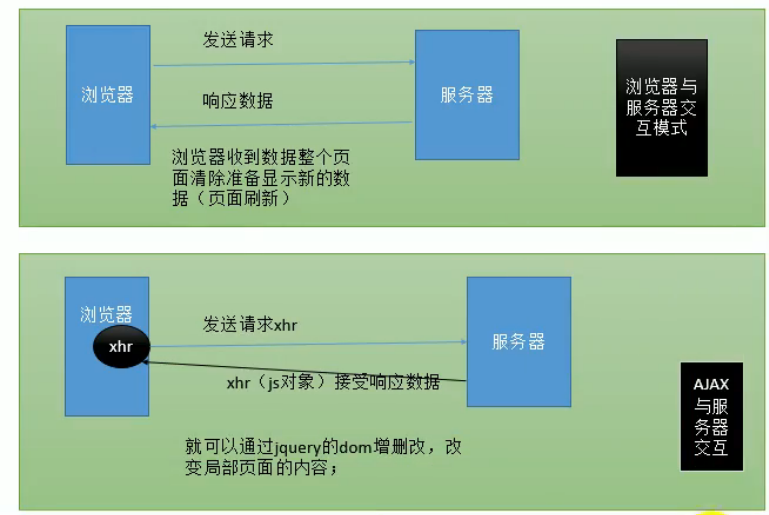
AJAX AJAX:Asynchronous JavaScript And XML 异步JavaScript和XML
页面不刷新获取服务器相应的数据
XmlHttpRequest对象 XmlHttpRequest发起请求
服务器收到请求,调用相应的Servlet进行处理,生成相应的响应信息
XmlHttpRequest接收数据
1 2 3 4 5 6 7 8 9 10 11 <!-- JS 原生AJAX --> var xhr = new XMLHttpRequest ();xhr.open ("GET" ,"路径" ,"true" ); xhr.send ();通过地道传输数据 xhr.onReadyStateChange = function ( if (xhr.readyState == 4 && xhr.status == 200 ){ document .getElementById ("" ).innerHTML = xhr.responseText ; } }
Jquery Ajax 1 2 3 4 5 6 7 8 9 10 11 12 13 14 15 16 17 18 19 20 21 22 $('#uid' ).click (function ( <!-- jquery封装AJAX --> $.get (url, [data], [callback], [type]) $.get ("${ctp}/getInfo" ,{待发送的数据对象},function ([存储回调数据的变量] ){}) $.post (url, [data], [callback], [type]) 若[type]为“json”,则jquery会自动转化为JSON 对象 $.ajax ({ url :"路径" , type :"GET" /"POST" , data :{}, success :function (data ){}, dataType :"json" , error :function (a,b ){} }); return false ; })
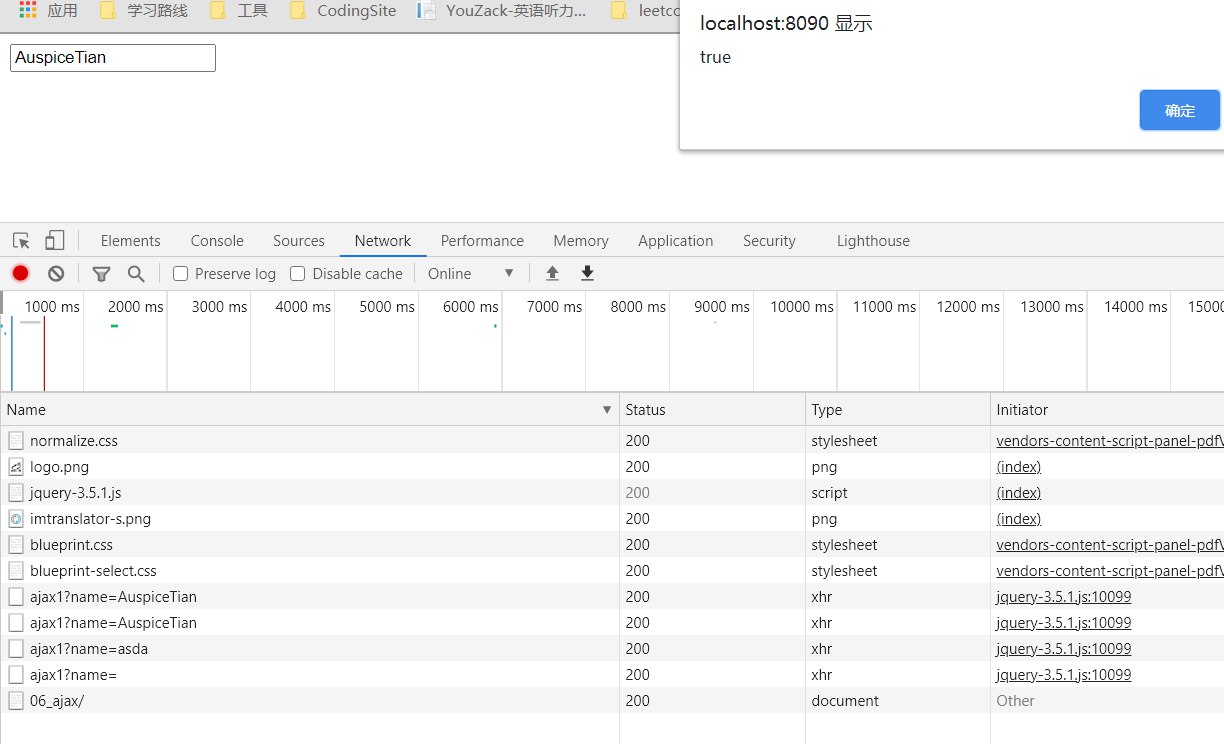
参数——基本数据类型 1 2 3 4 5 6 7 8 9 10 11 12 13 @RestController public class AjaxController { @RequestMapping("/ajax1") public String ajax1 (String name) { System.out.println("userName=>" +name); if ("AuspiceTian" .equals(name)){ return "true" ; }else { return "false" ; } } }
1 2 3 4 5 6 7 8 9 10 11 12 13 14 15 16 17 18 19 20 21 22 <%@ page contentType="text/html;charset=UTF-8" language="java" %> <html> <head> <title>$Title$</title> <script src="${pageContext.request.contextPath}/js/jquery-3.5.1.js" ></script> <script type="text/javascript" > function go () { $.ajax({ url:"${pageContext.request.contextPath}/ajax1" , data:{"name" :$("#username" ).val()}, success(data){ alert(data); } }) } </script> </head> <body> <input id="username" type="test" onblur="go()" /> </body> </html>
HTML+css+js
ES6:import、require
参数——POJO 1 2 3 4 5 6 7 8 9 @RequestMapping("/ajax2") public List<Pojo> ajax2 () { List<Pojo> list = new ArrayList <Pojo>(); list.add(new Pojo ("狂神说Java" ,1 ,"男" )); list.add(new Pojo ("狂神说前端" ,1 ,"女" )); list.add(new Pojo ("狂神说Spring" ,1 ,"男" )); return list; }
1 2 3 4 5 6 7 8 9 10 11 12 13 14 15 16 17 18 19 20 21 22 23 24 25 26 27 28 29 30 31 32 33 34 35 36 37 38 39 40 <%@ page contentType="text/html;charset=UTF-8" language="java" %> <html> <head> <title>$Title$</title> <script src="${pageContext.request.contextPath}/js/jquery-3.5.1.js" ></script> <script type="text/javascript" > function loadData () { $.ajax({ url: "${pageContext.request.contextPath}/ajax2" , success(data){ var html = "" ; for (let i = 0 ;i < data.length;++i){ html += "<tr>" + "<td>" +data[i].name+"</td>" + "<td>" +data[i].age+"</td>" + "<td>" +data[i].sex+"</td>" + "</tr>" ; } $("#content" ).html(html) } }) } </script> </head> <body> <div> <input type="button" onclick="loadData()" value="获取数据" /> </div> <table> <tr> <td>名称</td> <td>年龄</td> <td>性别</td> </tr> <tbody id="content" ></tbody> </table> </body> </html>
拦截器 过滤器
servlet规范中的一部分,任何java web工程 都适用 在url-pattern中配置了/*后,可以对所有要访问的资源进行过滤处理 拦截器
拦截器是AOP思想的具体应用 环绕(AroundAdvice)+方法执行后(AfterAdvice)
只要实现了HandlerInterceptor即为拦截器
1 2 3 4 5 6 7 8 9 <mvc:interceptors > <mvc:interceptor > <mvc:mapping path ="/**" /> <bean class ="com.kuang.config.MyInterceptor" /> </mvc:interceptor > </mvc:interceptors >
1 2 3 4 5 6 7 8 9 10 11 12 13 14 15 16 17 18 19 20 21 22 23 24 public class MyInterceptor implements HandlerInterceptor { @Override public boolean preHandle (HttpServletRequest request, HttpServletResponse response, Object handler) throws Exception { System.out.println("============所有页面的拦截器==========" ); response.sendRedirect(request.getContextPath()+"/index.jsp" ); return false ; } @Override public void postHandle (HttpServletRequest request, HttpServletResponse response, Object handler, ModelAndView modelAndView) throws Exception { System.out.println("==============日志功能============" ); } @Override public void afterCompletion (HttpServletRequest request, HttpServletResponse response, Object handler, Exception ex) throws Exception { System.out.println("================清理日志=============" ); } }
文件上传和下载 前端表单要求:
method设置为POST ,enctype设置为multipart/form-data 。只有在这样的情况下,浏览器才会把用户选择的文件以二进制数据发送给服务器;
1 2 3 4 <form action="${pageContext.request.contextPath}/upload" enctype="multipart/form-data" method="post" > <input type="file" name="file" /> <input type="submit" value="upload" > </form>
导入依赖 1 2 3 4 5 6 7 8 9 10 11 12 <dependency > <groupId > commons-fileupload</groupId > <artifactId > commons-fileupload</artifactId > <version > 1.3.3</version > </dependency > <dependency > <groupId > javax.servlet</groupId > <artifactId > javax.servlet-api</artifactId > <version > 4.0.1</version > </dependency >
文件上传 1. 配置bean:multipartResolver 注意!!!这个bena的id必须为:multipartResolver , 否则上传文件会报400的错误!
1 2 3 4 5 6 7 8 <bean id ="multipartResolver" class ="org.springframework.web.multipart.commons.CommonsMultipartResolver" > <property name ="defaultEncoding" value ="utf-8" /> <property name ="maxUploadSize" value ="10485760" /> <property name ="maxInMemorySize" value ="40960" /> </bean >
CommonsMultipartFile 的 常用方法:
String getOriginalFilename():获取上传文件的原名 InputStream getInputStream():获取文件流 void transferTo(File dest):将上传文件保存到一个目录文件中 2. Controller 1. 上传实现 1 2 3 4 5 6 7 8 9 10 11 12 13 14 15 16 17 18 19 20 21 22 23 24 25 26 27 28 29 30 31 32 33 34 35 36 37 38 39 40 41 42 43 44 45 46 package com.chen.controller;import org.springframework.stereotype.Controller;import org.springframework.web.bind.annotation.RequestMapping;import org.springframework.web.bind.annotation.RequestParam;import org.springframework.web.multipart.commons.CommonsMultipartFile;import javax.servlet.http.HttpServletRequest;import java.io.*;@Controller public class FileController { @RequestMapping("/upload") public String fileUpload (@RequestParam("file") CommonsMultipartFile file ,HttpServletRequest request) throws IOException { String uploadFileName = file.getOriginalFilename(); if ("" .equals(uploadFileName)){ return "redirect:/index.jsp" ; } System.out.println("上传文件名 : " +uploadFileName); String path = request.getServletContext().getRealPath("/upload" ); File realPath = new File (path); if (!realPath.exists()){ realPath.mkdir(); } System.out.println("上传文件保存地址:" +realPath); InputStream is = file.getInputStream(); OutputStream os = new FileOutputStream (new File (realPath,uploadFileName)); int len=0 ; byte [] buffer = new byte [1024 ]; while ((len=is.read(buffer))!=-1 ){ os.write(buffer,0 ,len); os.flush(); } os.close(); is.close(); return "redirect:/index.jsp" ; } }
2. 采用file.Transto 来保存上传的文件 1 2 3 4 5 6 7 8 9 10 11 12 13 14 15 16 17 @RequestMapping("/upload2") public String fileUpload2 (@RequestParam("file") CommonsMultipartFile file,HttpServletRequest request) throws IOException { String path = request.getServletContext().getRealPath("/upload" ); File realPath = new File (path); if (!realPath.exists()){ realPath.mkdir(); } System.out.println("上传文件保存地址:" +realPath); file.transferTo(new File (realPath +"/" + file.getOriginalFilename())); return "redirect:/index.jsp" ; }
文件下载 文件下载步骤:
1、设置 response 响应头
2、读取文件 — InputStream
3、写出文件 — OutputStream
4、执行操作
5、关闭流 (先开后关)
1 2 3 4 5 6 7 8 9 10 11 12 13 14 15 16 17 18 19 20 21 22 23 24 25 26 27 28 29 30 31 32 @RequestMapping(value="/download") public String downloads (HttpServletResponse response ,HttpServletRequest request) throws Exception{ String path = request.getServletContext().getRealPath("/upload" ); String fileName = "基础语法.jpg" ; response.reset(); response.setCharacterEncoding("UTF-8" ); response.setContentType("multipart/form-data" ); response.setHeader("Content-Disposition" , "attachment;fileName=" +URLEncoder.encode(fileName, "UTF-8" )); File file = new File (path,fileName); InputStream input=new FileInputStream (file); OutputStream out = response.getOutputStream(); byte [] buff =new byte [1024 ]; int index=0 ; while ((index= input.read(buff))!= -1 ){ out.write(buff, 0 , index); out.flush(); } out.close(); input.close(); return null ; }
1 <a href="${pageContext.request.contextPath}/download" >点击下载</a>