0%

SpringBoot

前置知识:

Spring

Mybatis

SpringMVC

学习视频:https://www.bilibili.com/video/BV1PE411i7CV?spm_id_from=333.337.search-card.all.click

自动装配原理

SpringBoot是企业级开发的整体整合解决方案,特别用于快速构建微服务应用,旨在用最简单的方式让开发人员适应各种开发场景

本视频着重介绍SpringBoot的使用和内部原理;

内容包含微服务概念、配置文件、日志框架的使用、web开发、Thymeleaf模板引擎、Docker容器技术教程由springboot核心技术+整合篇组成

SpringBoot

graph LR
A[SpringBoot]-->是什么
A-->配置如何编写
A-->自动装配原理:重要
A-->继承web开发:业务开发
A-->继承数据库Druid
A-->c["分布式开发:Dubbo(RPC接口风格)+zookeeper"]
A-->swagger:接口文档
A-->任务调度
A-->SpringSecurity,拦截器,shiro

简介

SpringBoot:简化Spring应用的配置文件,使用嵌入式Tomcat,含诸多开箱即用的微服务组件

Spring Cloud:为开发者提供了微服务动态访问与控制的开发工具包

一个SpringBoot项目就是让Spring启动的项目。过去要启动一个Spring项目,需要配置很多的xml文件,使用SpringBoot之后,可以极大地简化配置过程。

SpringBoot将所有功能场景封装为一个个的启动器,在开发中只需要导入相应的启动器,启动器就会帮我们导入该场景所需要的带有默认配置的组件,让开发过程专注于业务逻辑。

类比一下,Maven管理所以的jar包,docker整合了所有环境,SpringBoot整合了所有框架

启动器

1
2
3
4
5
<!--启动器-->
<dependency>
<groupId>org.springframework.boot</groupId>
<artifactId>spring-boot-starter</artifactId>
</dependency>

启动器:Springboot的启动场景,需要什么功能,找对应的启动器即可

启动器

eg:spring-boot-starter-web :会自动导入web环境相关的所有依赖

两大特点

开箱即用

在开发过程中,通过maven项目的pom配置文件添加相关依赖包,然后通过注解代替xml配置以管理Bean的生命周期

约定大于配置

由SpringBoot本身来配置目标结构,由开发者在结构中添加信息的结构标准

优点

  • 快速创建独立运行的Spring项目以及主流框架集成
  • 使用嵌入式Servlet容器,应用无需打成war包,jar包即可
  • 由starters完成自动依赖与版本控制
  • 大量的自动配置,简化开发,也可修改默认值
  • 无需配置XML,无代码生成,开箱即用
  • 准生产环境的运行时应用监控
  • 与云计算天然继承

Spring如何构建微服务

  • 通过SpringBoot快速构建一个个功能独立的微服务应用单元
  • 大新分布式网络服务的调用,由SpringCloud完成,实现分布式
  • 在分布式中间,进行流式数据计算,批处理,spring cloud data flow

Hello程序

0. 环境

修改主类位置

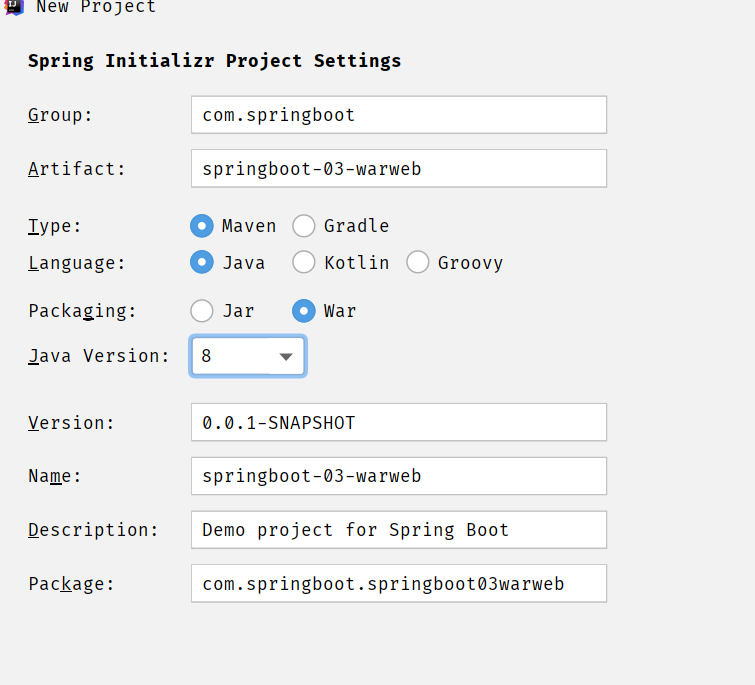
image-20210225121311369

重启idea后解决

Maven
1
2
3
4
5
6
7
8
9
10
11
12
13
14
<profiles>
<profile>
<id>development</id>
<activation>
<jdk>1.8</jdk>
<activeByDefault>true</activeByDefault>
</activation>
<properties>
<maven.compiler.source>1.8</maven.compiler.source>
<maven.compiler.target>1.8</maven.compiler.target>
<maven.compiler.compilerVersion>1.8</maven.compiler.compilerVersion>
</properties>
</profile>
</profiles>

image-20210225103909848

1. 新建Project

1
2
3
4
5
6
7
8
9
10
11
12
13
14
15
16
17
18
19
20
21
22
23
24
25
26
27
<dependencies>
<!--启动器-->
<dependency>
<groupId>org.springframework.boot</groupId>
<artifactId>spring-boot-starter</artifactId>
</dependency>
<dependency>
<groupId>org.springframework.boot</groupId>
<artifactId>spring-boot-starter-web</artifactId>
</dependency>
<!--junit-->
<dependency>
<groupId>org.springframework.boot</groupId>
<artifactId>spring-boot-starter-test</artifactId>
<scope>test</scope>
</dependency>
</dependencies>

<!--maven项目-->
<build>
<plugins>
<plugin>
<groupId>org.springframework.boot</groupId>
<artifactId>spring-boot-maven-plugin</artifactId>
</plugin>
</plugins>
</build>
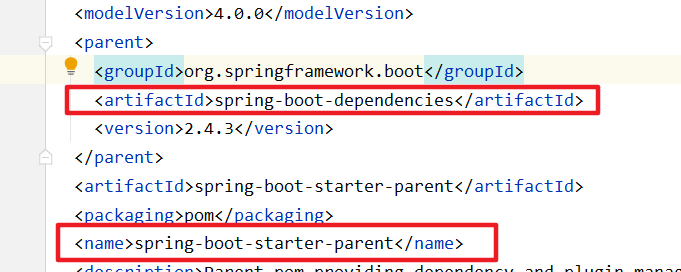
  • <parent> : 继承 spring-boot-starter-parent 的依赖管理,控制版本与打包等内容

    • 即继承spring-boot-dependencies:所有依赖版本控制

      image-20210222221540572

    • 引入SpringBoot依赖时,不需要指定版本,因为有版本仓库

  • 项目元数据信息:创建时的Project Metadata部分,包括groupid,artifactedId,version,name,description等

  • dependencies:项目具体依赖

    • spring-boot-starter-web 用于实现web应用
      • SpringMVC
      • RESTful
      • Tomcat作为默认的嵌入式容器
    • spring-boot-starter-test用于编写单元测试的依赖包
  • build:项目构建配置

    • spring-boot-maven-plugin:配合 Spring-boot-starter-parent将SpringBoot应用打包成JAR直接运行

2.标注主程序类

1
2
3
4
5
6
7
@SpringBootApplication
public class HelloWorldApplication(){
public static void main(String[] args){
//Spring应用启动
SpringApplication.run(HelloWorldApplicatio,args)
}
}
  • @SpringBootApplication,说明这个类是SpringBoot的主配置类

3. 导入web依赖

1
2
3
4
<dependency>
<groupId>org.springframework.boot</groupId>
<artifactId>spring-boot-starter-web</artifactId>
</dependency>
1
2
3
4
5
6
7
8
9
10
@Controller
@RequestMapping("/hello")
public class HelloController {

@RequestMapping("/hello")
@ResponseBody
public String test(){
return "Hello";
}
}

4. 改端口号

application.properties

1
2
#更改端口号
server.port=8081

5.部署

将应用打包成可执行的jar包

1
2
3
4
5
6
7
8
<build>
<plugins>
<plugin>
<groupId>org.springframework.boot</groupId>
<artifactId>spring-boot-maven-plugin</artifactId>
</plugin>
</plugins>
</build>

image-20210225112938454

image-20210225113002016

自动装配

自动装配示例

需求:定义一个注解,让使用了这个注解的应用程序自动化地注入一些类或者做一些底层的事情
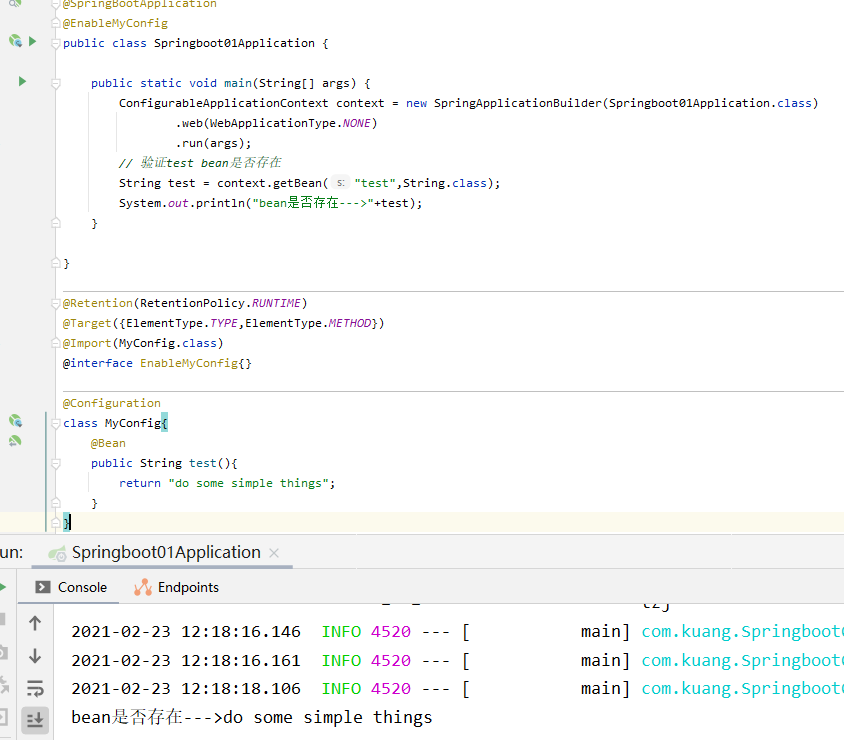
在应用程序的入口加上 @EnableMyConfig 注解。这样的话,MyConfig就被注入进来了

SpringBoot也就是用这个完成的。只不过它用了更加高级点的ImportSelector。

什么是自动装配

  1. SpringBoot启动时会根据启动器 starter 加载自动配置类,就是将带有默认配置信息的组件导入Spring容器

    只要自动配置的组件满足场景需求,则无需手动配置

    若应用场景所需的环境没有对应的组件,再尝试手动配置

  2. 可以在配置文件application.yml 中修改这些自动装配的组件的信息,可以配置的属性封装在了与XXXAutoConfiguration 对应的 XXXProperties

@SpringBootApplication

将这个类标注为Springboot主配置类;导入并启动类下的所有资源

image-20210225184203682

@SpringBootConfiguration

表示这是一个Spring的配置类,以组件的方式加入到Spring容器中

相当于XML配置文件 <xml></xml>

@ComponentScan

自动扫描并加载符合条件的组件或者bean , 将这个bean定义加载到IOC容器中

相当于扫描并加载XML配置文件中的组件 <bean></bean>

@EnableAutoConfiguration

开启自动而配置功能

@AutoconfigurationPackage

导入组件 Registrar 将主启动类的所在包及包下的所有子包中的配置类注册到Spring容器

@Import({AutoConfigurationImportSelector.class})

导入 自动配置导入选择器 组件用于配置导入哪些自动配置类

@EnableAutoConfiguration 注解中使用了 AutoConfigurationImportSelector(自动配置类的导入选择器),用于选择自动配置类,导入Spring容器后,以这些自动配置类全限定名数组的形式返回给主配置类。


第1层

selectImports()

image-20210225124913706

  • AnnotationMetadata指向的是主配置类,也就是 AutoConfigurationImportSelector 会为标注了主配置类(标注了 @SpringBootApplication )导入自动配置类,并将这些自动配置类(也就是可以被自动导入的组件)的全限定名以字符串数组的形式返回给主配置类
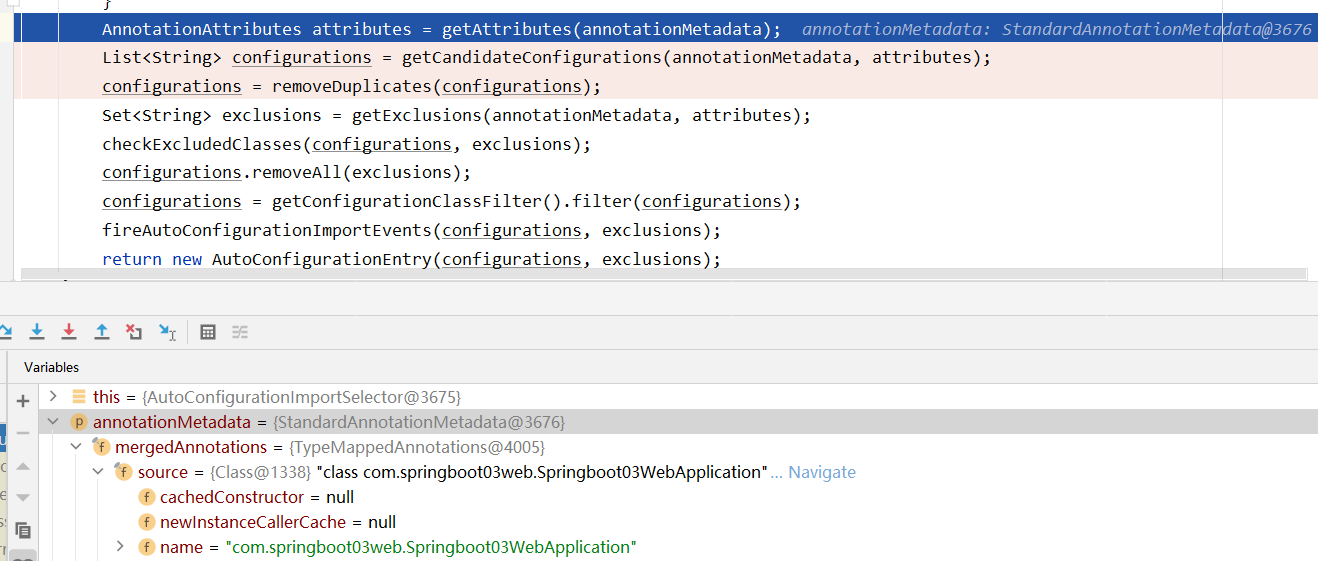
    image-20210225123445960

那这些自动配置类哪里来的

由一个与 selectImports() 方法同一层的 getAutoConfigurationEntry() 选择
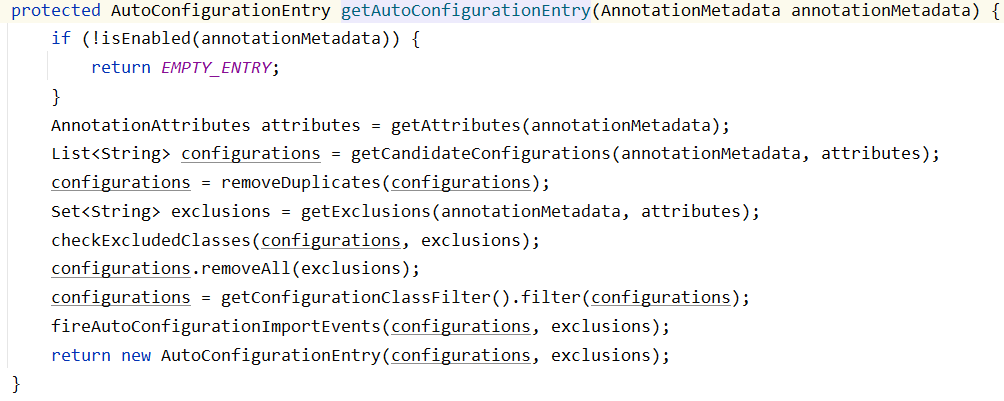
image-20210225125310828

在这个方法中,调用了 getCandidateConfigurations() 方法,将候选的配置类以字符串列表的形式返回,再经过一系列的排除,过滤操作,才将最终的自动配置类的全限定名数组返回给主配置类。
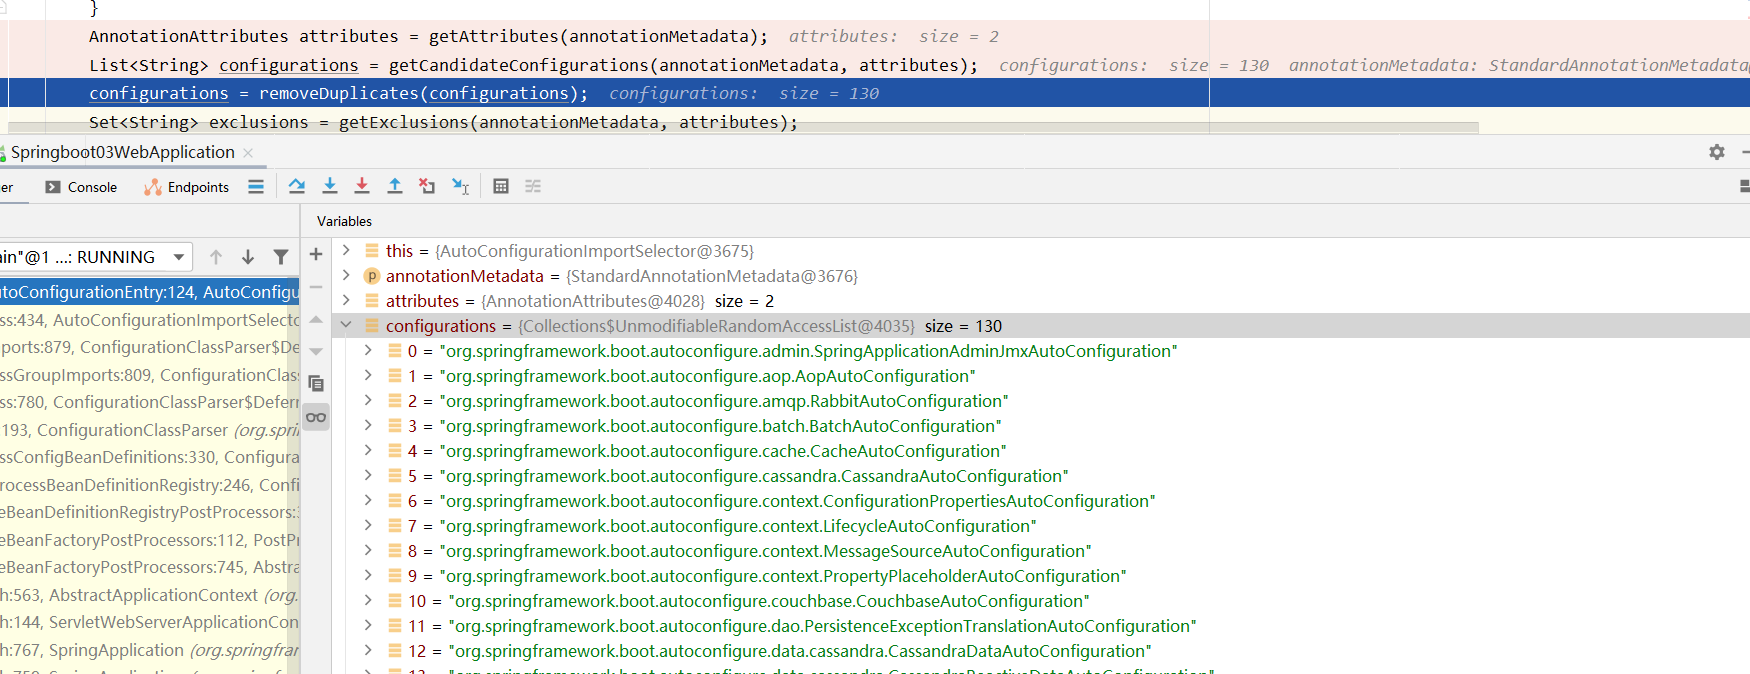
image-20210225123900899

getCandidateConfigurations() 方法将获取到的所有配置类的全限定名,保存到 List<String> configurations 字符列表中


那这些候选的自动配置类又从哪里来,看 getCandidateConfiguration() 方法的执行流程

第二层:getCandidateConfigurations()

image-20210223123339231

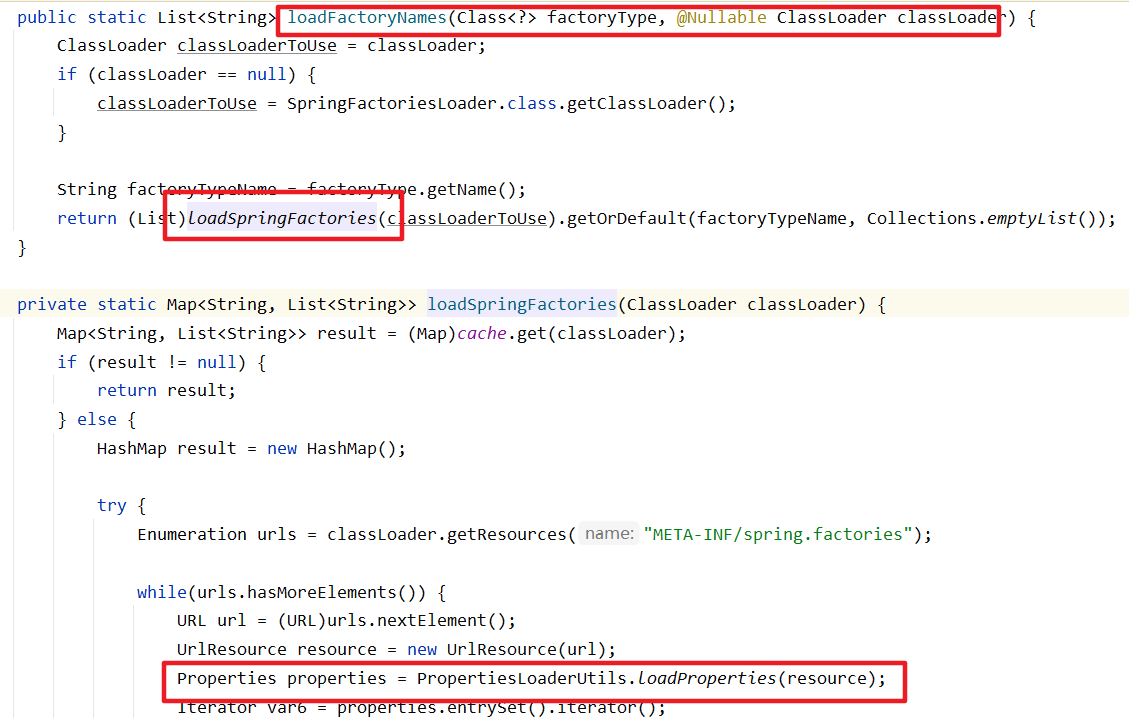
显然,是调用了 SpringFactoriesLoader.loadFactoryName 获取的全限定名列表


第三层:SpringFactoriesLoader执行流程

image-20210223105713021

image-20210222164313683

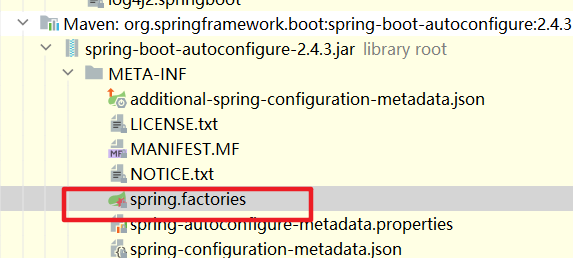
上面这些代码片段的意思就是,SpringFactoriesLoader 会从类路径中查找 spring.factories 的文件,将文件中的全限定名逐一封装为 Properties 类的实例
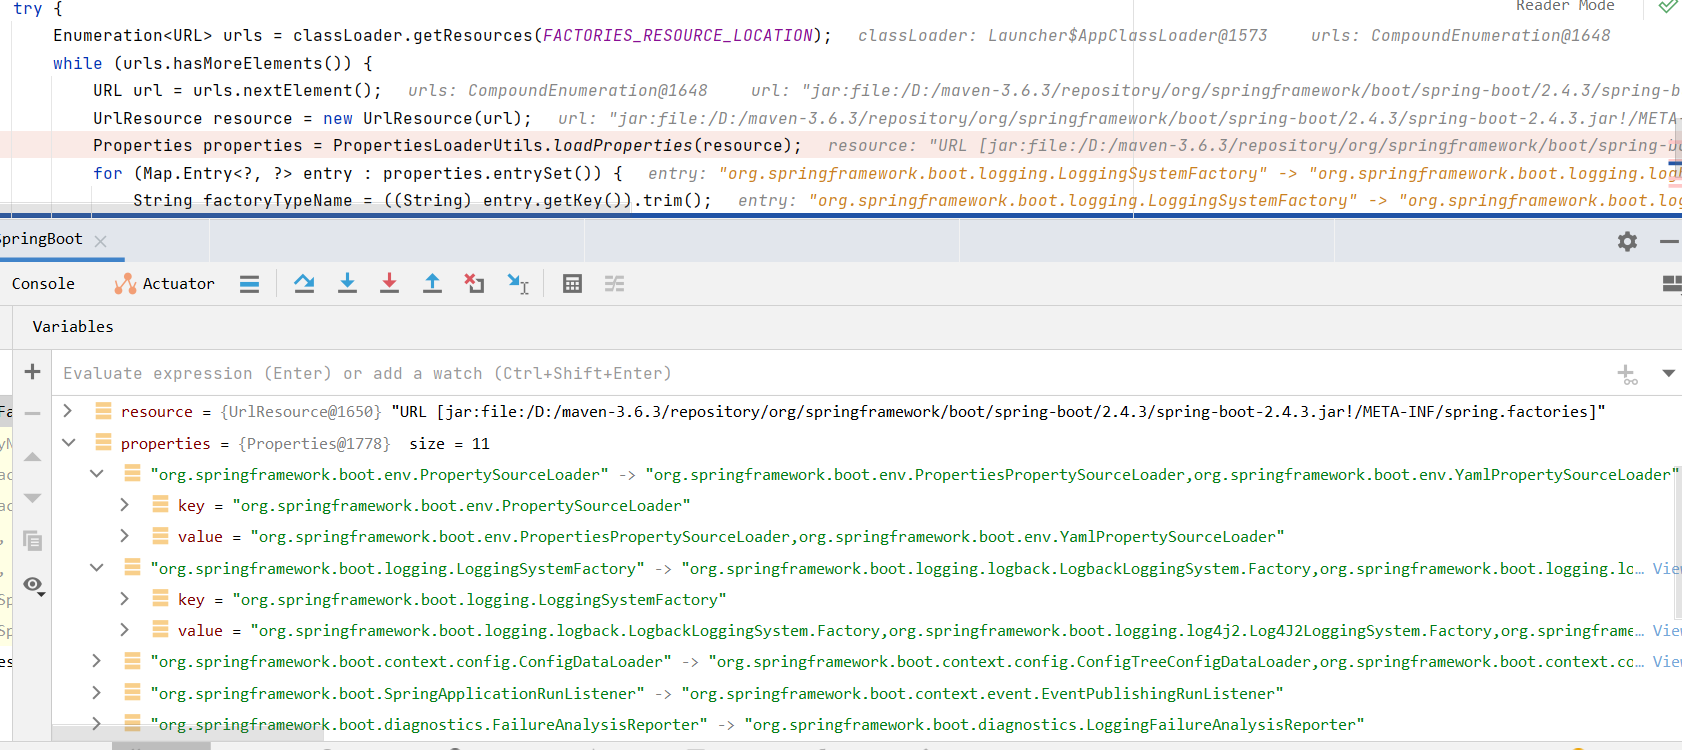
image-20220318101012496

自动装配核心配置——XXXAutoConfiguration

image-20210222163317091

eg:

image-20210222163655934

image-20210223101105630

image-20210222163803945

getCandidateConfigurations 方法中的 getSpringFactoriesLoaderFactoryClass 方法返回的是EnableAutoConfiguration.class,所以会过滤出key为org.springframework.boot.autoconfigure.EnableAutoConfiguration的值。

下面这段配置代码就是autoconfigure这个jar包里的spring.factories文件的一部分内容(有个key为org.springframework.boot.autoconfigure.EnableAutoConfiguration,所以会得到这些AutoConfiguration)

1
2
3
4
5
6
# Auto Configure
org.springframework.boot.autoconfigure.EnableAutoConfiguration=\
org.springframework.boot.autoconfigure.admin.SpringApplicationAdminJmxAutoConfiguration,\
org.springframework.boot.autoconfigure.aop.AopAutoConfiguration,\
org.springframework.boot.autoconfigure.amqp.RabbitAutoConfiguration,\
org.springframework.boot.autoconfigure.MessageSourceAutoConfiguration,\

当然了,这些AutoConfiguration不是所有都会加载的,会根据AutoConfiguration上的

@ConditionalOnClass 经过exclude和filter等操作,最终确定要装配的类。

@ConditionalOnXXX

@Conditional扩展注解作用(判断是否满足当前指定条件)
@ConditionalOnJava系统的java版本是否符合要求
@ConditionalOnBean容器中是否存在指定Bean
@ConditionalOnMissingBean容器中不存在指定Bean
@ConditionalOnExpression满足SpEL表达式指定
@ConditionalOnClass系统中有指定的类
@ConditionalOnMissingClass系统中没有指定的类
@ConditionalOnSingleCandidate容器中只有一个指定的Bean
@ContidionalOnProperty系统中指定的属性是否有指定的值
@ContidionalOnResource类路径下是否存在指定资源文件
@ContidionalOnWebApplication当前是web环境
@ContidionalOnNotWebApplication当前不是Web环境
@ConditionalOnJndiJNDI存在指定项

总结

  • 自动装配利用了 SpringFactoriesLoader 会根据 FACTORIES_RESOURCE_LOCATION 这个静态变量指出spring.factories的路径,然后从所有的jar包中读取根据这个文件内容指出的自动配置类。将类信息封装为 propreties 类型的对象
  • 在若干 @ConditionalOnXXX 的约束下,经过exclude和filter等操作,确定待装配的类是否生效
  • 所有需要导入的组件,以类名的方式返回,这些组件在 starter 作用下,自动装配到相应的环境

SpringApplication.run(Springboot01Application.class, args);

将SpringBoot启动

  • _推断应用类型是普通项目还是web项目_
  • 查找并加载所有可用的初始化器,设置到initializers属性中
  • 找出所有的而应用程序监听器,设置到listeners属性中
  • _推断并设置main方法的定义类,找出运行的主类_

总结

1. 什么会被自动装配

我只知道如何选择自动装配的组件这块,至于这些组件在Spring容器生命周期的哪个阶段加入就没有了解了。

选择哪些组件会被自动配置,与 @SpringBootApplication 这个注解有关。他有三个重要的注解

第一个是 @SpringBootConfiguration ,表示启动类也是一个配置类,会以Bean的形式注册到 Spring 容器中

第二个是 @ComponentScan ,这个注解本身的作用是指出包扫描路径。由于没有配置,默认是扫描主配置类所在包及子包下的组件

第三个是 @EnableAutoConfiguration 表示开启自动装配功能。他有两个功能,第一个是选择支持自动装配的组件,然后将这些组件的全限定名以字符串数组的方式返回给主配置类,第二个是将需要自动装配组件导入到Spring容器中。这个两个功能分别由两个注解完成,@Import({AutoConfigurationImportSelector.class})@AutoConfigurationPackage

@Import({}) 就是通过反射机制导入 AutoConfigurationImportSelector ,这个选择器中有一个 selectImports() 方法,完成自动配置类的选择和全限定名的返回

具体做法是调用 getAutoConfigurationEntry() 方法筛选主配置类需要的组件,然后返回全限定名。而待筛选的自动配置类,由 getCandidateAutoConfiguration() 返回,这些自动配置类的全限定名是由 SpringFactoriesLoader 加载 spring.factories 文件得到的

@AutoConfigurationPackage :会导入一个 Registrar 注册器,将启动类所在包及其子包下的组件注册到Spring容器中,就是把自己写的Bean导入到Spring容器中

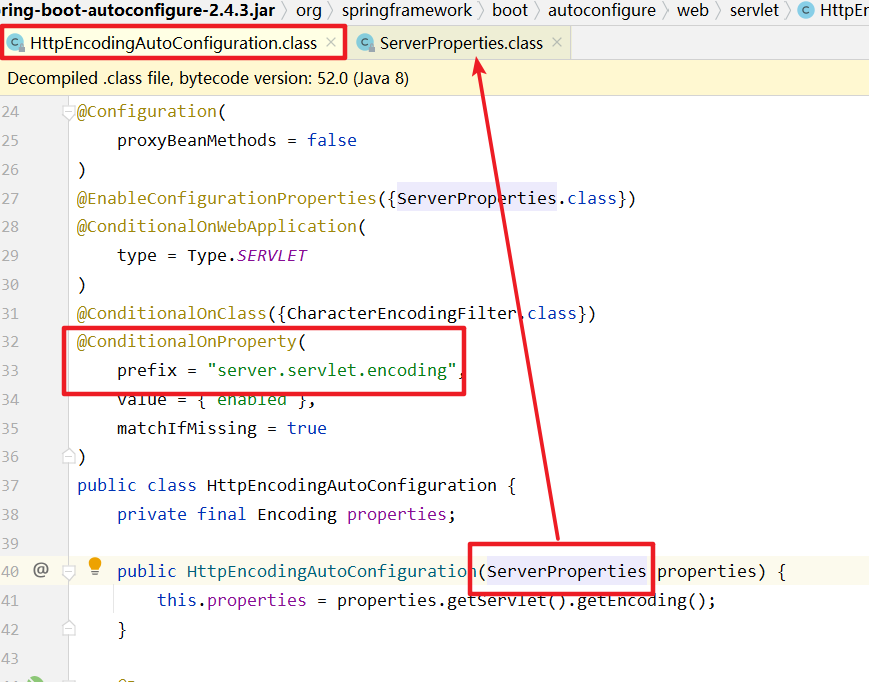
而我们平时在 application.yml 主配置文件中的配置项,是与相应的 XXXProperties 中的属性绑定的。 XXXAutoConfiguration 这些可以自动装配的组件,会通过 XXXProperties 获取到配置信息,然后在 @ConditionOn() 注解的作用下,这些可以被自动装配的组件有选择的注册称为Spring容器中的Bean

2.XXXAutoConfiguration

在application.yaml中能配置的属性,这些属性的默认值都在对应的 XXXProperties中 :

  • 一定会存在对应的 XXXAutoConfiguration类,由 @EnableAutoContiguration 将这些配置类封装为 Properties 类加载到运行主类中

3. 每一个XXXAutoConfiguration进行自动配置功能

1
2
3
4
5
6
7
8
9
10
11
12
13
14
15
16
17
18
19
20
21
22
23
24
25
26
27
28
29
30
31
32
@Configuration(proxyBeanMethods = false)
//标注为配置类

@EnableConfigurationProperties(ServerProperties.class)
//启用指定类的CongigurationProperties功能,并把这个配置类加入到IoC容器中

@ConditionalOnWebApplication(type = ConditionalOnWebApplication.Type.SERVLET)
//如果是web应用,当前配置类生效

@ConditionalOnClass(CharacterEncodingFilter.class)
//判断当前项目有没有这个类;SpringMVC中乱码过滤器

@ConditionalOnProperty(prefix = "server.servlet.encoding", value = "enabled", matchIfMissing = true)
//配置文件中是否存在某个配置,即使配置文件中没有配置,也是生效的

public class HttpEncodingAutoConfiguration {
private final Encoding properties;//properties与SpringBoot的配置文件映射

//在只有有参构造器的情况下,参数的值(ServerProperties properties)从容器中取
public HttpEncodingAutoConfiguration(ServerProperties properties) {
this.properties = properties.getServlet().getEncoding();
}

@Bean //给容器中添加一个组件,这个组件的某些值需从properties中获取
@ConditionalOnMissingBean //IoC容器中没有这个Bean才new
public CharacterEncodingFilter characterEncodingFilter() {
CharacterEncodingFilter filter = new OrderedCharacterEncodingFilter();
filter.setEncoding(this.properties.getCharset().name());
filter.setForceRequestEncoding(this.properties.shouldForce(Encoding.Type.REQUEST));
filter.setForceResponseEncoding(this.properties.shouldForce(Encoding.Type.RESPONSE));
return filter;
}
  • 根据 @ConditionalOnXXX 判断当前 XXXAutoConfiguration 是否生效
  • 一旦 XXXAutoconfiguration 生效,这个配置类就会给容器中添加各种组件 (由@Bean标注) ;
  • 这些组件的属性是从对应的XXXProperties类中获取
  • XXXAutoconfiguration的每一个属性都是和配置文件绑定,并可通过配置文件修改

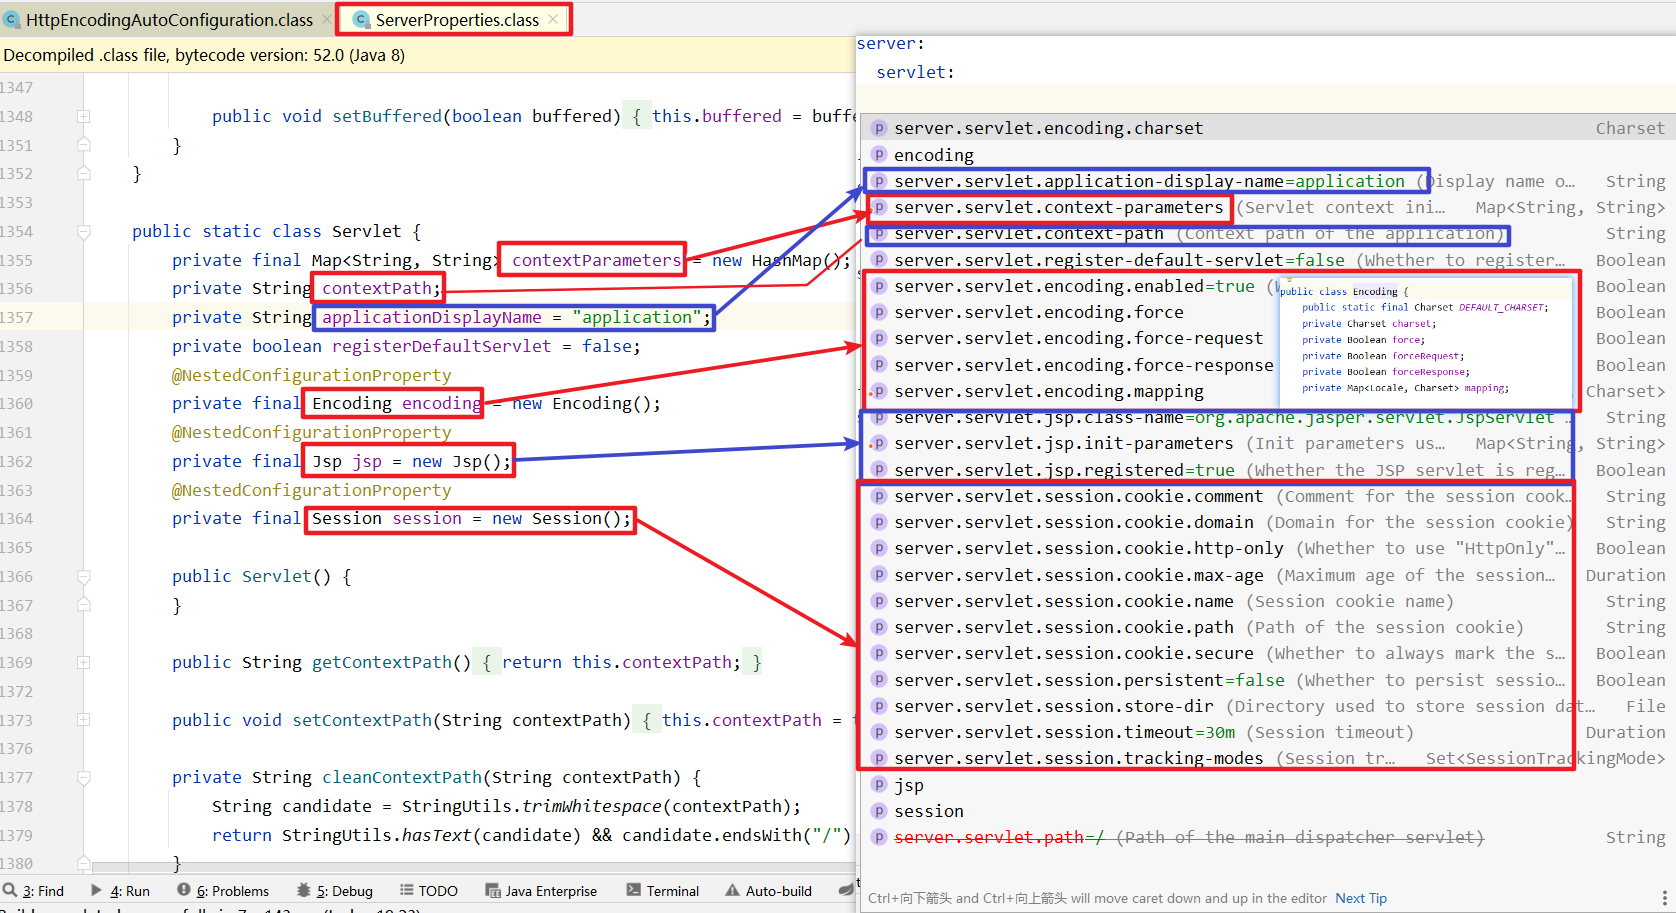
4. 配置文件中能配置的属性都在XXXProperties中封装

1
2
3
@ConfigurationProperties(prefix = "server", ignoreUnknownFields = true)
//从配置文件中获取指定属性的值和bean属性进行绑定
public class ServerProperties {

image-20210223212441301

application.yaml 中修改的是这些配置类的属性值

image-20210223213822781

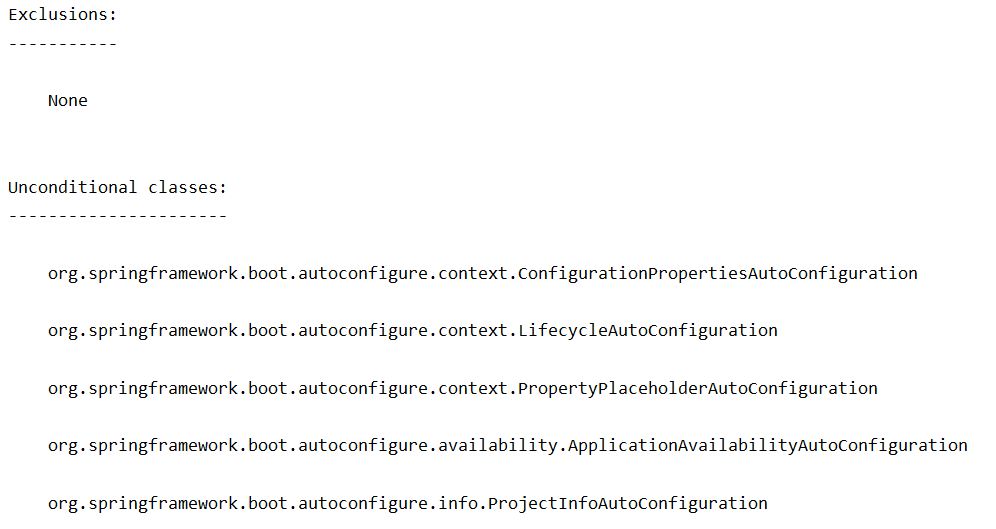
检测自动配置类是否生效

1
debug: true

生效的

image-20210223215720062

没生效的:

image-20210223215732495

排除的和不满足条件的:

image-20210223215737203

配置文件

yaml

yaml基本语法

以数据为中心

_空格控制层级_

属性和值,大小写敏感

“[内容]”:不转义,输出特殊字符表示的内容

  • name: “hello \n !” _>hello [换行] !

    ‘[内容]’:转义,将特殊字符以字符串形式输出

  • name: ‘hello \n !’ _> hello \n !

1
2
3
<server>
<port>8080</port>
</server>
1
2
student.name=qinjiang
student.age=3
1
2
3
4
5
6
7
8
9
10
11
12
13
14
15
16
server:
port: 8080
#对象
student:
name: qinjiang
age: 3

#行内写法
student: {name: qinjiang,age: 3}

#数组
pets:
- cat
- dog
- pig
pets: [cats,dogs,pig]

配置文件占位符

properties文件和yaml文件都适用

$ 查找的是当前yaml中及其支持的变量

随机数${random.XXXX}
  • ${random.int}
  • ${random.uuid}
获取之前的值,指定默认值
  • ${[A]:[B]}:存在用A,不存在用B
1
2
3
4
5
6
7
8
9
10
11
person:
name: tian${random.uuid}
age: ${random.int}
happy: true
date: 2020/02/23
maps: {k1: v1,k2: v2}
lists: [code,music]
hello: todo
dog:
name: ${person.hello:hello}_旺财
age: 3

image-20210223165605554

注入,给实体类赋值

之前

1
2
3
4
5
6
7
8
9
10
11
12
13
14
15
16
17
18
19
20
@Data
@NoArgsConstructor
@AllArgsConstructor
@Repository
public class Dog {
@Value("旺财")
private String name;
@Value("3")
private int age;
}

@SpringBootTest
class Springboot02YamlApplicationTests {
@Autowired
private Dog dog;
@Test
void contextLoads() {
System.out.println(dog);
}
}

相关依赖

1
2
3
4
5
<dependency>
<groupId>org.springframework.boot</groupId>
<artifactId>spring-boot-configuration-processor</artifactId>
<optional>true</optional>
</dependency>
1
2
3
4
5
6
7
8
9
10
person:
name: tian
age: 3
happy: true
date: 2020/02/23
maps: {k1: v1,k2: v2}
lists: [code,music]
dog:
name: 旺财
age: 3

@ConfigurationProperties

@ConfigurationProperties(prefix=) 将本类的属性与配置文件中的相关配置绑定

  • prefix(“”):指定配置文件中哪个变量进行映射
  • 只有在 IoC容器中的组件才能使用这个注解
1
2
3
4
5
6
7
8
9
10
11
12
13
14
@Data
@AllArgsConstructor
@NoArgsConstructor
@Repository
@ConfigurationProperties(prefix = "person")
public class Person {
private String name;
private Integer age;
private Boolean happy;
private Date date;
private Map<String,Object> maps;
private List<Object> lists;
private Dog dog;
}

image-20210223163436025

@PropertySource

@PropertySource("classpath:myconfig.xml")加载指定的配置文件

1
2
3
4
5
6
7
8
9
10
11
12
13
14
15
16
17
18
19
20
21
22
23
24
25
26
@Data
@AllArgsConstructor
@NoArgsConstructor
@Repository
//@ConfigurationProperties(prefix = "person")
@PropertySource(value = "classpath:myconfig.properties")
public class Person {
/*
* <bean class="Person">
* <property name="lastName"
* value="字面量|
${key}:从环境变量中获取键值|
#{SpEL}":表达式></property>
* </bean>
*/
@Value("${name}")
private String name;
@Value("#{11*2}")
private Integer age;
@Value("true")
private Boolean happy;
private Date date;
private Map<String,Object> maps;
private List<Object> lists;
private Dog dog;
}

区别

@ConfigurationProperties@Value

@ConfigurationProperties@Value
功能从全局配置文件中,批量注入属性一个个指定
松散绑定(松散语法)支持不支持last-name_>lastName
SpEL不支持支持#{11*2}
JSR303数据校验支持不支持@Validated
复杂类型封装支持不支持${maps.key}
松散绑定

yml中横线命名 : java中驼峰命名

last-name : lastName

JSR303校验

@Validated_>开启数据验证

1
2
3
4
5
6
7
8
9
10
11
12
13
14
15
16
17
18
19
20
21
22
23
24
25
26
27
@NotNull(message="名字不能为空")
private String userName;
@Max(value=120,message="年龄最大不能查过120")
private int age;
@Email(message="邮箱格式错误")
private String email;

空检查
@Null 验证对象是否为null
@NotNull 验证对象是否不为null, 无法查检长度为0的字符串
@NotBlank 检查约束字符串是不是Null还有被Trim的长度是否大于0,只对字符串,且会去掉前后空格.
@NotEmpty 检查约束元素是否为NULL或者是EMPTY.

Booelan检查
@AssertTrue 验证 Boolean 对象是否为 true
@AssertFalse 验证 Boolean 对象是否为 false

长度检查
@Size(min=, max=) 验证对象(Array,Collection,Map,String)长度是否在给定的范围之内
@Length(min=, max=) string is between min and max included.

日期检查
@Past 验证 Date 和 Calendar 对象是否在当前时间之前
@Future 验证 Date 和 Calendar 对象是否在当前时间之后
@Pattern 验证 String 对象是否符合正则表达式的规则


结论

  • 在某个业务中,只需要配置某个属性的值:@Value
  • 专门编写了一个JavaBean来和配置文件映射:`@ConfigurationProperties

全局配置文件

配置文件名是固定的

  • application.properties
    • 语法:key=value
  • application.yml
    • 语法:key: value

可以修改SpringBoot自动配置的默认值

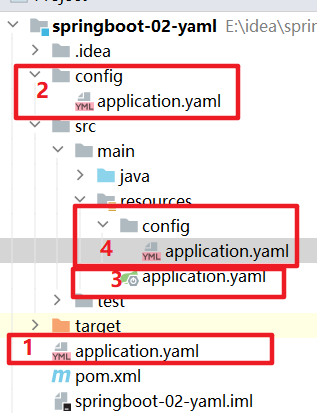
全局配置文件的加载位置

项目内
  • ./
  • ./config

  • classpath:/

  • classpath:/config

image-20210223190448217

命令行修改配置文件加载位置

springjava -jar [打包后包名] —spring.config.location=F:/application.properties

优先级
  1. 项目路径/config/application.yml
  2. 项目路径/application.yml
  3. 资源路径/config/application.yml
  4. 资源路径/applicatin.yml
外部配置加载顺序

image-20210225174128054

原则

  • 互补配置
  • 高优先级覆盖低优先级

其他配置文件的加载

@PropertySource(value={"",""})

读取指定的配置文件

@ImportResource(location={"",""})

在一个配置类上标注,导入Spring配置文件,让其生效

SpringBoot推荐使用配置类编写配置

以前

1
2
3
4
5
6
7
<?xml version="1.0" encoding="UTF-8" ?>
<beans xmlns="http://www.springframework.org/schema/beans"
xmlns:xsi="http://www.w3.org/2001/XMLSchema-instance"
xsi:schemaLocation="http://www.springframework.org/schema/beans
http://www.springframework.org/schema/beans/spring-beans-3.0.xsd">

</beans>

配置类

1
2
3
4
5
6
7
8
9
10
11
12
13
14
/*
*@Configuration指明当前类是一个配置类,替代Spring-application.xml文件
*相当于<beans></beans>
*/
@Configuration
public class MyAppConfig(){
/*
* @Bean将方法的返回值添加到容器中;容器中组件的返回值默认的Id就是方法名
*/
@Bean
public HelloService helloService(){
return new HelloService();
}
}

多环境切换——Profile

profiles 是Spring对不同环境提供不同配置功能的支持,可以通过激活不同的环境版本,实现快速切换环境;

我们在主配置文件编写的时候,文件名可以是 application-{profiles}.properties/yml , 用来指定多个环境版本;

但是Springboot并不会直接启动这些配置文件,它默认使用application.properties主配置文件

激活方式

配置文件
1

命令行

java -jar [打包后包名] —spring.profiles.active=dev
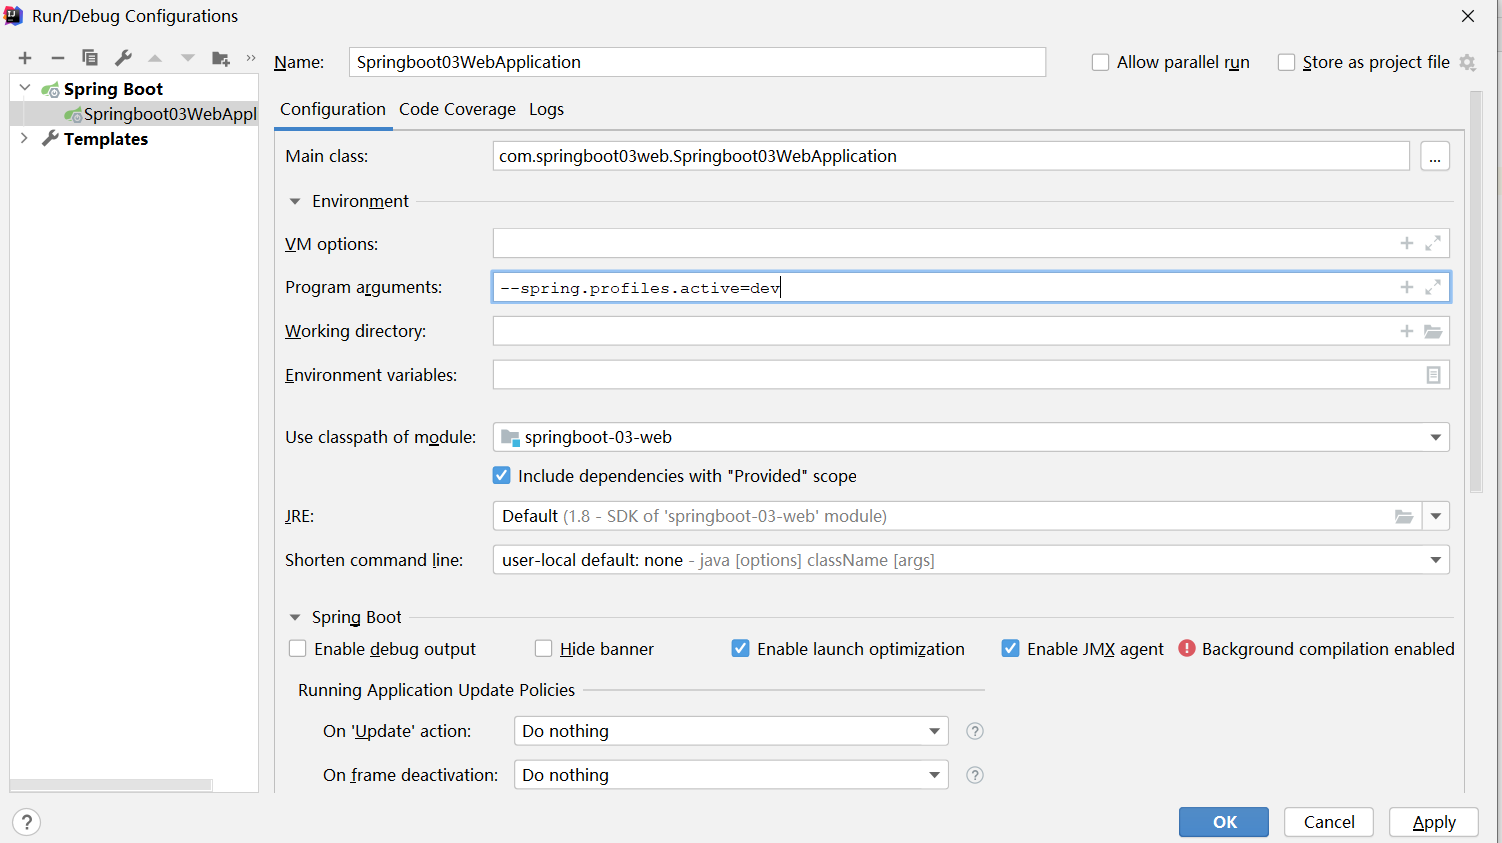
image-20210225172726191

jvm参数

-Dspring.profiles.active=dev

yaml多文档块
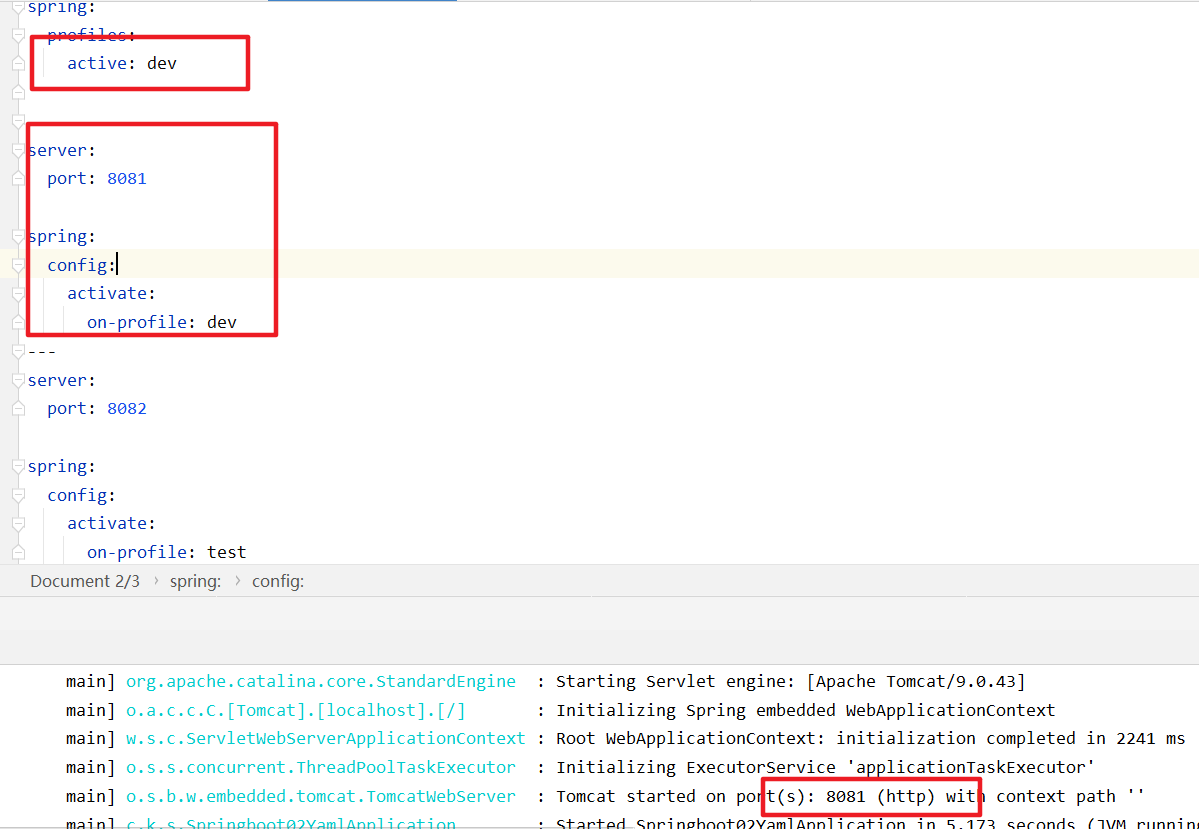
image-20210223192432319

日志

日志门面(日志抽象层)日志实现
JCL(Apache2014停更)jboss-logging(不好用),SLF4J(Simple Logging Facade for java)Log4j,Logback(同一人)
log4j2,JUL(java.util.logging)

springboot:SLF4J+Logback

默认日志依赖

1
2
3
4
5
6
<dependency>
<groupId>org.springframework.boot</groupId>
<artifactId>spring-boot-starter-logging</artifactId>
<version>2.4.3</version>
<scope>compile</scope>
</dependency>

image-20210225212508624

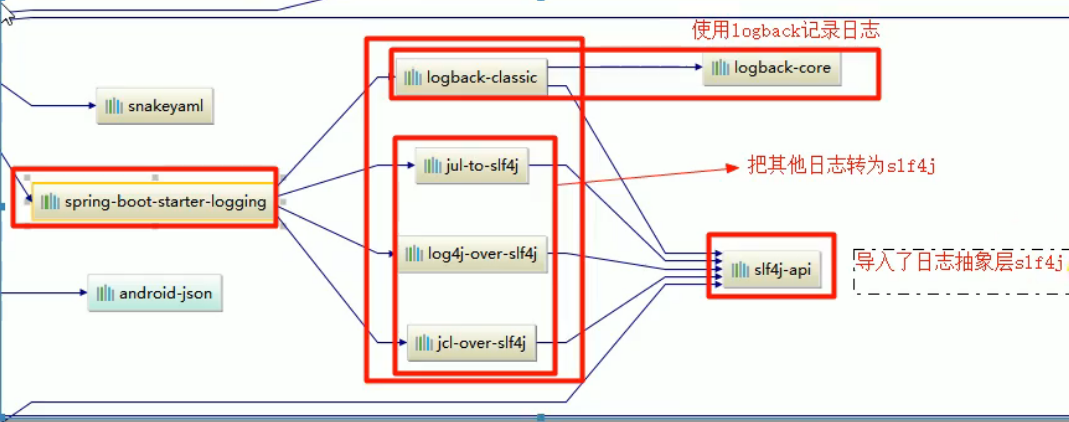
  1. SpringBoot底层也是使用SLF4J+logback进行日志记录
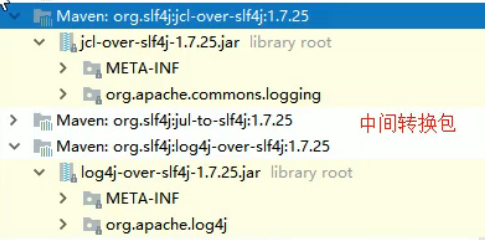
  2. SpringBoot通过中间替换包把其他日志替换成了SLF4J

image-20210225212715554

image-20210225212801309

  1. 使用其他框架,一定要把这个框架默认的日志依赖移除
1
2
3
4
5
6
7
8
9
10
11
<dependency>
<groupId>org.apache.activemq</groupId>
<artifactId>activemq-spring</artifactId>
<version>${activemq.version}</version>
<exclusions>
<exclusion>
<groupId>commons-logging</groupId>
<artifactId>commons-logging</artifactId>
</exclusion>
</exclusions>
</dependency>

日志文档与框架关系

SLF4J文档

SLF4J可以由Log4j,logback实现,也可以通过适配层,将其他实现框架转化为SLF4J框架。即一个应用内的所有日志抽象层都是用SLF4J框架
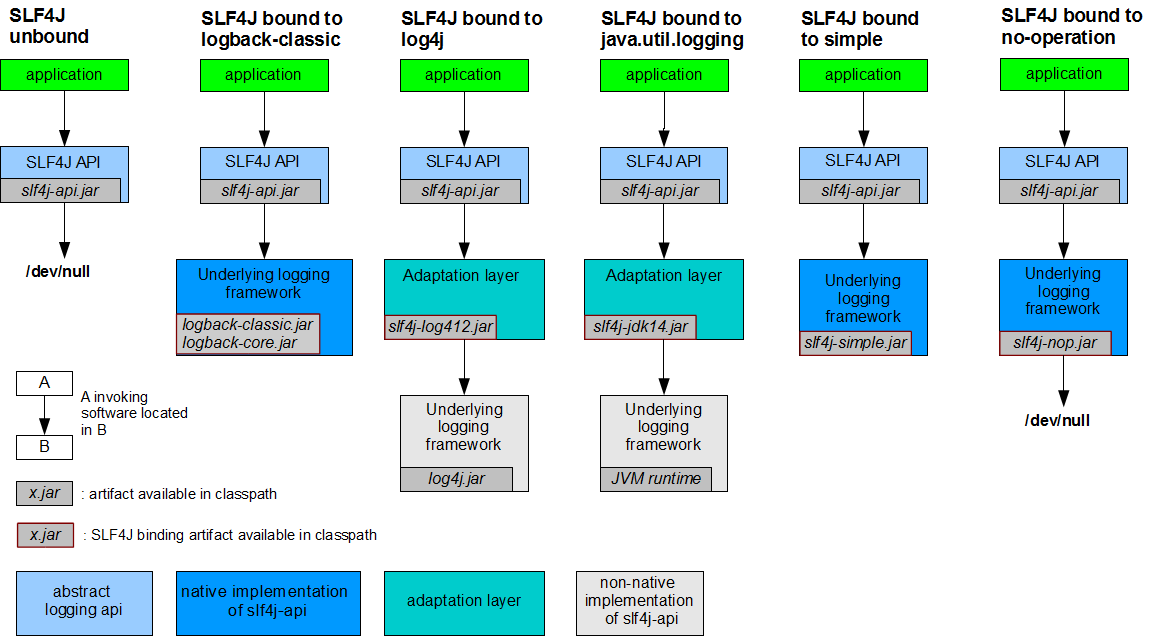
img

其他框架的统一转换为SLF4J

不同层使用不同的日志框架,通过适配层统一转化为SLF4J框架
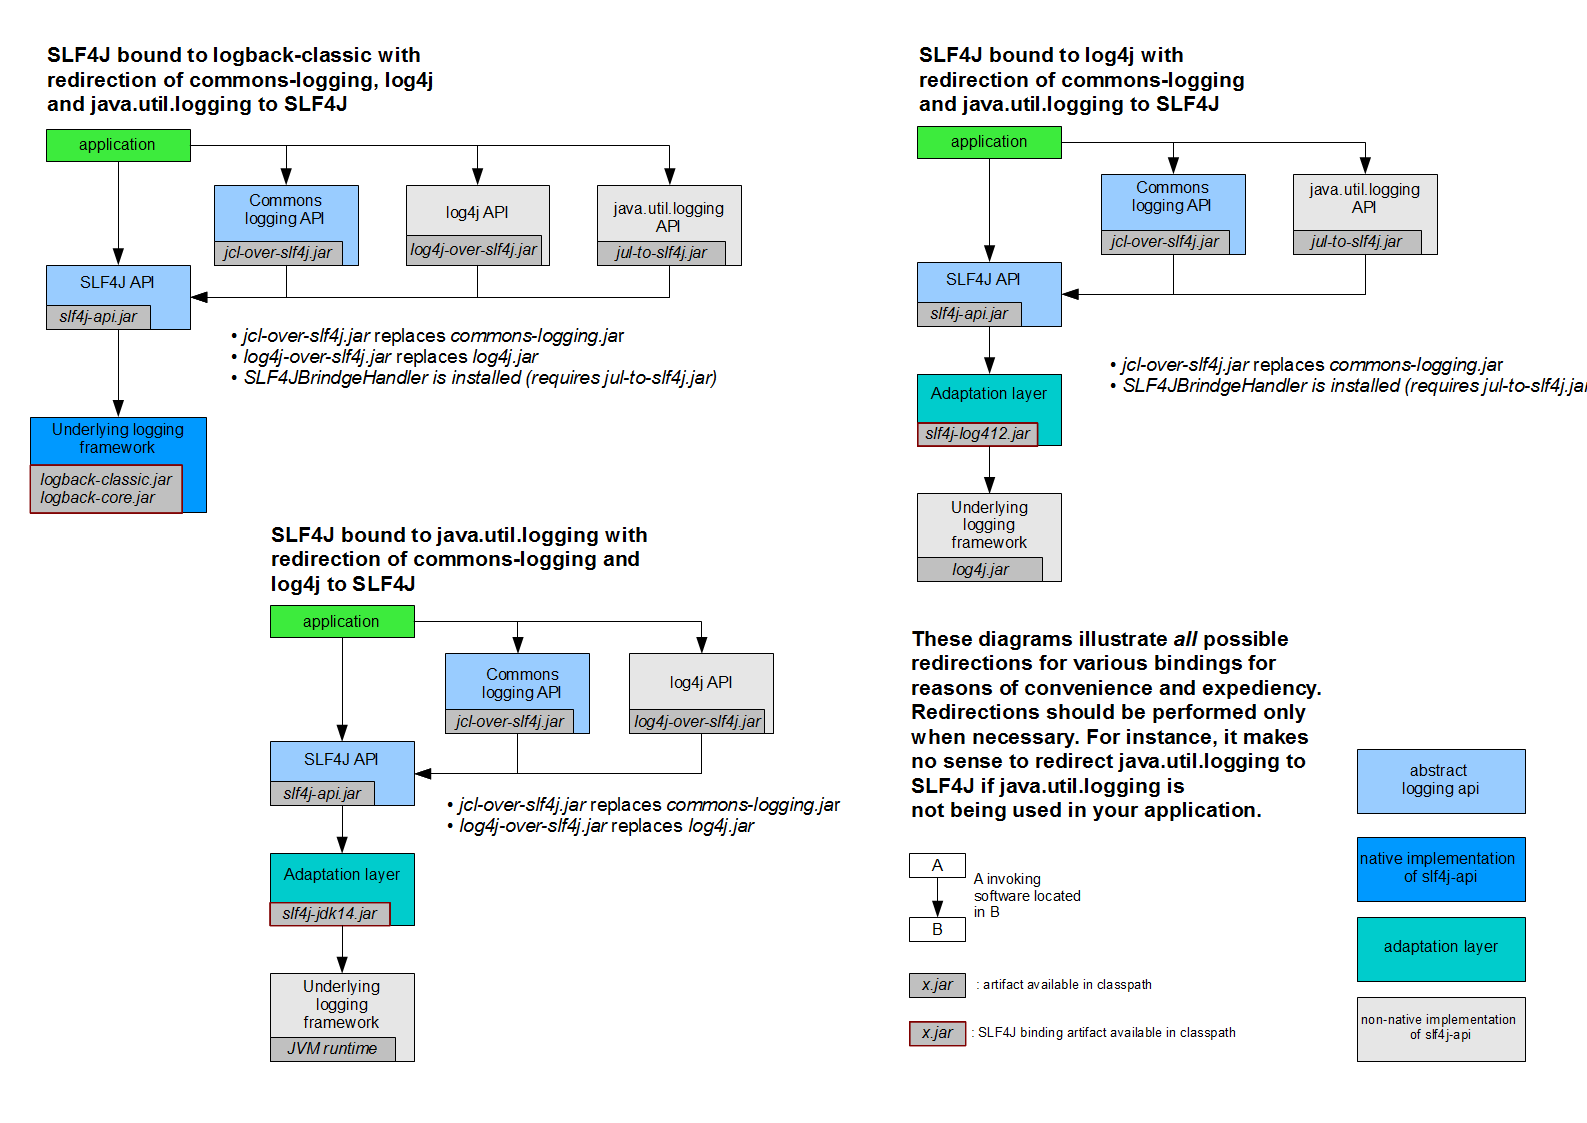
click to enlarge

  1. 将系统中其他日志框架先排除出去
  2. 用中间包替换原有日志框架
  3. 导入SLF4J的其他实现

框架每一个日志的实现实框架都有自己的配置文件,使用SLF4J后,配置文件为实现日志实现框架的配置文件

切换日志实现框架

根据SLF4J的日志适配图,进行相关切换

click to enlarge

image-20210226104919822

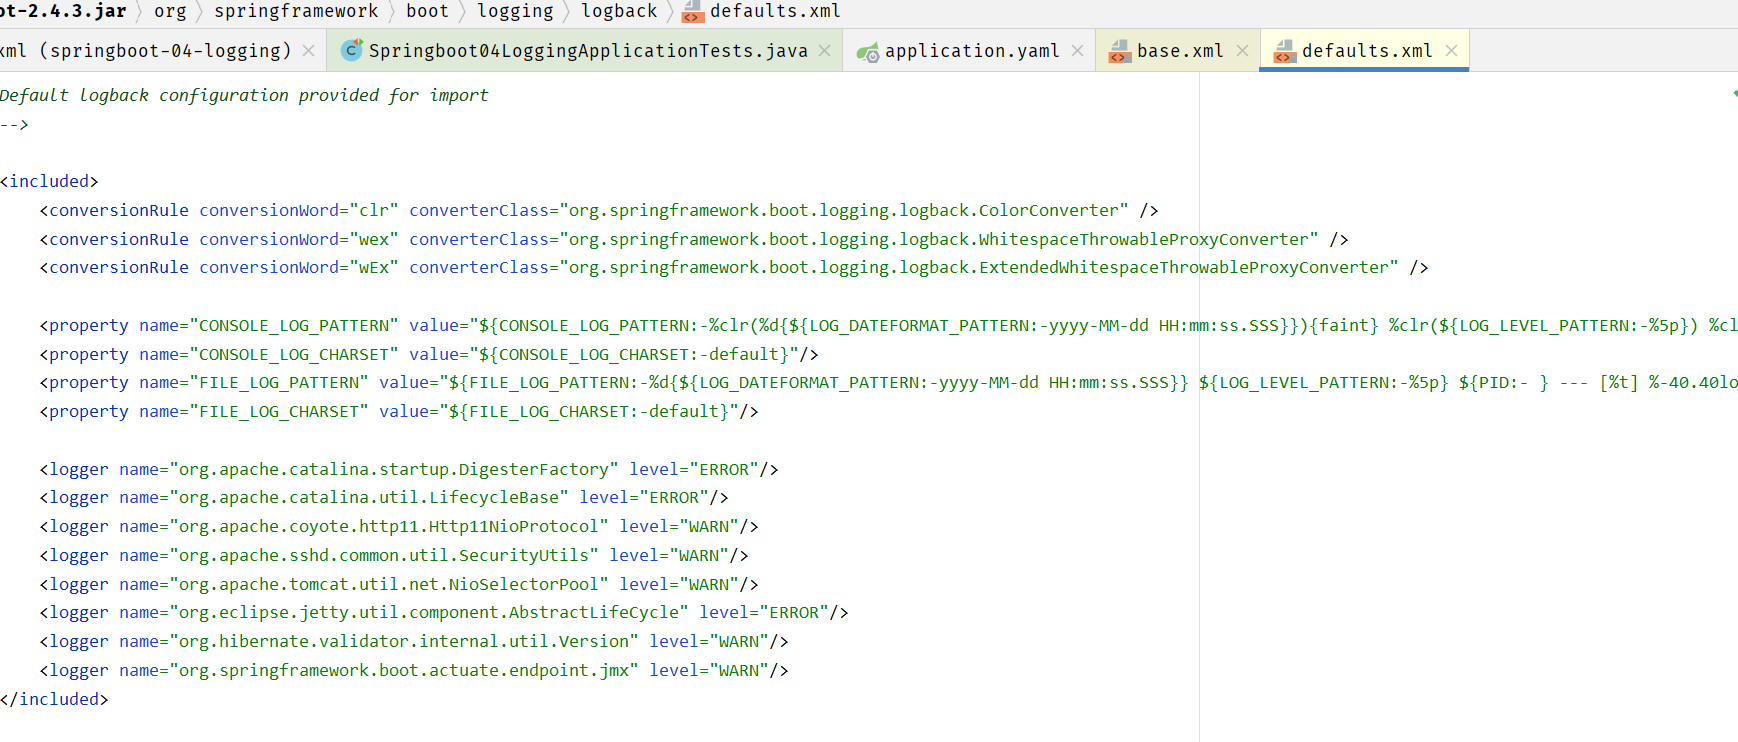
SpringBoot默认配置

image-20210226092429241

image-20210226092447844

0.配置原理

image-20210226093025027

获得配置文件中的属性值

image-20210226093946609

1. 导包

1
2
import org.slf4j.Logger;
import org.slf4j.LoggerFactory;
1
Logger logger = LoggerFactory.getLogger(getClass());

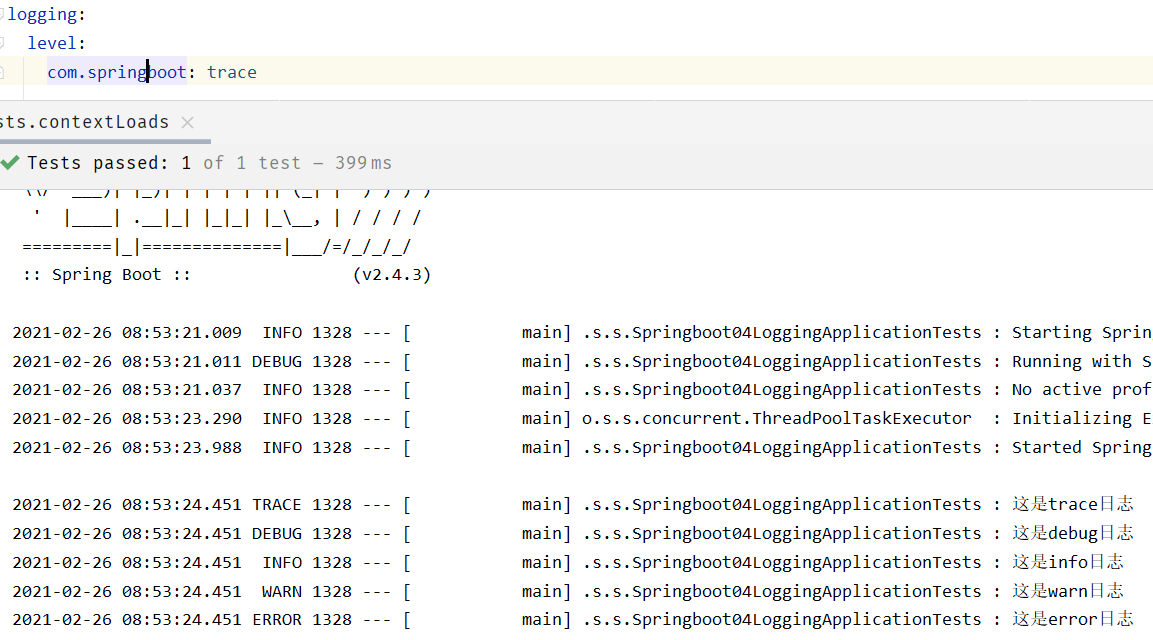
2. 日志级别

调整需要输出的日志级别

trace < debug < info < warn < error
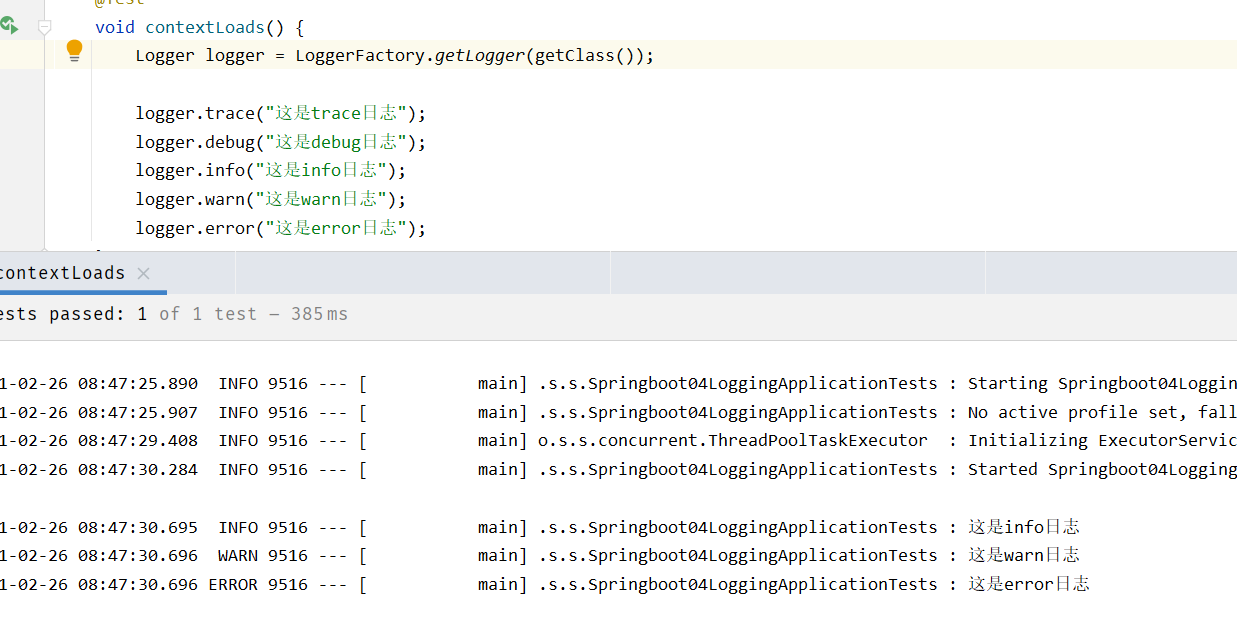
image-20210226084751792

1
2
3
logging:
level:
com.springboot: trace

image-20210226085421452

3. 指定日志信息的输出格式

image-20210225222114977

image-20210225222231571

4. 日志输出路径

1.在当前路径下输出
1
2
3
logging:
file:
name: springboot.log

image-20210226085732192

2. 指定输出到某一目录下的文件
1
2
3
logging:
file:
name: F:/springboot.log
3. 本项目下的目录,默认的文件名为spring.log
1
2
3
logging:
file:
path: log/sringboot-04

SpringBoot自定义日志配置

每一个日志的实现实框架都有自己的配置文件,使用SLF4J后,配置文件为实现日志实现框架的配置文件

[实现框架名].xml放在在类路径下,即替换

Logging SystemCustomization
Logbacklogback-spring.xml, logback-spring.groovy, logback.xml, or logback.groovy
Log4j2log4j2-spring.xml or log4j2.xml
JDK (Java Util Logging)logging.properties

logback.xml:直接就被日志框架识别

logback-spring.xml:由spring识别,可以使用 profile

多环境日志输出

1
2
3
4
5
6
7
<!--可以根据环境调整输出-->
<springProfile name="dev">

</springProfile>
<springProfile name="!dev">

</springProfile>
1
2
3
spring:
profiles:
active: dev

日志使用

1. 自定义日志配置文件

1
2
3
4
5
6
7
8
# application.properties
#配置日志
## 调整需要输出的日志级别 trace < debug < info < warn < error
logging.level.root=info
## 使用mybatis的时候,sql语句是debug下才会打印,而这里我们只配置了info,所以想要查看sql语句的话,有以下两种操作:
### 第一种把 日志配置文件中的 <root level="info">改成<root level="DEBUG">这样就会打印sql,不过这样日志那边会出现很多其他消息
### 第二种就是单独给dao下目录配置debug模式,这样配置sql语句会打印,其他还是正常info级别:
logging.level.com.xq.tmall.dao = debug

2. 日志配置

在resources下面创建一个官方推荐:logback-spring.xml

带spring后缀的可以使用 <springProfile > 这个标签来指定环境

根节点\包含的属性

日志级别从低到高分为TRACE < DEBUG < INFO < WARN < ERROR < FATAL,如果设置为WARN,则低于WARN的信息都不会输出

  • scan:当此属性设置为true时,配置文件如果发生改变,将会被重新加载,默认值为true。
  • scanPeriod:设置监测配置文件是否有修改的时间间隔,如果没有给出时间单位,默认单位是毫秒。当scan为true时,此属性生效。默认的时间间隔为1分钟。
  • debug:当此属性设置为true时,将打印出logback内部日志信息,实时查看logback运行状态。默认值为false。
1
2
3
总体说明:根节点下有2个属性,三个节点
属性: contextName 上下文名称; property 设置变量
节点: appender, root, logger
<root>

root节点是必选节点,用来指定最基础的日志输出级别,只有一个level属性。

level:用来设置打印级别,大小写无关:TRACE, DEBUG, INFO, WARN, ERROR, ALL 和 OFF,不能设置为INHERITED或者同义词NULL。
默认是DEBUG。
可以包含零个或多个元素,表示这个appender将会添加到这个loger。

<contextName>

设置上下文名称

每个logger都关联到logger上下文,默认上下文名称为“default”。但可以使用设置成其他名字,用于区分不同应用程序的记录。一旦设置,不能修改,可以通过%contextName来打印日志上下文名称,一般来说我们不用这个属性,可有可无。

<property>

设置变量

用来定义变量值的标签, 有两个属性,name和value;其中name的值是变量的名称,value的值时变量定义的值。通过定义的值会被插入到logger上下文中。定义变量后,可以使“${}”来使用变量。

<appender>

appender用来格式化日志输出节点,有两个属性name和class

  • class用来指定哪种输出策略,常用就是控制台输出策略和文件输出策略。
控制台输出ConsoleAppender
1
2
3
4
5
6
7
8
9
10
11
12
13
14
15
<appender name="consoleLog1" class="ch.qos.logback.core.ConsoleAppender">
<!--展示格式 layout-->
<layout class="ch.qos.logback.classic.PatternLayout">
<pattern>%d -1 %msg%n</pattern>
</layout>
</appender>

<appender name="consoleLog2" class="ch.qos.logback.core.ConsoleAppender">
<encoder>
<pattern>%d -2 %msg%n</pattern>
</encoder>
<filter class="ch.qos.logback.classic.filter.ThresholdFilter">
<level>ERROR</level>
</filter>
</appender>

都可以将事件转换为格式化后的日志记录,但是控制台输出使用layout,文件输出使用encoder

<encoder>表示对日志进行编码:

1
2
3
4
5
6
%d{HH: mm:ss.SSS}——日志输出时间
%thread——输出日志的进程名字,这在Web应用以及异步任务处理中很有用
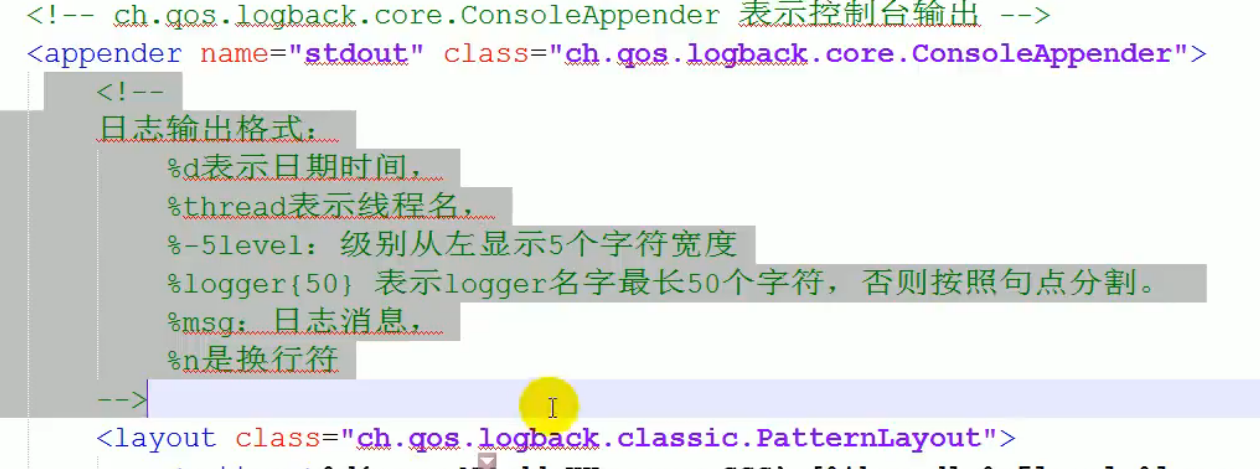
%-5level——日志级别,并且使用5个字符靠左对齐
%logger{36}——日志输出者的名字
%msg——日志消息
%n——平台的换行符

ThresholdFilter为系统定义的拦截器,例如我们用ThresholdFilter来过滤掉ERROR级别以下的日志不输出到文件中。如果不用记得注释掉,不然你控制台会发现没日志~

输出到文件 RollingFileAppender

随着应用的运行时间越来越长,日志也会增长的越来越多,将他们输出到同一个文件并非一个好办法。RollingFileAppender用于切分文件日志:

<loger>

<loger>用来设置某一个包或者具体的某一个类的日志打印级别、以及指定 <appender>

  • name:用来指定受此loger约束的某一个包或者具体的某一个类。

  • level

    用来设置打印级别,大小写无关:TRACE, DEBUG, INFO, WARN, ERROR, ALL 和 OFF,还有一个特殊值INHERITED或者同义词NULL,代表强制执行上级的级别。如果未设置此属性,那么当前loger将会继承上级的级别。

  • addtivity:是否向上级loger传递打印信息。默认是true

1
2
3
4
5
6
7
8
9
10
11
12
13
14
15
16
17
18
19
20
21
22
23
24
25
26
27
28
29
30
31
32
33
34
35
36
37
38
39
40
41
42
43
44
45
46
47
48
49
50
51
52
53
54
55
56
57
58
59
60
61
62
63
64
65
66
67
68
69
70
71
72
73
74
75
76
77
78
79
80
81
82
83
84
85
86
87
88
89
90
91
92
93
94
95
96
97
98
99
100
101
102
103
104
105
106
107
108
109
110
111
112
113
114
115
116
117
118
119
120
121
122
123
124
125
126
127
128
129
130
131
132
133
134
135
136
137
138
139
140
141
142
143
144
145
146
147
148
149
150
151
152
153
154
155
156
157
158
159
160
161
162
163
164
165
166
167
168
169
170
171
172
173
174
175
176
177
178
179
180
181
182
183
184
185
186
187
188
189
<?xml version="1.0" encoding="UTF-8"?>
<configuration scan="true" scanPeriod="10 seconds">
<contextName>logback-spring</contextName>
<property name="logging.path" value="myLogs"/>
<!--0. 日志格式和颜色渲染 -->
<!-- 彩色日志依赖的渲染类 -->
<conversionRule conversionWord="clr" converterClass="org.springframework.boot.logging.logback.ColorConverter"/>
<conversionRule conversionWord="wex" converterClass="org.springframework.boot.logging.logback.WhitespaceThrowableProxyConverter"/>
<conversionRule conversionWord="wEx" converterClass="org.springframework.boot.logging.logback.ExtendedWhitespaceThrowableProxyConverter"/>
<!-- 彩色日志格式 -->
<property name="CONSOLE_LOG_PATTERN"
value="${CONSOLE_LOG_PATTERN:-%clr(%d{yyyy-MM-dd HH:mm:ss.SSS}){faint} %clr(${LOG_LEVEL_PATTERN:-%5p}) %clr(${PID:- }){magenta} %clr(---){faint} %clr([%15.15t]){faint} %clr(%-40.40logger{39}){cyan} %clr(:){faint} %m%n${LOG_EXCEPTION_CONVERSION_WORD:-%wEx}}"/>

<!--1. 输出到控制台-->
<appender name="CONSOLE" class="ch.qos.logback.core.ConsoleAppender">
<!--此日志appender是为开发使用,只配置最底级别,控制台输出的日志级别是大于或等于此级别的日志信息-->
<filter class="ch.qos.logback.classic.filter.ThresholdFilter">
<level>debug</level>
</filter>

<!--日志文档输出格式-->
<encoder>
<!--指定日志格式-->
<Pattern>${CONSOLE_LOG_PATTERN}</Pattern>
<!--设置字符集-->
<charset>UTF-8</charset>
</encoder>
</appender>

<!--输出到文档-->
<!-- 时间滚动输出 level为 DEBUG 日志 -->
<appender name="DEBUG_FILE" class="ch.qos.logback.core.rolling.RollingFileAppender">
<!-- 正在记录的日志文件的路径及文件名~~~~~file设置打印的文件的路径及文件名,建议绝对路径-->
<file>${logging.path}/web_debug.log</file>

<!--日志文档输出格式-->
<encoder>
<!--指定日志格式-->
<pattern>%d{yyyy-MM-dd HH:mm:ss.SSS} [%thread] %-5level %logger{50} - %msg%n</pattern>
<!-- 设置字符集 -->
<charset>UTF-8</charset>
</encoder>

<!-- 日志记录器的滚动策略,按日期,按大小记录 -->
<!--
日志记录器的滚动策略
SizeAndTimeBasedRollingPolicy 按日期,大小记录日志
另外一种方式:
rollingPolicy的class设置为ch.qos.logback.core.rolling.TimeBasedRollingPolicy
-->
<rollingPolicy class="ch.qos.logback.core.rolling.TimeBasedRollingPolicy">
<!-- 日志归档 -->
<!--
归档的日志文件的路径,例如今天是2018-08-23日志,当前写的日志文件路径为file节点指定,
可以将此文件与file指定文件路径设置为不同路径,从而将当前日志文件或归档日志文件置不同的目录。
而2018-08-23的日志文件在由fileNamePattern指定。%d{yyyy-MM-dd}指定日期格式,%i指定索引
-->
<fileNamePattern>${logging.path}/web-debug-%d{yyyy-MM-dd}.%i.log</fileNamePattern>

<!--
配置日志文件不能超过100M,若超过100M,日志文件会以索引0开始,命名日志文件
例如error.20180823.0.txt
-->
<timeBasedFileNamingAndTriggeringPolicy
class="ch.qos.logback.core.rolling.SizeAndTimeBasedFNATP">
<maxFileSize>100MB</maxFileSize>
</timeBasedFileNamingAndTriggeringPolicy>

<!--日志文档保留天数-->
<maxHistory>15</maxHistory>
</rollingPolicy>

<!-- 此日志文档只记录debug级别的 -->
<!-- 过滤策略:
LevelFilter : 只打印level标签设置的日志级别
ThresholdFilter:打印大于等于level标签设置的级别,小的舍弃
-->
<!--<filter class="ch.qos.logback.classic.filter.ThresholdFilter">-->
<filter class="ch.qos.logback.classic.filter.LevelFilter">
<!-- 过滤的日志级别 -->
<level>debug</level>
<!--匹配到就允许-->
<onMatch>ACCEPT</onMatch>
<!--没有匹配到就禁止-->
<onMismatch>DENY</onMismatch>
</filter>
</appender>

<!-- 2.2 level为 INFO 日志,时间滚动输出 -->
<appender name="INFO_FILE" class="ch.qos.logback.core.rolling.RollingFileAppender">
<!-- 正在记录的日志文档的路径及文档名 -->
<file>${logging.path}/web_info.log</file>
<!--日志文档输出格式-->
<encoder>
<pattern>%d{yyyy-MM-dd HH:mm:ss.SSS} [%thread] %-5level %logger{50} - %msg%n</pattern>
<charset>UTF-8</charset>
</encoder>
<!-- 日志记录器的滚动策略,按日期,按大小记录 -->
<rollingPolicy class="ch.qos.logback.core.rolling.TimeBasedRollingPolicy">
<!-- 每天日志归档路径以及格式 -->
<fileNamePattern>${logging.path}/web-info-%d{yyyy-MM-dd}.%i.log</fileNamePattern>
<timeBasedFileNamingAndTriggeringPolicy
class="ch.qos.logback.core.rolling.SizeAndTimeBasedFNATP">
<maxFileSize>100MB</maxFileSize>
</timeBasedFileNamingAndTriggeringPolicy>
<!--日志文档保留天数-->
<maxHistory>15</maxHistory>
</rollingPolicy>
<!-- 此日志文档只记录info级别的 -->
<filter class="ch.qos.logback.classic.filter.LevelFilter">
<level>info</level>
<onMatch>ACCEPT</onMatch>
<onMismatch>DENY</onMismatch>
</filter>
</appender>

<!-- 2.3 level为 WARN 日志,时间滚动输出 -->
<appender name="WARN_FILE" class="ch.qos.logback.core.rolling.RollingFileAppender">
<!-- 正在记录的日志文档的路径及文档名 -->
<file>${logging.path}/web_warn.log</file>
<!--日志文档输出格式-->
<encoder>
<pattern>%d{yyyy-MM-dd HH:mm:ss.SSS} [%thread] %-5level %logger{50} - %msg%n</pattern>
<charset>UTF-8</charset> <!-- 此处设置字符集 -->
</encoder>
<!-- 日志记录器的滚动策略,按日期,按大小记录 -->
<rollingPolicy class="ch.qos.logback.core.rolling.TimeBasedRollingPolicy">
<fileNamePattern>${logging.path}/web-warn-%d{yyyy-MM-dd}.%i.log</fileNamePattern>
<timeBasedFileNamingAndTriggeringPolicy
class="ch.qos.logback.core.rolling.SizeAndTimeBasedFNATP">
<maxFileSize>100MB</maxFileSize>
</timeBasedFileNamingAndTriggeringPolicy>
<!--日志文档保留天数-->
<maxHistory>15</maxHistory>
</rollingPolicy>
<!-- 此日志文档只记录warn级别的 -->
<filter class="ch.qos.logback.classic.filter.LevelFilter">
<level>warn</level>
<onMatch>ACCEPT</onMatch>
<onMismatch>DENY</onMismatch>
</filter>
</appender>

<!-- 2.4 level为 ERROR 日志,时间滚动输出 -->
<appender name="ERROR_FILE" class="ch.qos.logback.core.rolling.RollingFileAppender">
<!-- 正在记录的日志文档的路径及文档名 -->
<file>${logging.path}/web_error.log</file>
<!--日志文档输出格式-->
<encoder>
<pattern>%d{yyyy-MM-dd HH:mm:ss.SSS} [%thread] %-5level %logger{50} - %msg%n</pattern>
<charset>UTF-8</charset> <!-- 此处设置字符集 -->
</encoder>
<!-- 日志记录器的滚动策略,按日期,按大小记录 -->
<rollingPolicy class="ch.qos.logback.core.rolling.TimeBasedRollingPolicy">
<fileNamePattern>${logging.path}/web-error-%d{yyyy-MM-dd}.%i.log</fileNamePattern>
<timeBasedFileNamingAndTriggeringPolicy
class="ch.qos.logback.core.rolling.SizeAndTimeBasedFNATP">
<maxFileSize>100MB</maxFileSize>
</timeBasedFileNamingAndTriggeringPolicy>
<!--日志文档保留天数-->
<maxHistory>15</maxHistory>
</rollingPolicy>
<!-- 此日志文档只记录ERROR级别的 -->
<filter class="ch.qos.logback.classic.filter.LevelFilter">
<level>ERROR</level>
<onMatch>ACCEPT</onMatch>
<onMismatch>DENY</onMismatch>
</filter>
</appender>

<!--
## 使用mybatis的时候,sql语句是debug下才会打印,而这里我们只配置了info,所以想要查看sql语句的话,有以下两种操作:
### 第一种把 日志配置文件中的 <root level="info">改成<root level="DEBUG">这样就会打印sql,不过这样日志那边会出现很多其他消息
<logger name="org.springframework.web" level="info"/>
<logger name="org.springframework.scheduling.annotation.ScheduledAnnotationBeanPostProcessor" level="INFO"/>
-->

<!-- 4. 最终的策略 -->
<!--

-->
<root level="info">
<appender-ref ref="CONSOLE"/>
<appender-ref ref="DEBUG_FILE"/>
<appender-ref ref="INFO_FILE"/>
<appender-ref ref="WARN_FILE"/>
<appender-ref ref="ERROR_FILE"/>
</root>
</configuration>

3. 使用

SLF4J的jar和Logback的实现jar

1
2
3
4
5
6
7
8
9
import org.slf4j.Logger;
import org.slf4j.LoggerFactory;

public class HelloWorld {
public static void main(String[] args) {
Logger logger = LoggerFactory.getLogger(HelloWorld.class);
logger.info("Hello World");
}
}

AOP实现自定义日志

定义切点注解

定义切面

在切点切入

web

  • 导入静态资源
  • 首页
  • jsp,模板引擎Thymeleaf
  • 装配扩展SpringMVC
  • CRUD
  • Inteceptor
  • 国家化

使用SpringBoot:

  • 创建SpringBoot应用,选中模块
  • SpringBoot默认将这些场景配置好,只需要在配置文件中指定少量配置即可
  • 自己编写业务代码

自动配置原理:

  • 这个场景SpringBoot帮我们配置了什么?能不能修改!
1
2
XXXAutoconfiguration
XXXProperties

bootstrap

导入静态资源

image-20210226112126811

image-20210226112259041

1
2
3
4
5
6
7
8
9
10
11
12
13
14
15
16
17
18
19
20
21
22
@Override
protected void addResourceHandlers(ResourceHandlerRegistry registry) {
super.addResourceHandlers(registry);
//判断是否开启自动配置资源路径
if (!this.resourceProperties.isAddMappings()) {
logger.debug("Default resource handling disabled");
return;
}

ServletContext servletContext = getServletContext();

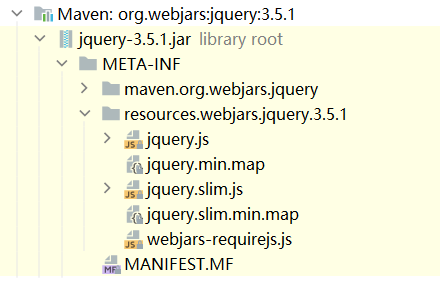
//所有 /webjars 的静态资源请求,都被映射到 classpath:/META-INF/resources/webjars/下
addResourceHandler(registry, "/webjars/**", "classpath:/META-INF/resources/webjars/");

//
addResourceHandler(registry, this.mvcProperties.getStaticPathPattern(), (registration) -> {
registration.addResourceLocations(this.resourceProperties.getStaticLocations());
if (servletContext != null) {
registration.addResourceLocations(new ServletContextResource(servletContext, SERVLET_LOCATION));
}
});
}

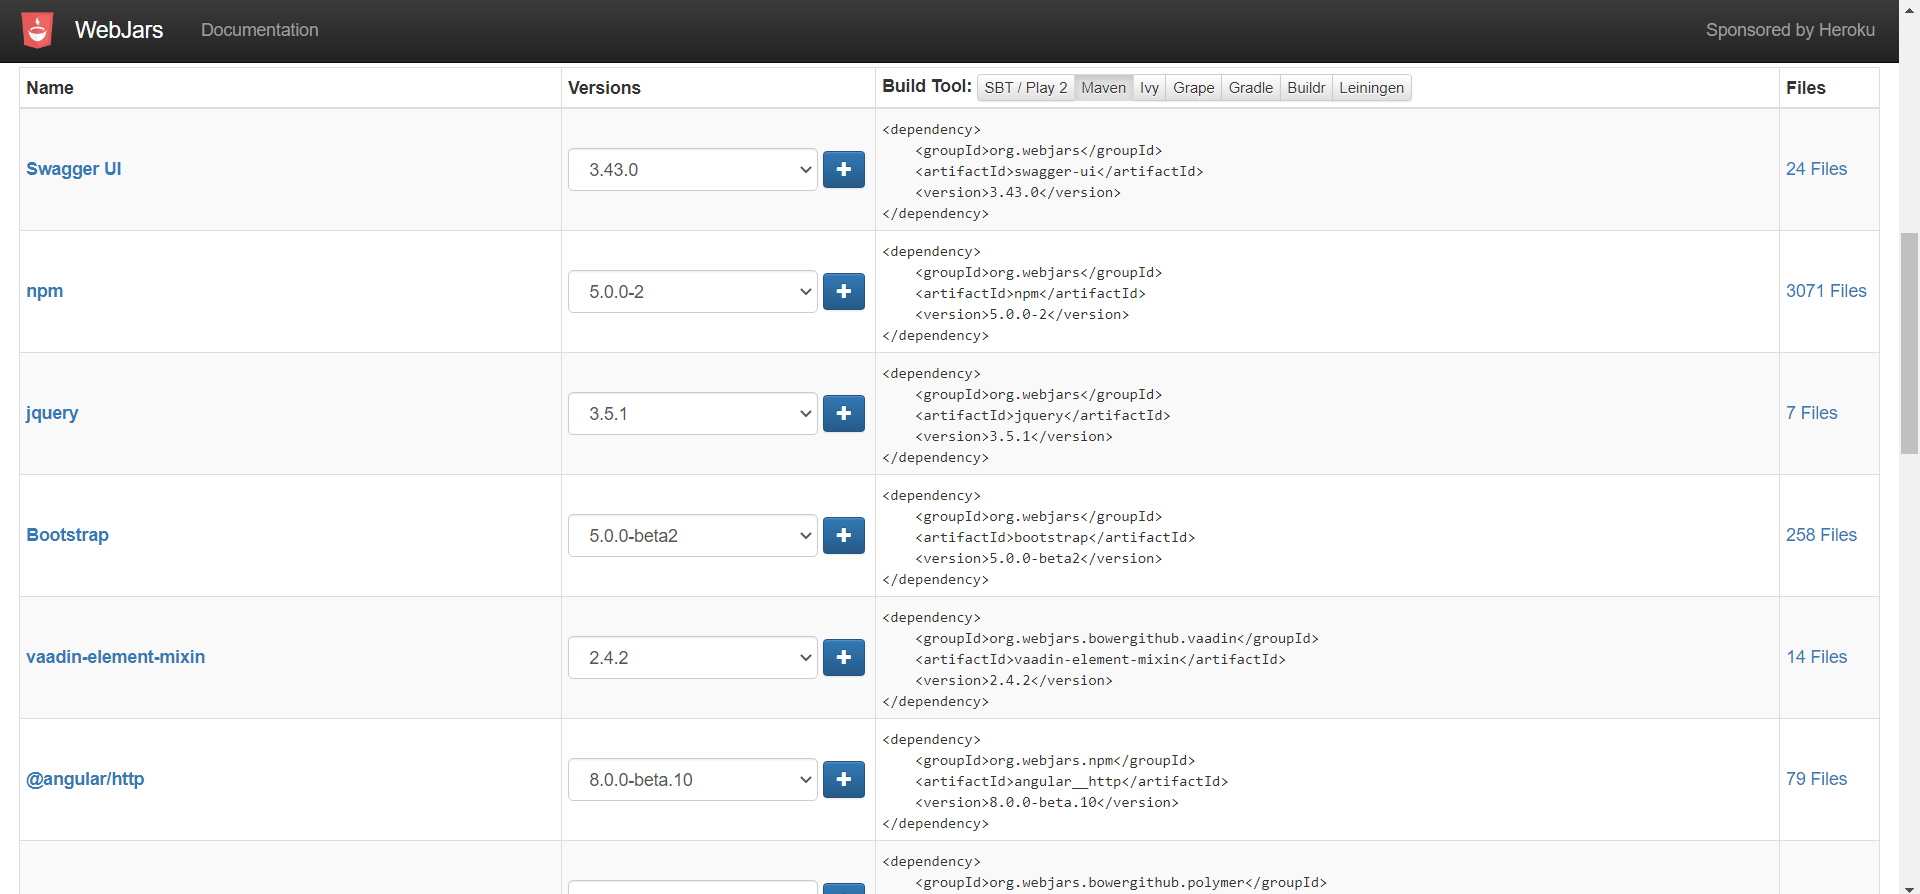
1. webjars

webjars:以jar包的方式导入静态资源

所有 /webjars 的静态资源请求,都被映射到 classpath:/META-INF/resources/webjars/

image-20210226112533794

image-20210224113046456

1
2
3
4
5
<dependency>
<groupId>org.webjars</groupId>
<artifactId>jquery</artifactId>
<version>3.5.1</version>
</dependency>

image-20210224114108697

image-20210224115108314

image-20210224115154440

2. 静态资源的默认查找位置

image-20210226113236236

image-20210226113328599

总结

  • wabjars :一般不用
  • rescources :上传的文件
  • static :静态资源,图片
  • public :公共资源

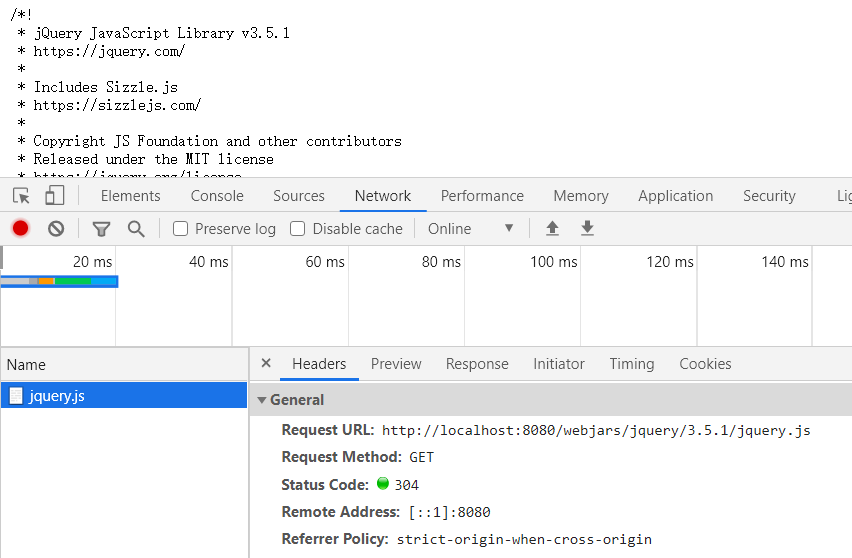
localhost:8080/webjars/**

优先级

rescources>static>public
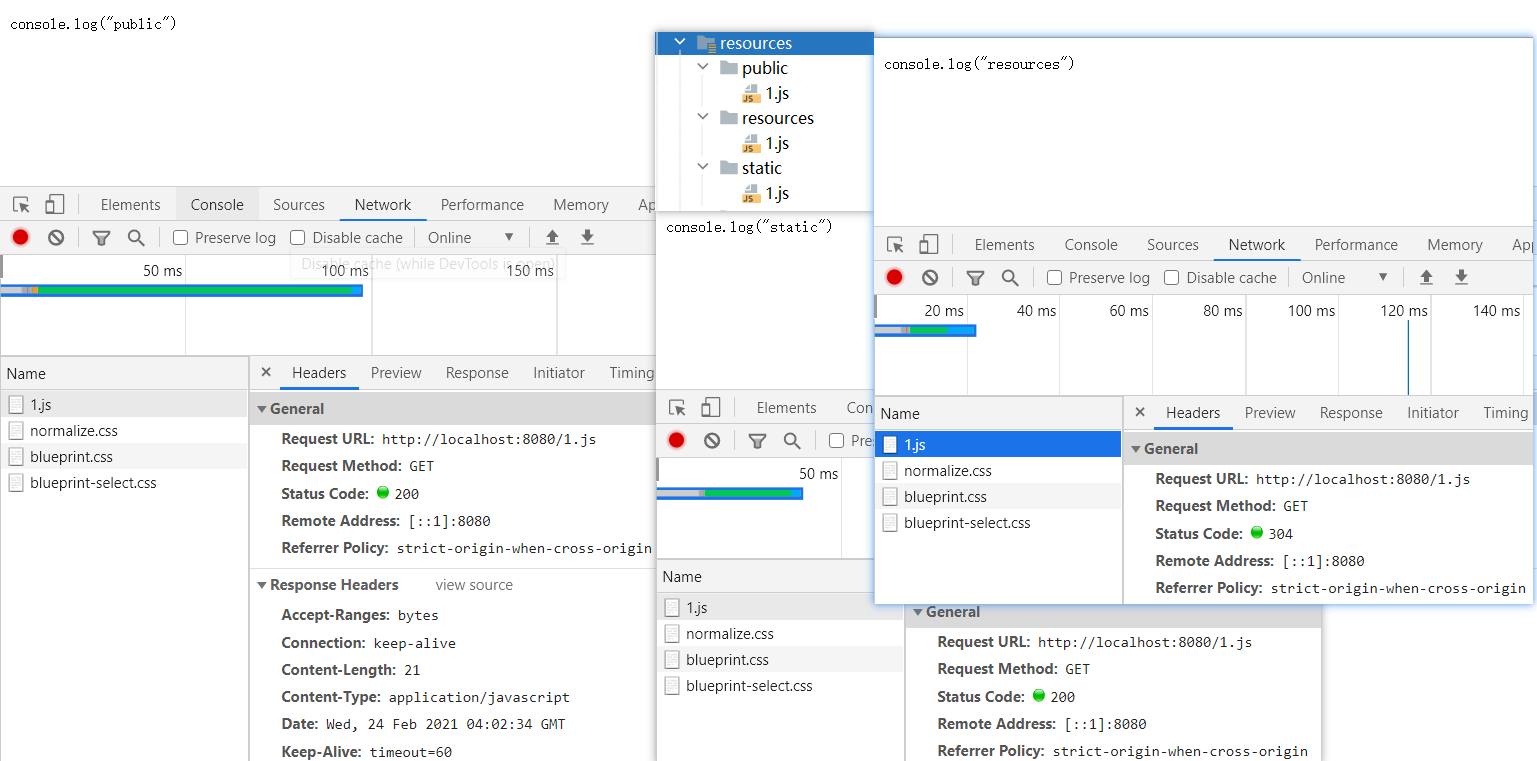
image-20210224120258081

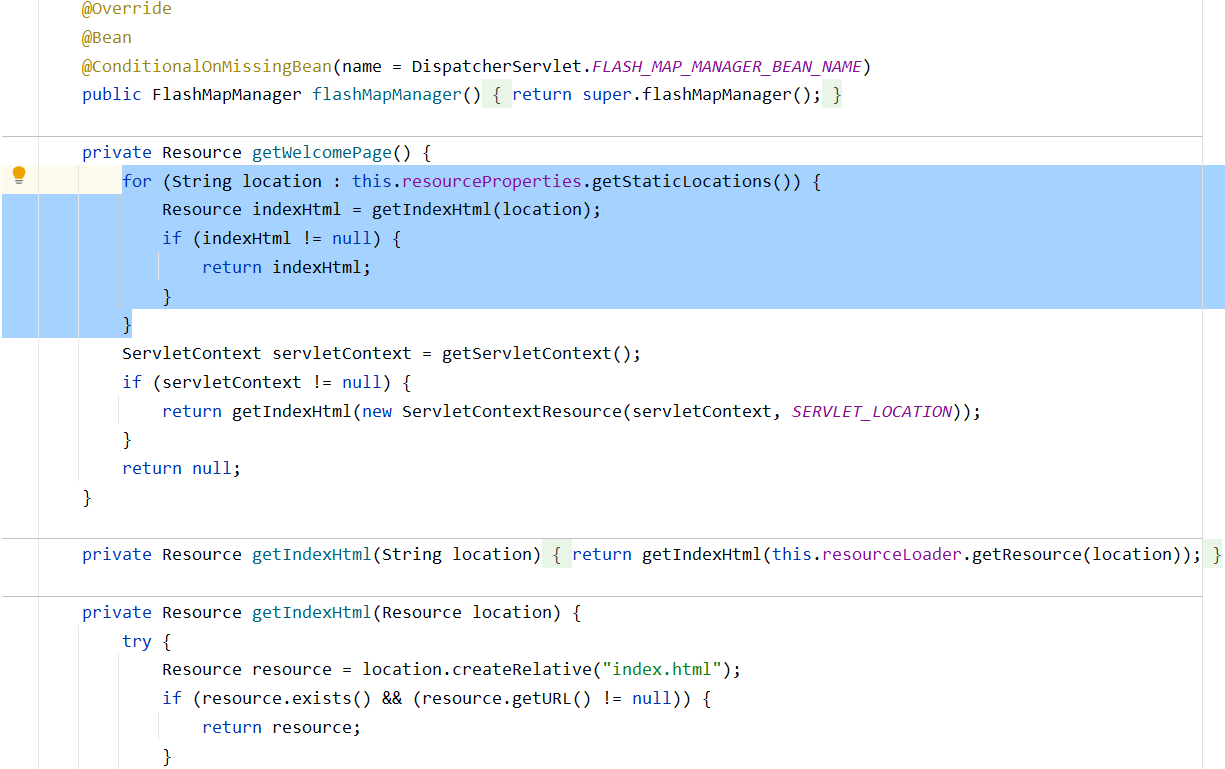
首页

位置

首页 从静态资源路径 CLASSPATH_RESOURCE_LOCATIONS +index.gtml中查找

image-20210224122214027

在Templates目录下的所有页面只能通过Controller跳转,相当于 WEB-INF

需要TemplateEngine模板引擎支持

模板引擎——ThymeLeaf

为了使用户界面与业务数据(内容)分离而产生的,它可以生成特定格式的文档,用于网站的模板引擎就会生成一个标准的HTML文档。

模板引擎的实现方式有很多,最简单的是“置换型”模板引擎,这类模板引擎只是将指定模板内容(字符串)中的特定标记(子字符串)替换一下便生成了最终需要的业务数据(比如网页)。

类比:JSP
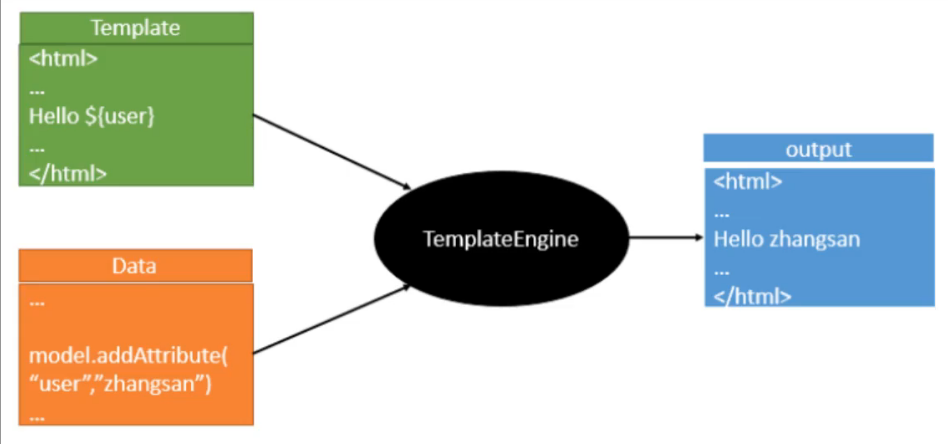
image-20210224123713024

github

Thymeleaf官网

启动器

spring-boot-starter-thymeleaf

1
2
3
4
5
6
7
8
<dependency>
<groupId>org.thymeleaf</groupId>
<artifactId>thymeleaf-spring5</artifactId>
</dependency>
<dependency>
<groupId>org.thymeleaf.extras</groupId>
<artifactId>thymeleaf-extras-java8time</artifactId>
</dependency>

image-20210226120355646

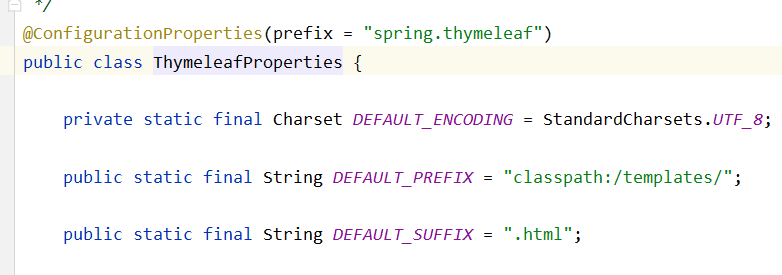
默认位置

image-20210224131808705

页面默认位置为classpath:/templates/

导入thymeleaf约束

1
2
<html xmlns:th="http://www.thymeleaf.org">
</html>

基本语法

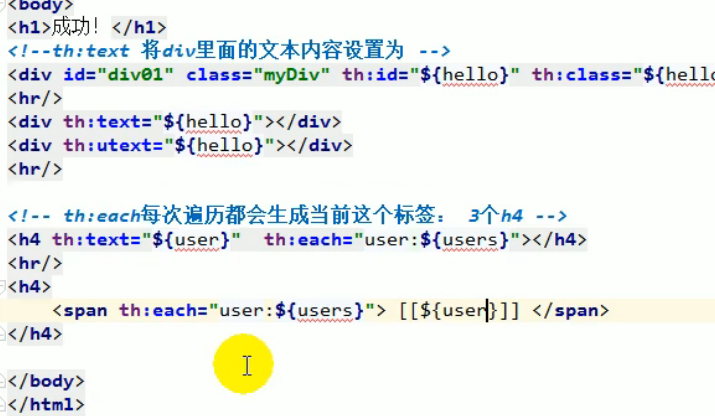
所有的html元素都可被 thymeleaf替换接管, th:元素名

属性优先级
JSPFeatureAttributes
jsp:includeFragment inclusionth:insert th:replace
c:forEachFragment iterationth:each
流程控制Conditional evaluationth:if th:unless th:switch th:case
声明变量 c:setLocal variable definitionth:object th:with
属性修改,支持 prepend,appendGeneral attribute modificationth:attr th:attrprepend th:attrappend
修改指定属性默认值Specific attribute modificationth:value th:href th:src ...
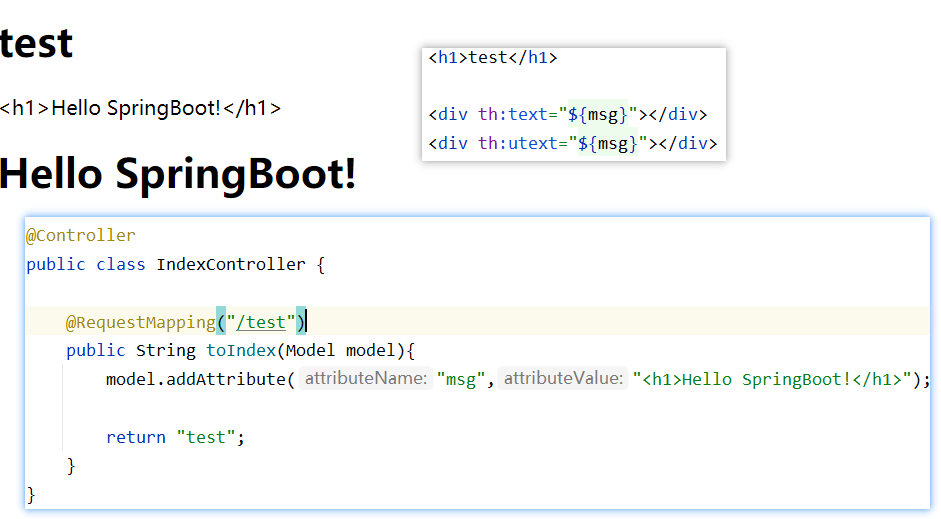
修改标签体内容Text (tag body modification)是否转义th:text转义特殊字符
th:utext不转义特殊字符
声明片段Fragment specificationth:fragment
Fragment removalth:remove

image-20210224160157281

表达式
Simple expressions:
  1. Variable Expressions: ${...}:获取变量值
1
2
3
4
5
6
7
8
9
10
11
12
13
14
15
16
17
18
19
20
21
22
23
24
25
26
27
28
29
/* 
* Access to properties using the point (.). Equivalent to calling property getters.
*/
${person.father.name}

/*
* Access to properties can also be made by using brackets ([]) and writing
* the name of the property as a variable or between single quotes.
*/
${person['father']['name']}

/*
* If the object is a map, both dot and bracket syntax will be equivalent to
* executing a call on its get(...) method.
*/
${countriesByCode.ES}
${personsByName['Stephen Zucchini'].age}

/*
* Indexed access to arrays or collections is also performed with brackets,
* writing the index without quotes.
*/
${personsArray[0].name}

/*
* Methods can be called, even with arguments.
*/
${person.createCompleteName()}
${person.createCompleteNameWithSeparator('-')}
  • 内置的基本对象

    1
    2
    3
    4
    5
    6
    7
    8
    9
    #ctx: the context object.
    #vars: the context variables.
    #locale: the context locale.

    <!--(only in Web Contexts)-->
    #request: the HttpServletRequest object.
    #response: the HttpServletResponse object.
    #session: the HttpSession object.
    #servletContext: the ServletContext object.
  • 内置的工具对象

    1
    2
    3
    4
    5
    6
    7
    8
    9
    10
    11
    12
    13
    14
    15
    16
    17
    18
    19
    20
    21
    22
    23
    24
    25
    26
    27
    28
    29
    30
    #execInfo: information about the template being processed.

    #messages: methods for obtaining externalized messages inside variables expressions, in the same way as they would be obtained using #{…} syntax.

    #uris: methods for escaping parts of URLs/URIs

    #conversions: methods for executing the configured conversion service (if any).

    #dates: methods for java.util.Date objects: formatting, component extraction, etc.

    #calendars: analogous to #dates, but for java.util.Calendar objects.

    #numbers: methods for formatting numeric objects.
    #strings: methods for String objects: contains, startsWith, prepending/appending, etc.

    #objects: methods for objects in general.

    #bools: methods for boolean evaluation.

    #arrays: methods for arrays.

    #lists: methods for lists.

    #sets: methods for sets.

    #maps: methods for maps.

    #aggregates: methods for creating aggregates on arrays or collections.

    #ids: methods for dealing with id attributes that might be repeated (for example, as a result of an iteration).
  1. Selection Variable Expressions: *{...}:配合th:object使用
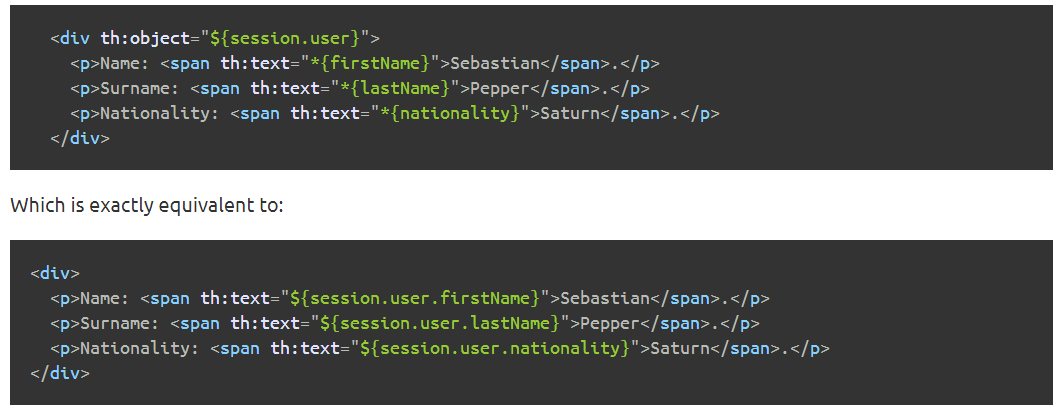
    image-20210224165636820

  2. Message Expressions: #{...}获取国际化内容

  3. Link URL Expressions: @{...}:定义URL

  • @{/order/process(execId=${execId},execType=’FAST’)}
  1. Fragment Expressions: ~{...}
Literals 字面量
  • Text literals: 'one text', 'Another one!',…
  • Number literals: 0, 34, 3.0, 12.3,…
  • Boolean literals: true, false
  • Null literal: null
  • Literal tokens: one, sometext, main,…
Text operations:文本拼接
  • String concatenation: +
  • Literal substitutions: |The name is ${name}|
Arithmetic operations:数学运算
  • Binary operators: +, -, *, /, %
  • Minus sign (unary operator): -
Boolean operations:布尔运算
  • Binary operators: and, or
  • Boolean negation (unary operator): !, not
Comparisons and equality:比较运算
  • Comparators: >, <, >=, <= (gt, lt, ge, le)
  • Equality operators: _, != (eq, ne)
Conditional operators:条件运算
  • If-then: (if) ? (then)
  • If-then-else: (if) ? (then) : (else)
  • Default: (value) ?: (defaultvalue)
Special tokens:
  • No-Operation: _

All these features can be combined and nested:

1
'User is of type ' + (${user.isAdmin()} ? 'Administrator' : (${user.type} ?: 'Unknown'))

image-20210224170722867

image-20210224170708295

Thymeleaf请求转发实现机制

image-20210228193748674

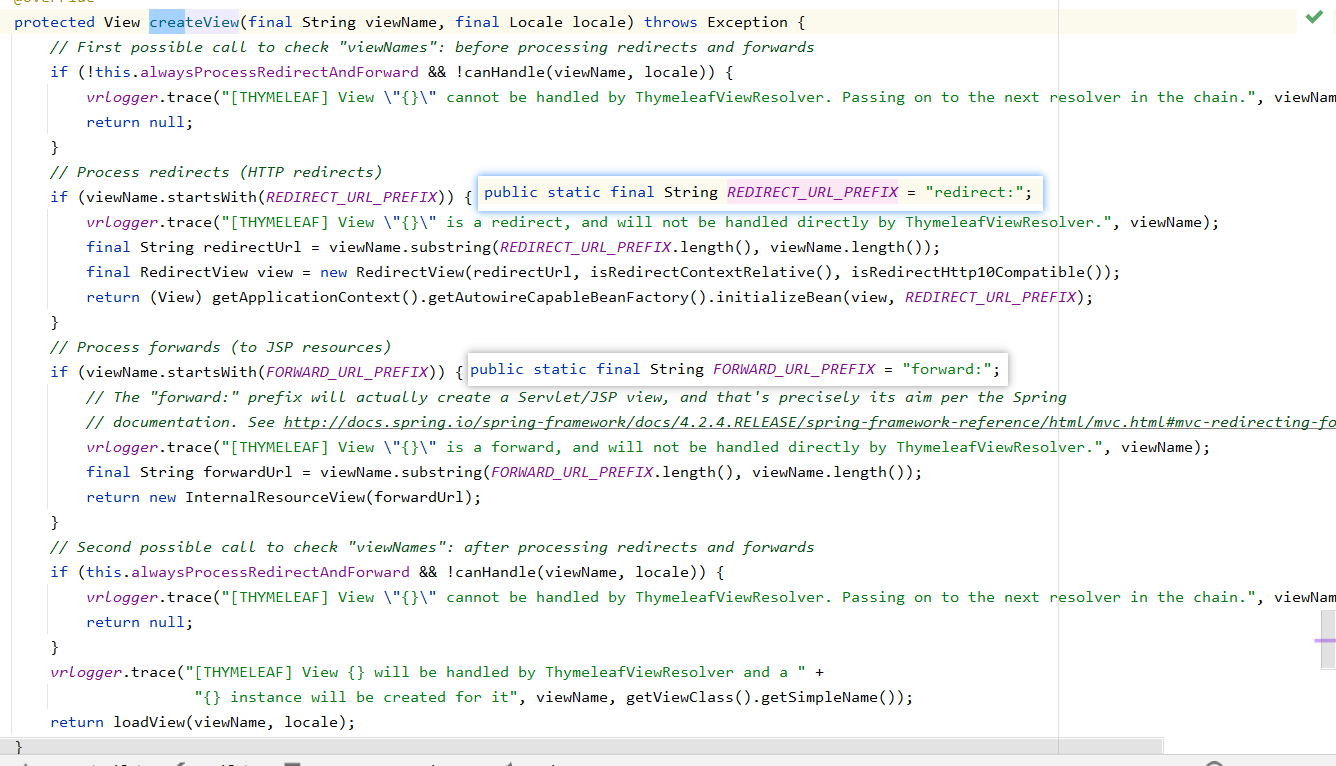
redirect

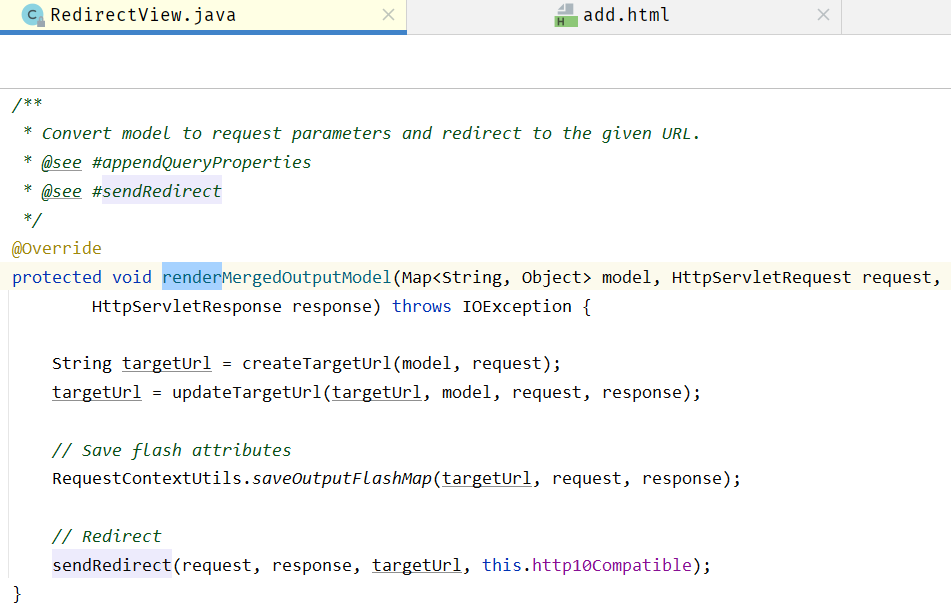
底层也是response.sendredirect 实现页面重定向
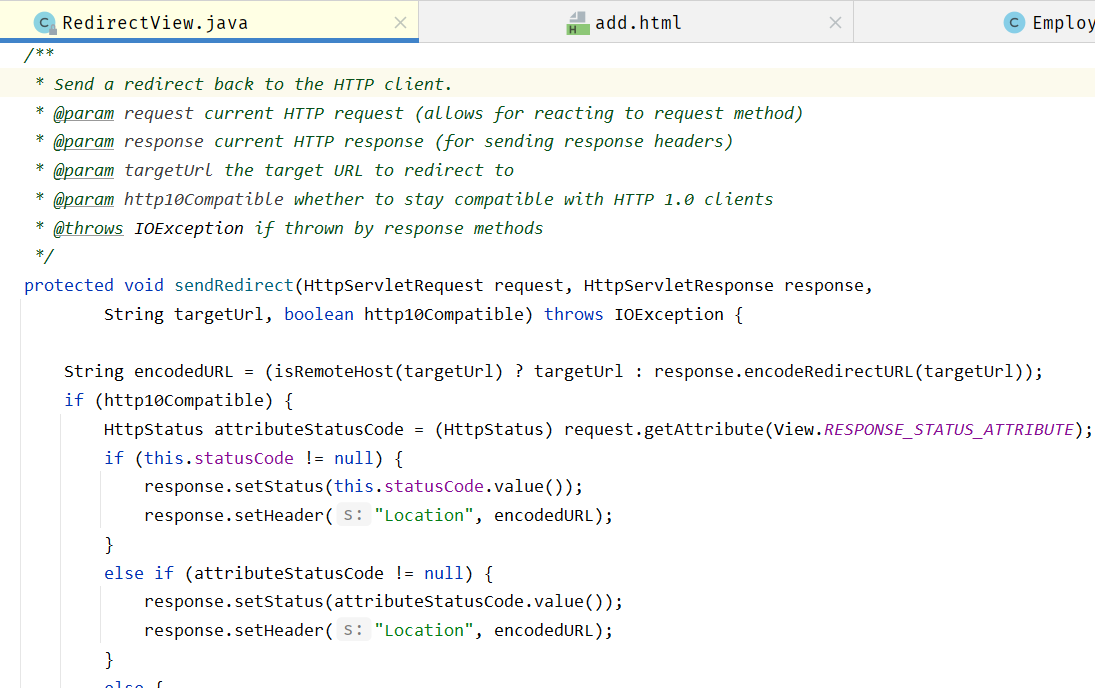
image-20210228194341578

渲染页面,并将model中属性转为request参数,并重定向到目标页面

image-20210228194628911

request

image-20210228195336959

1
2
3
4
5
6
7
8
9
10
11
12
13
14
15
16
17
18
19
20
21
22
23
24
25
26
27
28
29
30
31
32
33
34
35
36
37
38
39
40
41
/**
* Render the internal resource given the specified model.
* This includes setting the model as request attributes.
*/
@Override
protected void renderMergedOutputModel(
Map<String, Object> model, HttpServletRequest request, HttpServletResponse response) throws Exception {

// Expose the model object as request attributes.
exposeModelAsRequestAttributes(model, request);

// Expose helpers as request attributes, if any.
exposeHelpers(request);

// Determine the path for the request dispatcher.
String dispatcherPath = prepareForRendering(request, response);

// Obtain a RequestDispatcher for the target resource (typically a JSP).
RequestDispatcher rd = getRequestDispatcher(request, dispatcherPath);
if (rd _ null) {
throw new ServletException("Could not get RequestDispatcher for [" + getUrl() +
"]: Check that the corresponding file exists within your web application archive!");
}

// If already included or response already committed, perform include, else forward.
if (useInclude(request, response)) {
response.setContentType(getContentType());
if (logger.isDebugEnabled()) {
logger.debug("Including [" + getUrl() + "]");
}
rd.include(request, response);
}

else {
// Note: The forwarded resource is supposed to determine the content type itself.
if (logger.isDebugEnabled()) {
logger.debug("Forwarding to [" + getUrl() + "]");
}
rd.forward(request, response);
}
}

MVC

官方文档

SpringBoot Web MVC Framework

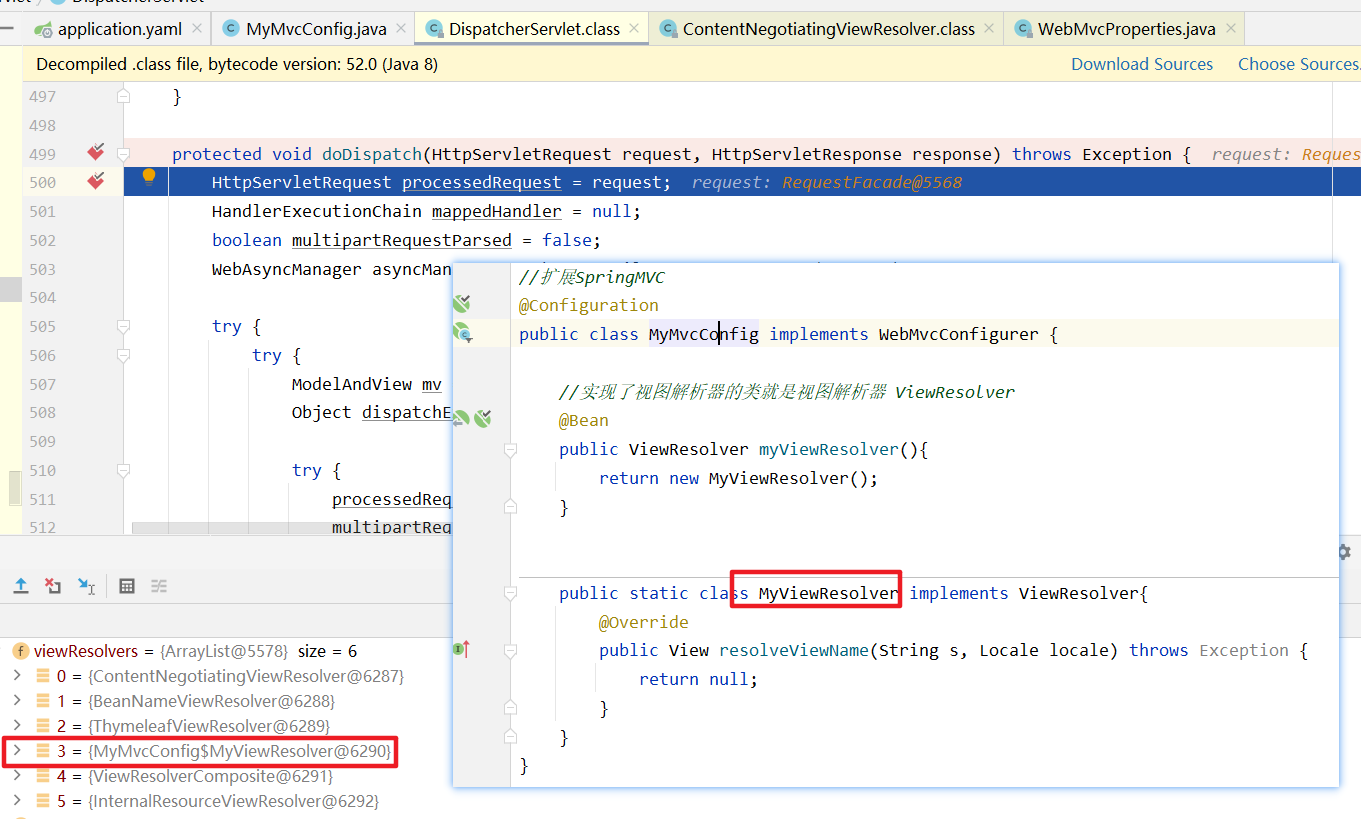
1. Inclusion of ContentNegotiatingViewResolver and BeanNameViewResolver beans.
  • 自动配置了视图解析器:根据方法返回值得到视图对象,视图对象决定页面如何渲染

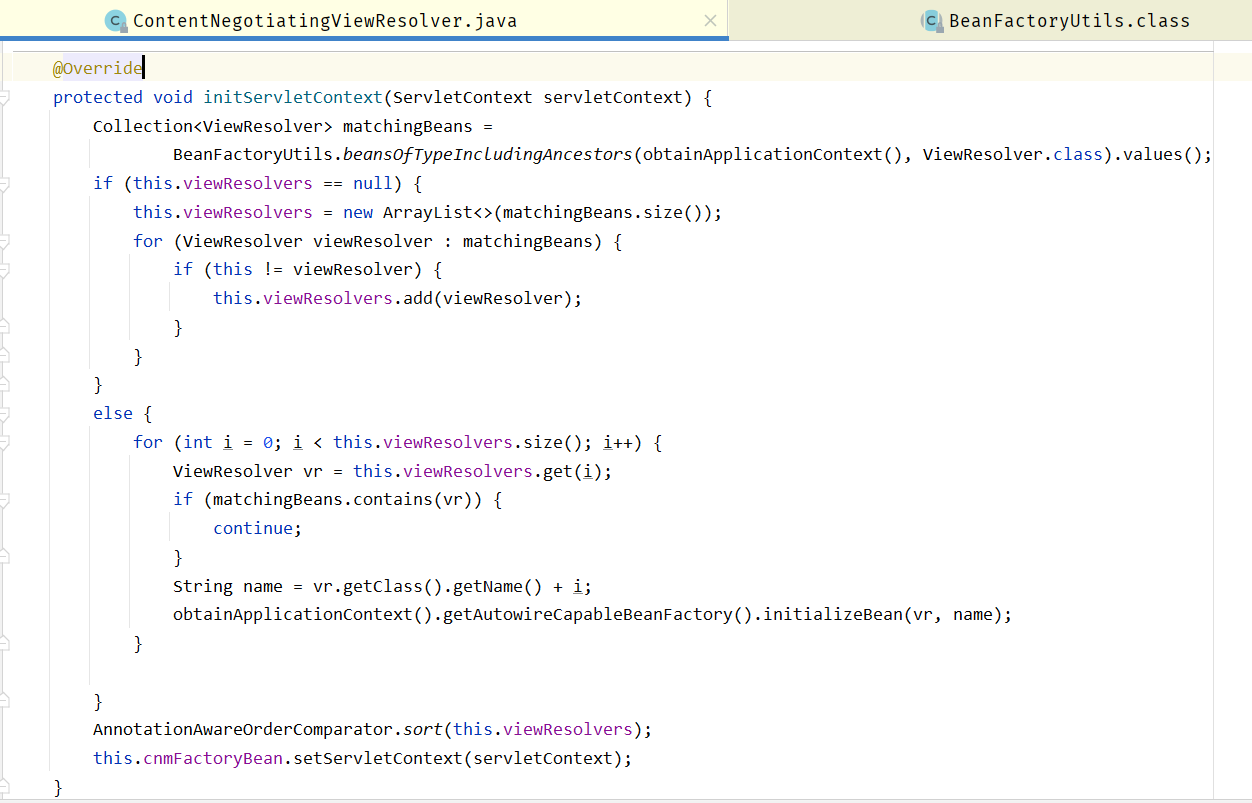
  • ContentNegotiatingViewResolver:用于组合所有视图解析器
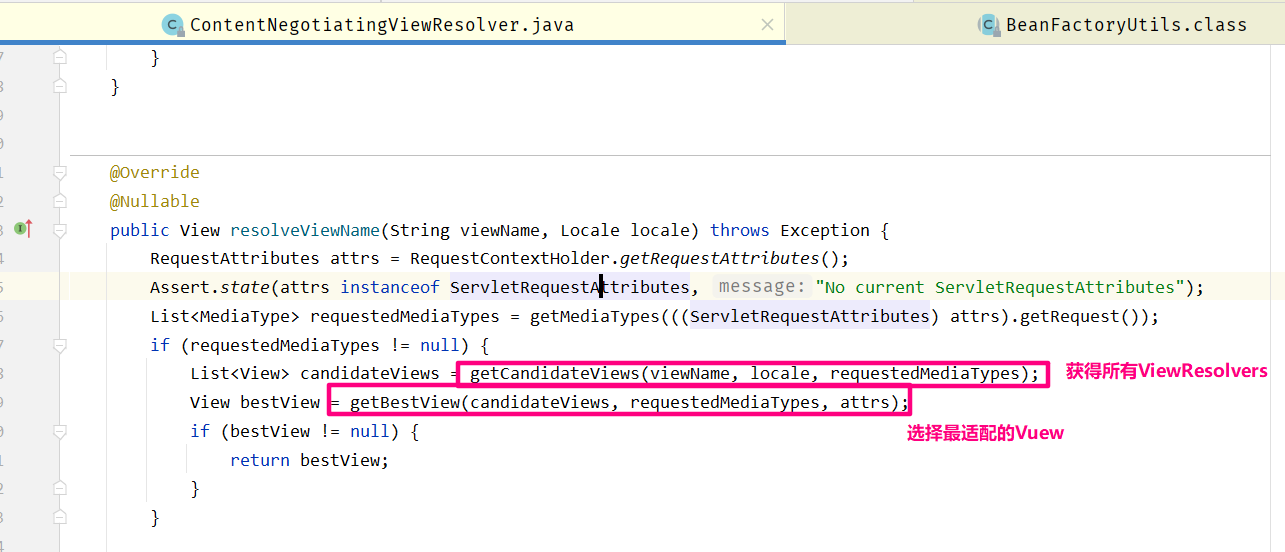
    image-20210226163508330

    image-20210226163149713

    • 将所有的viewResolvers装配到servletcontext中

    可以自己给容器中添加一个ViewResolver;自动将其组合进IoC容器

2. Support for serving static resources, including support for WebJars .

静态资源路径,支持webjars

3. Static index.html support.

静态首页访问

4. Automatic registration of Converter, GenericConverter, and Formatter beans.

converter(转换器):前端提交的数据自动封装为相应的POJO

Formatter(格式化器):字符串_>Date类型
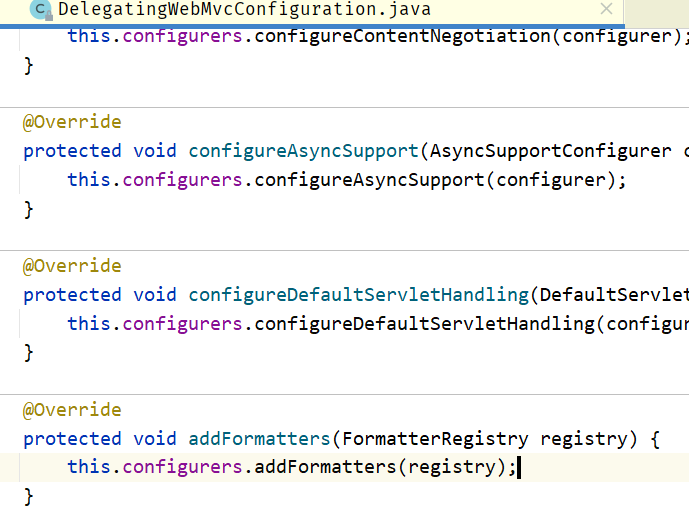
  • image-20210226164737142

image-20210226165131407

自己添加的 formatter,只需要注册到容器中即可

5. Support for HttpMessageConverters .

SpringMVC用来转换Http请求和响应

​ POJO-User_>JSON

image-20210226165701261

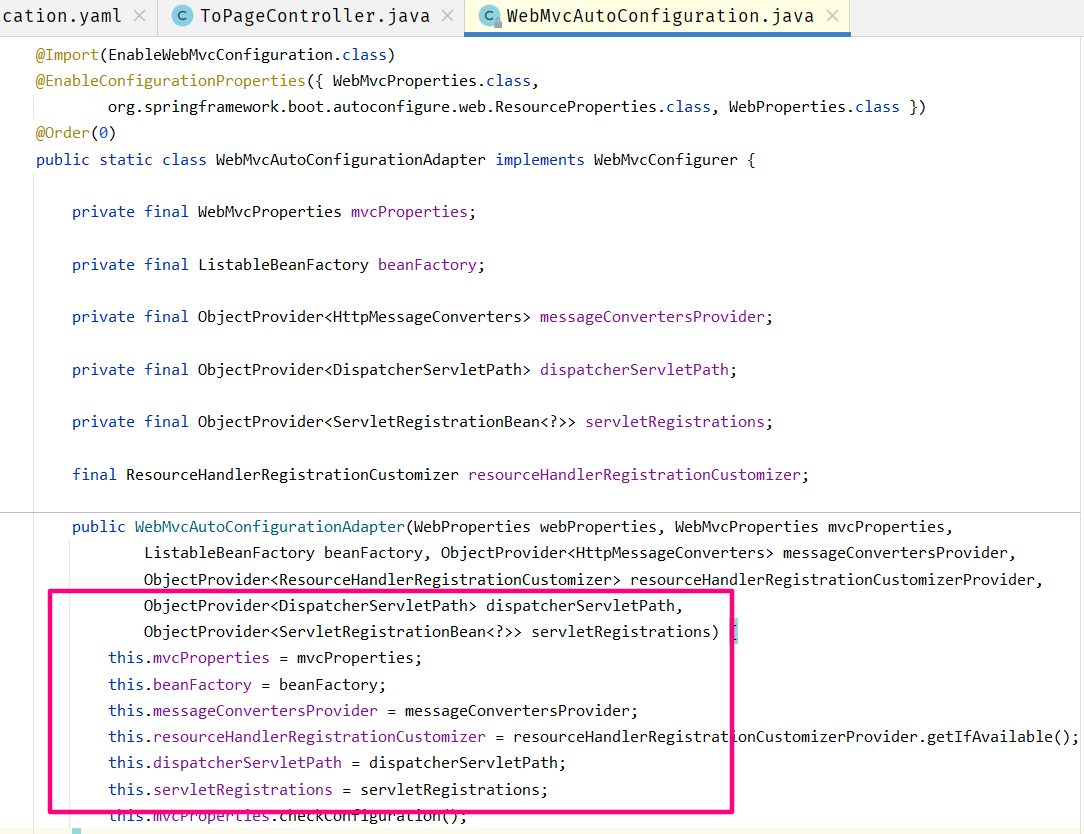
只有一个有参构造器,其参数都是从容器中获取

自己添加的 HttpMessageConverters,只需要注册到容器中即可

1
2
3
4
5
6
7
8
9
10
11
12
13
14
15
import org.springframework.boot.autoconfigure.http.HttpMessageConverters;
import org.springframework.context.annotation.*;
import org.springframework.http.converter.*;

@Configuration(proxyBeanMethods = false)
public class MyConfiguration {

@Bean
public HttpMessageConverters customConverters() {
HttpMessageConverter<?> additional = ...
HttpMessageConverter<?> another = ...
return new HttpMessageConverters(additional, another);
}

}
6. Automatic registration of MessageCodesResolver .

消息编码解析器;定义错误代码生成规则
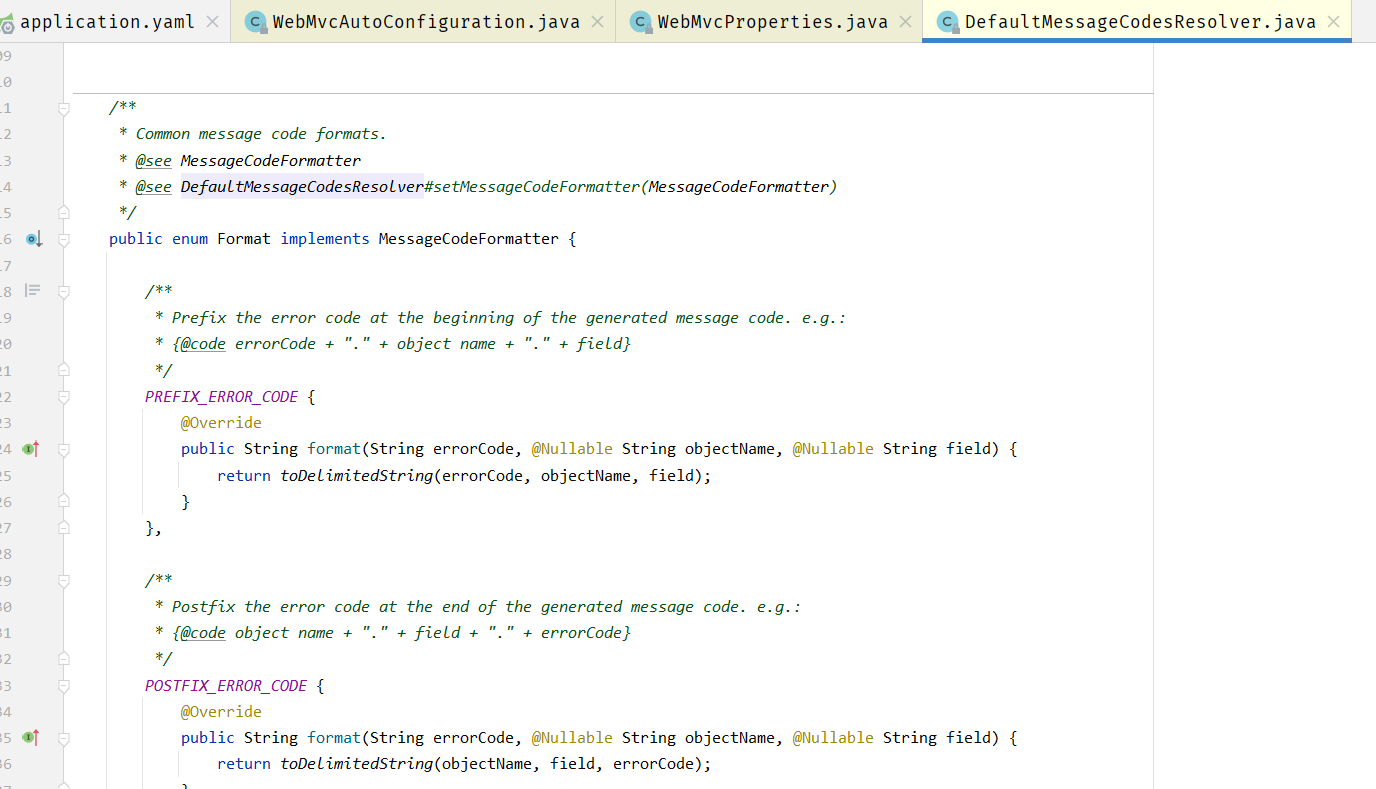
image-20210226170412960

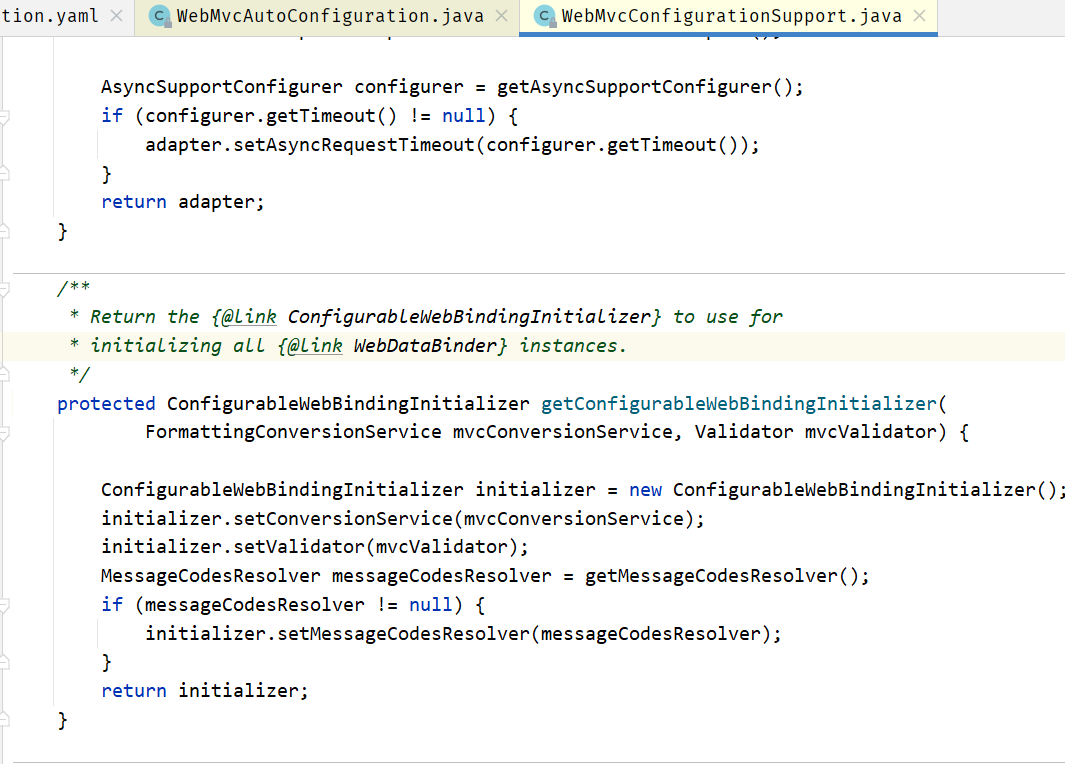
7. Automatic use of a ConfigurableWebBindingInitializer bean.

image-20210226170618218

从容器中获取一个组件

image-20210226170702724

初始化WebDataBinder

请求数据__JavaBean

扩展MVC功能

If you want to keep those Spring Boot MVC customizations and make more MVC customizations (interceptors, formatters, view controllers, and other features), you can add your own @Configuration class of interface WebMvcConfigurer but without @EnableWebMvc.
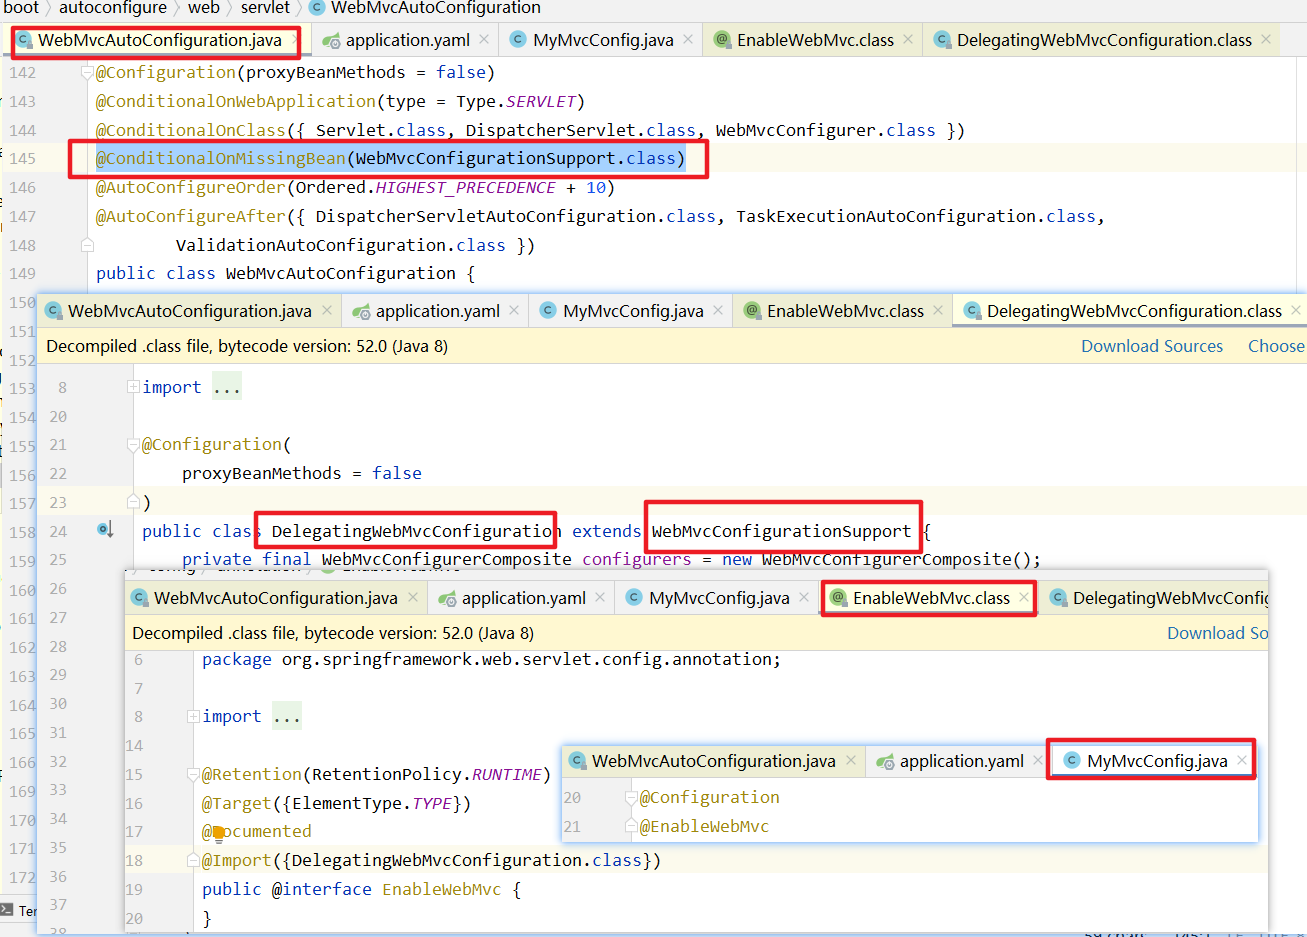
image-20210224180352060

实现页面跳转+拦截器
1
2
3
4
5
6
7
8
@Controller
public class ToPageController {

@RequestMapping("/hello")
public String toHello(){
return "hello";
}
}
1
2
3
4
5
6
7
8
9
<!--拦截器配置-->
<mvc:interceptors>
<mvc:interceptor>
<!--拦截这个请求下的所有请求-->
<mvc:mapping path="/**"/>
<!--配置拦截器-->
<bean class="com.kuang.config.MyInterceptor"/>
</mvc:interceptor>
</mvc:interceptors>
1
2
3
4
5
6
7
8
9
10
11
12
13
14
15
16
17
18
19
20
21
public class MyInteceptor implements HandlerInterceptor{
@Override
public boolean preHandle(HttpServletRequest request, HttpServletResponse response, Object handler) throws Exception {
System.out.println("__方法执行前!__");

/*
* return true;放行
* */
return true;
}

@Override
public void postHandle(HttpServletRequest request, HttpServletResponse response, Object handler, ModelAndView modelAndView) throws Exception {
System.out.println("__方法完成后!__");
}

@Override
public void afterCompletion(HttpServletRequest request, HttpServletResponse response, Object handler, Exception ex) throws Exception {
System.out.println("__清理__");
}
}

扩展SpringMVC,_互补配置_

1
2
3
4
5
6
7
8
9
10
11
12
13
14
15
16
17
18
19
20
21
22
23
24
25
26
27
28
29
30
31
32
33
34
35
36
37
38
@Configuration
public class MyConfig implements WebMvcConfigurer {

/*
* WebMvcConfigurer 用于扩展MVC
* */
@Override
public void addViewControllers(ViewControllerRegistry registry) {
registry.addViewController("/hello").setViewName("hello");
}

@Override
public void addInterceptors(InterceptorRegistry registry) {
registry.addInterceptor(new MyInteceptor());
}
}

class MyInteceptor implements HandlerInterceptor{
@Override
public boolean preHandle(HttpServletRequest request, HttpServletResponse response, Object handler) throws Exception {
System.out.println("__方法执行前!__");

/*
* return true;放行
* */
return true;
}

@Override
public void postHandle(HttpServletRequest request, HttpServletResponse response, Object handler, ModelAndView modelAndView) throws Exception {
System.out.println("__方法完成后!__");
}

@Override
public void afterCompletion(HttpServletRequest request, HttpServletResponse response, Object handler, Exception ex) throws Exception {
System.out.println("__清理__");
}
}
配置原则
  • SpringBoot自动配置组件,先看用户是否自己配置,若用户自定义用户配置,则用用户的;若没有则使用自动配置的;

  • 对于同时可存在多个的组件(ViewResolver),则组合使用。

    image-20210224175103168

自动配置生效原理

image-20210226180354872

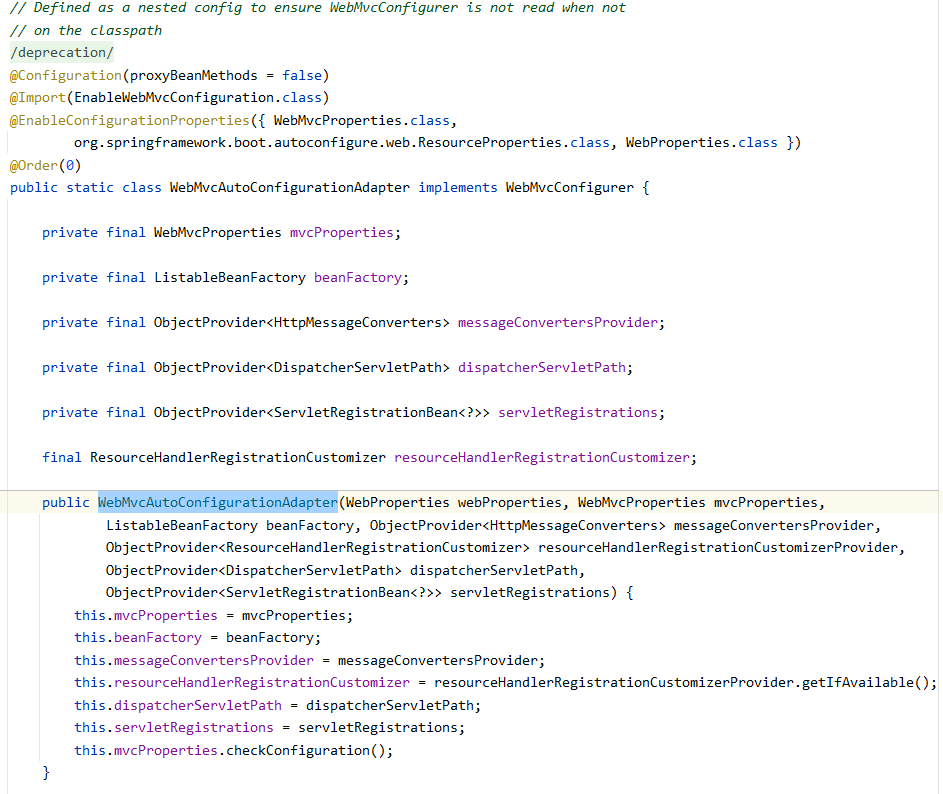
  1. WebMvcAutoConfiguration是SpringMVC的自动配置类

  2. @Import(EnableWebMvcConfiguration.class)

    image-20210226184520287

    image-20210226184627774

    image-20210226190411112

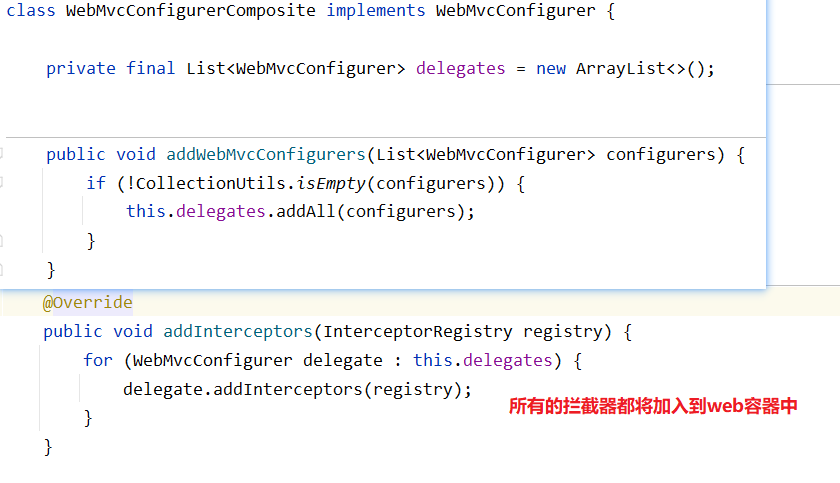
    • addWebMvcConfigurers 将所有实现了WebMvcConfigurer的configuration一起调用

    可见SpringBoot实现的自动配置会与自定义的自动配置一起调用形成_互补配置_

第一个MVC项目

1. 环境搭建

POJO
1
2
3
4
5
6
7
8
9
10
11
12
13
14
15
16
17
18
19
20
21
22
23
24
25
26
27
28
29
@Data
@AllArgsConstructor
@NoArgsConstructor
@Repository
public class Department {
private Integer id;
private String departmentName;
}

@Data
@NoArgsConstructor
@Repository
public class Employee {
private Integer id;
private String lastName;
private String email;
private Integer gender;
private Department department;
private Date date;

public Employee(Integer id, String lastName, String email, Integer gender, Department department) {
this.id = id;
this.lastName = lastName;
this.email = email;
this.gender = gender;
this.department = department;
this.date = new Date();
}
}
Dao
1
2
3
4
5
6
7
8
9
10
11
12
13
14
15
16
17
18
19
public class DepartmentDao {
private static Map<Integer, Department> departments;

static {
departments.put(101,new Department(101,"教学部"));
departments.put(102,new Department(102,"市场部"));
departments.put(103,new Department(103,"教研部"));
departments.put(104,new Department(104,"运营部"));
departments.put(105,new Department(105,"后勤部"));
}

public Collection<Department> getDepartments(){
return departments.values();
}

public Department getDepartmentById(Integer id){
return departments.get(id);
}
}
1
2
3
4
5
6
7
8
9
10
11
12
13
14
15
16
17
18
19
20
21
22
23
24
25
26
27
28
29
30
31
32
33
34
35
36
37
38
39
40
41
42
43
44
45
@Repository
public class EmployeeDao {
private static Map<Integer,Employee> employees = null;

static {
employees = new HashMap<Integer, Employee>();

employees.put(1001,new Employee(1001,"A","A123@email.com",
1,new Department(101,"教学部")));
employees.put(1002,new Employee(1002,"B","B123@email.com",
0,new Department(102,"市场部")));
employees.put(1003,new Employee(1003,"C","C123@email.com",
1,new Department(103,"教研部")));
employees.put(1004,new Employee(1004,"D","D123@email.com",
0,new Department(104,"运营部")));
employees.put(1005,new Employee(1005,"E","E123@email.com",
1,new Department(105,"后勤部")));
}

private static Integer initId = 1006;

//新增
public void save(Employee employee){
if(employee.getId()_null){//实现自增
employee.setId(initId++);
}

employees.put(employee.getId(),employee);
}

//查找全部
public Collection<Employee> getEmployees(){
return employees.values();
}

//通过id查找
public Employee getEmployeeById(Integer id){
return employees.get(id);
}

//通过id删除
public void delete(Integer id){
employees.remove(id);
}
}

2. 首页配置

所有的静态资源都要使用 Thymeleaf 接管

Thymeleaf依赖
1
2
3
4
5
6
7
8
<dependency>
<groupId>org.thymeleaf</groupId>
<artifactId>thymeleaf-spring5</artifactId>
</dependency>
<dependency>
<groupId>org.thymeleaf.extras</groupId>
<artifactId>thymeleaf-extras-java8time</artifactId>
</dependency>
Thymeleaf约束
1
xmlns:th="http://www.thymeleaf.org"
关闭模板引擎的缓存
1
2
3
spring:
thymeleaf:
cache: false
设置首页
  1. 不推荐

    1
    2
    3
    4
    5
    6
    7
    8
    9
    10
    11
    12
    @Bean
    public WebMvcConfigurerAdapter webMvcConfigurerAdapter(){
    WebMvcConfigurerAdapter adapter = new WebMvcConfigurerAdapter() {
    @Override
    public void addViewControllers(ViewControllerRegistry registry) {
    registry.addViewController("/").setViewName("index");
    registry.addViewController("/index.html").setViewName("index");
    }
    };

    return adapter;
    }
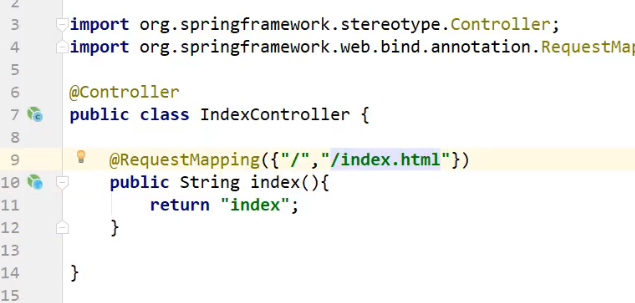
image-20210224204653626

  1. 【推荐使用】
1
2
3
4
5
6
7
8
@Configuration
public class MyMvcConfig implements WebMvcConfigurer {
@Override
public void addViewControllers(ViewControllerRegistry registry) {
registry.addViewController("/").setViewName("index");
registry.addViewController("/index.html").setViewName("index");
}
}
设置路径前缀
1
2
3
server:
servlet:
context-path: /t
将静态资源交给Thymeleaf统一管理

image-20210224215124654

3. 国际化

之前

  1. 编写国际化配置文件
  2. 使用ResourceBUndleMessageSource管理国际化资源
  3. 在页面使用fmt:message取出国际化内容

SpringBoot原理

国际化Locale(区域信息对象)

LocaleResolver(获取区域信息对象)
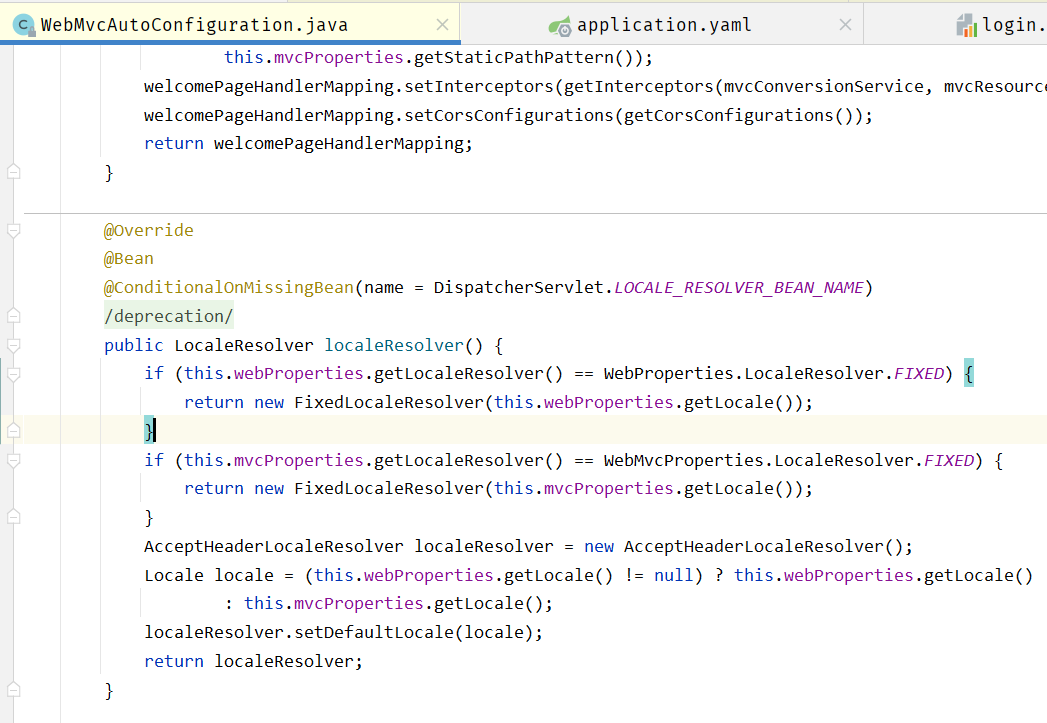
image-20210227093127936

  • 给容器中添加LocaleResolver组件
1
2
3
4
5
6
7
8
9
10
11
12
13
14
15
16
17
18
19
20
21
22
23
/**
* {@link LocaleResolver} implementation that simply uses the primary locale specified in the "accept-language" header of the HTTP request (that is the locale sent by the client browser, normally that of the client's OS).
*/
public class AcceptHeaderLocaleResolver implements LocaleResolver {
/*如果没有指定locale,则用浏览器默认的语言*/
@Override
public Locale resolveLocale(HttpServletRequest request) {
Locale defaultLocale = getDefaultLocale();
if (defaultLocale != null && request.getHeader("Accept-Language") _ null) {
return defaultLocale;
}
Locale requestLocale = request.getLocale();
List<Locale> supportedLocales = getSupportedLocales();
if (supportedLocales.isEmpty() || supportedLocales.contains(requestLocale)) {
return requestLocale;
}
Locale supportedLocale = findSupportedLocale(request, supportedLocales);
if (supportedLocale != null) {
return supportedLocale;
}
return (defaultLocale != null ? defaultLocale : requestLocale);
}
}
1
2
3
4
5
6
7
8
9
10
11
12
13
14
15
16
17
18
19
20
21
22
23
24
25
26
27
28
@ConfigurationProperties("spring.web")
public class WebProperties {

/**
* Locale to use. By default, this locale is overridden by the "Accept-Language"
* header.
*/
private Locale locale;

/**
* Define how the locale should be resolved.
*/
private LocaleResolver localeResolver = LocaleResolver.ACCEPT_HEADER;

public enum LocaleResolver {

/**
* Always use the configured locale.
*/
FIXED,

/**
* Use the "Accept-Language" header or the configured locale if the header is not
* set.
*/
ACCEPT_HEADER
}
}

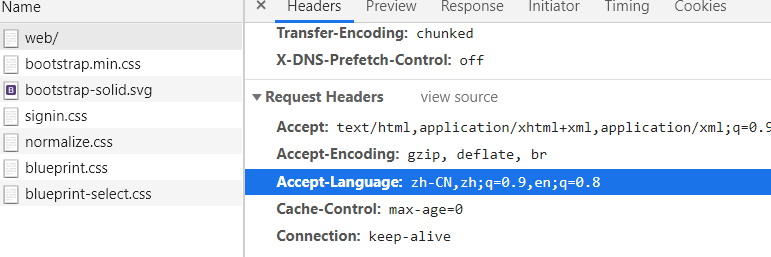
默认的就是根据请求头带来的区域信息获取Locale进行国际化

image-20210227093632333

自定义组件只需要实现 LocaleResolver 接口即可

步骤

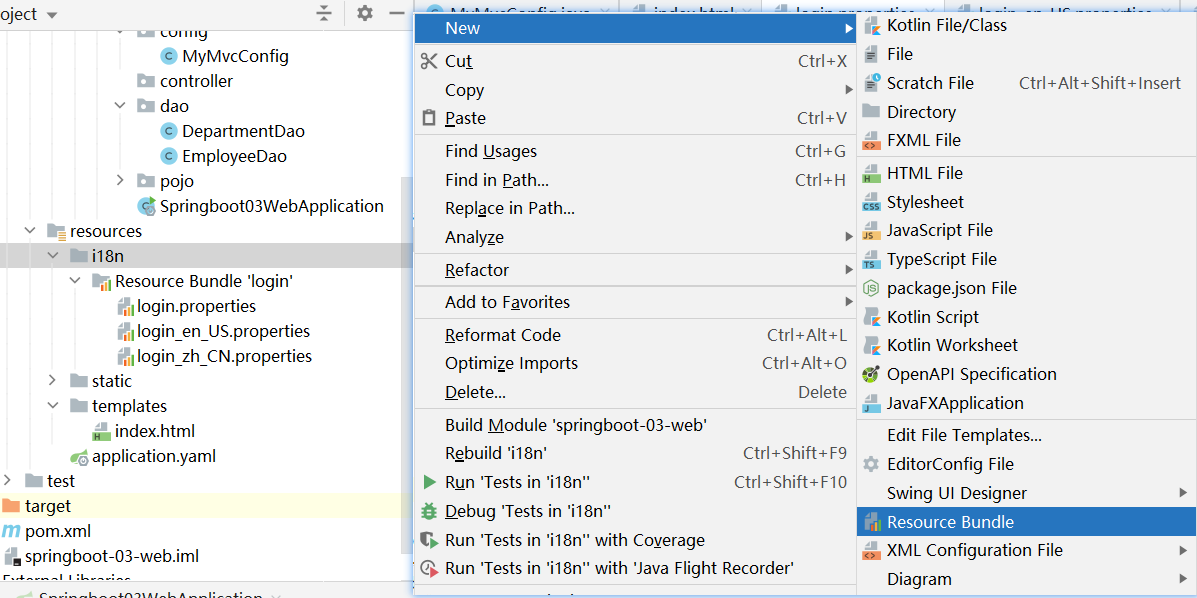
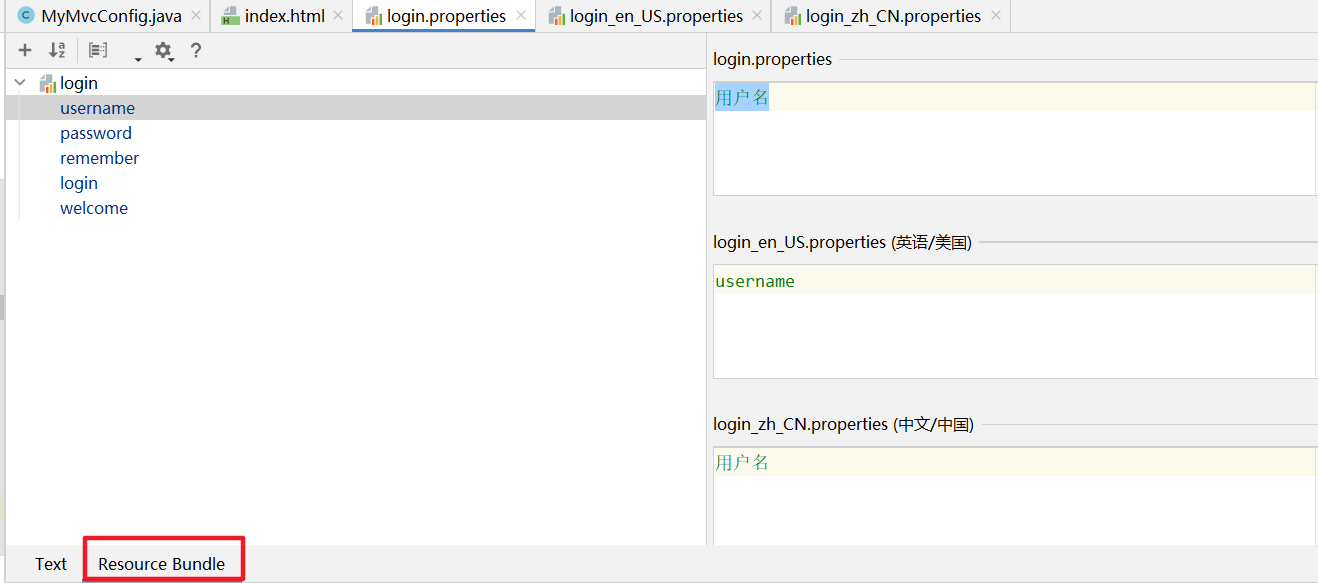
1. 编写到国际化配置文件中,抽取页面需要显示的国际化消息

image-20210224222417611

image-20210224222954196

image-20210227082052346

2. SpringBoot自动配置好了管理国际化的组件
1
2
3
4
5
6
7
8
9
10
11
12
13
14
15
16
17
18
19
20
21
22
23
24
25
26
27
28
29
30
31
32
33
@Conditional(ResourceBundleCondition.class)
//String basename = context.getEnvironment().getProperty("spring.messages.basename", "messages");
//自定义的配置文件可以放在类路径下叫messages.properties
//若不指定,则从类路径下根路径寻找
//ConditionOutcome outcome = cache.get(basename);
public class MessageSourceAutoConfiguration {
@Bean
@ConfigurationProperties(prefix = "spring.messages")
public MessageSourceProperties messageSourceProperties() {
return new MessageSourceProperties();
}

@Bean
public MessageSource messageSource(MessageSourceProperties properties) {
ResourceBundleMessageSource messageSource = new ResourceBundleMessageSource();
if (StringUtils.hasText(properties.getBasename())) {
//设置国际化资源文件的基础名(去掉语言国家代码)
messageSource.setBasenames(StringUtils
.commaDelimitedListToStringArray(StringUtils.trimAllWhitespace(properties.getBasename())));
}
if (properties.getEncoding() != null) {
messageSource.setDefaultEncoding(properties.getEncoding().name());
}
messageSource.setFallbackToSystemLocale(properties.isFallbackToSystemLocale());
Duration cacheDuration = properties.getCacheDuration();
if (cacheDuration != null) {
messageSource.setCacheMillis(cacheDuration.toMillis());
}
messageSource.setAlwaysUseMessageFormat(properties.isAlwaysUseMessageFormat());
messageSource.setUseCodeAsDefaultMessage(properties.isUseCodeAsDefaultMessage());
return messageSource;
}
}
3. 修改配置文件路径
1
2
3
spring:
messages:
basename: i18n.login
4. 修改国际化的属性

image-20210224223826116

5. 自定义国际化组件
1
2
3
4
5
6
7
8
9
10
11
12
13
14
15
16
17
18
19
20
21
22
23
24
25
26
27
28
29
30
31
32
33
34
35
36
import org.springframework.web.servlet.LocaleResolver;
import org.thymeleaf.util.StringUtils;

import javax.servlet.http.HttpServletRequest;
import javax.servlet.http.HttpServletResponse;
import java.util.Locale;

/**
* @author Auspice Tian
* @time 2021-02-27 9:56
* @current springboot-03-web-com.springboot.component
*/
public class MyLocaleResolver implements LocaleResolver {

@Override
public Locale resolveLocale(HttpServletRequest request) {
//强制使用系统的区域信息 浏览器改语言失效
String language = request.getParameter("l");
System.out.println(language);

Locale locale = Locale.getDefault();

//如果链接携带了国际化参数
if(!StringUtils.isEmpty(language)){
String[] split = language.split("_");
locale = new Locale(split[0],split[1]);
}

return locale;
}

@Override
public void setLocale(HttpServletRequest request, HttpServletResponse response, Locale locale) {

}
}
1
2
3
4
5
6
7
8
@Configuration
public class MyConfig implements WebMvcConfigurer {
@Bean
public LocaleResolver localeResolver(){

return new MyLocaleResolver();
}
}

4. 登录+拦截器

登录
  1. 前端表单传入数据,LoginController处理,验证正确,则返回后台页面(dashboard);验证错误,携带信息返回登录页面
  2. 开发期间,使用模板引擎的注意点
    • 禁用Thymeleaf缓存
    • 页面修改完后,重新编译
  3. 登录失败后,显示错误提示信息
    • Thymeleaf属性优先级
    • th:if语法

实现:

1
2
3
4
5
6
7
8
9
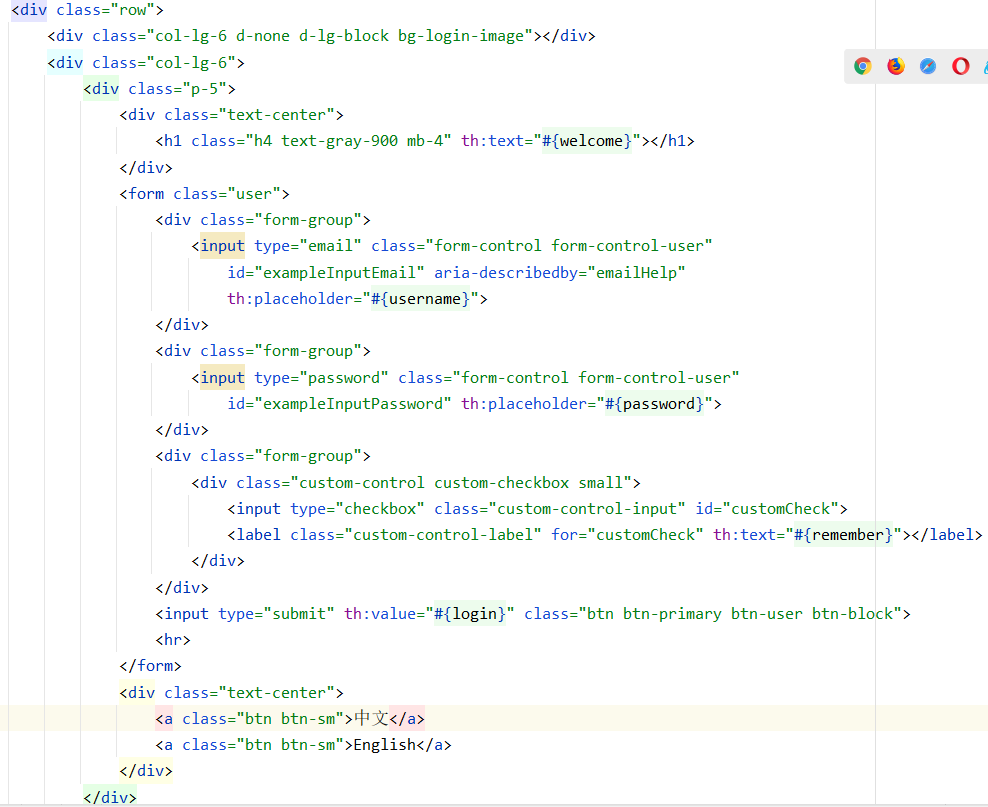
<form class="form-signin" th:action="@{/user/login}" method="post">
<img class="mb-4" th:src="@{/asserts/img/bootstrap-solid.svg}" alt="" width="72" height="72">
<h1 class="h3 mb-3 font-weight-normal" th:text="#{login.tip}">Please sign in</h1>
<p style="color: red;" th:text="${msg}" th:if="${not #strings.isEmpty(msg)}"></p>
<label class="sr-only">Username</label>
<input type="text" name="username" class="form-control" th:placeholder="#{login.username}" required="" autofocus="">
<label class="sr-only">Password</label>
<input type="password" name="password" class="form-control" th:placeholder="#{login.password}" required="">
</form>
1
2
3
4
5
6
7
8
9
10
11
12
13
14
15
16
17
18
@Controller
public class LoginController {

@PostMapping("/user/login")
public String login(@RequestParam("username") String username,
@RequestParam("password") String password,
Map<String ,Object> map
){

if(!StringUtils.isEmpty(username) && password.equals("1")){
//若用户名不空,且密码等于1,登录成功
return "dashboard";
}else{
map.put("msg","用户密码错误!");
return "index";
}
}
}

考虑到刷新页面 重新提交表单问题

image-20210227113118384

使用 return “redirect:/dashboard.html”

防止表单重复提交——重定向
1
2
3
4
5
6
7
8
9
10
11
12
13
14
15
16
17
18
@Controller
public class LoginController {

@PostMapping("/user/login")
public String login(@RequestParam("username") String username,
@RequestParam("password") String password,
Map<String ,Object> map
){

if(!StringUtils.isEmpty(username) && password.equals("1")){
//若用户名不空,且密码等于1,登录成功
return "redirect:/dashboard";
}else{
map.put("msg","用户密码错误!");
return "index";
}
}
}

新问题:直接输入地址,会跳转到目标页面

解决:使用拦截器,拦截非法请求

拦截器进行登录检查
  1. 将登录状态加入到session中

  2. 拦截的情况:

  • 没有登录_>session中,user为null
  1. 放行的情况:

    • 用户已经登录
  2. 注册拦截器WebMvcConfigurerAdapter.addInterceptor

    • 使用拦截器的请求 ~.addPathPatterns()

      所有请求

    • 不使用拦截器的请求~.excludePathPatterns()

      首页、登录提交表单

实现:

1
2
3
4
5
6
7
8
9
10
11
12
13
14
15
16
17
18
19
20
@Controller
public class LoginController {

@PostMapping("/user/login")
public String login(@RequestParam("username") String username,
@RequestParam("password") String password,
Map<String ,Object> map,
HttpSession session
){

if(!StringUtils.isEmpty(username) && password.equals("1")){
//若用户名不空,且密码等于1,登录成功
session.setAttribute("loginUser",username);
return "redirect:/dashboard";
}else{
map.put("msg","用户密码错误!");
return "index";
}
}
}
1
2
3
4
5
6
7
8
9
10
11
12
13
14
15
16
17
18
19
public class MyInterceptor implements HandlerInterceptor {
@Override
public boolean preHandle(HttpServletRequest request,
HttpServletResponse response,
Object handler) throws Exception {
Object loginUser = request.getSession().getAttribute("loginUser");

if(loginUser _ null){
//未登录,拦截
request.setAttribute("msg","未登录,没有权限!");
request.getRequestDispatcher("/").forward(request,response);
return false;
}else{
//已登录,放行
return true;
}

}
}
1
2
3
4
5
6
7
8
 @Override
public void addInterceptors(InterceptorRegistry registry) {

//SpringBoot已经做好了静态资源映射
registry.addInterceptor(new MyInterceptor())
.addPathPatterns("/**")
.excludePathPatterns("/","index.html","/user/login");
}

5. CRUD

要求

  1. restfulCRUD:CRUD满足Rest风格

    URI:资源名称/资源表示

    HTTP请求方式区分对资源的CRUD操作

普通CRUD(URI区分资源操作)RestfulCRUD()
查询getEmpemp————Get方式
添加addEmp?XXXemp————POST方式
修改updateEmp?XXXemp/{id}——PUT方式
删除deleteEmp?id=emp/{id}——DELETE方式
  1. 实验的请求架构
请求URI请求方式
查询所有员工empsGET
查询某个员工emp/{id}GET
跳转添加页面empGET
添加员工empPOST
跳转修改页面(查出员工进行信息回显)emp/{id}GET
修改员工empPUT
删除员工emp/{id}GET
R——列表页面
  1. 前端点击 员工信息 _> 发送emps请求

    image-20210227213638344

  2. EmpController处理,

    1
    2
    3
    4
    5
    6
    7
    8
    9
    10
    11
    12
    13
    14
    15
    16
    17
    18
    19
    @Controller
    public class EmployeeController {

    @Autowired
    EmployeeDao employeeDao;

    @RequestMapping("/emps")
    public String emps(Model model){

    Collection<Employee> employees = employeeDao.getEmployees();

    //将信息放在请求域中返回
    model.addAttribute("emps",employees);

    //thymeleaf默认拼串
    //classpath:/templates/xxx.html
    return "emp/list";
    }
    }
  3. 公共元素抽取

    1. 公共片段抽取 th:fragment

      1
      2
      3
      <div th:fragment="copy">

      </div>
    2. 引入公共片段

      1
      2
      3
      4
      <div th:insert="~{footer::copy}"></div>

      ~{templatename::selector} 模板名::选择器
      ~{templatename::fragmentname} 模板名::片段名

    三种引入功能片段的th属性

    th:insert 将公共片段整个插入到声明引入的元素中

    th:replace 将声明引入的元素替换为公共片段

    th:include 将被引入的片段的内容包含进声明引入的元素

    1
    2
    3
    4
    5
    6
    7
    8
    9
    10
    11
    12
    13
    14
    15
    16
    17
    18
    19
    20
    21
    22
    23
    24
    25
    26
    <footer th:fragment="copy">
    &copy; 2011 The Good Thymes Virtual Grocery
    </footer>

    <!---->
    <div th:insert="footer :: copy"></div>

    <div th:replace="footer :: copy"></div>

    <div th:include="footer :: copy"></div>


    <!---->
    <div>
    <footer>
    &copy; 2011 The Good Thymes Virtual Grocery
    </footer>
    </div>

    <footer>
    &copy; 2011 The Good Thymes Virtual Grocery
    </footer>

    <div>
    &copy; 2011 The Good Thymes Virtual Grocery
    </div>
  4. 导航栏+侧边栏

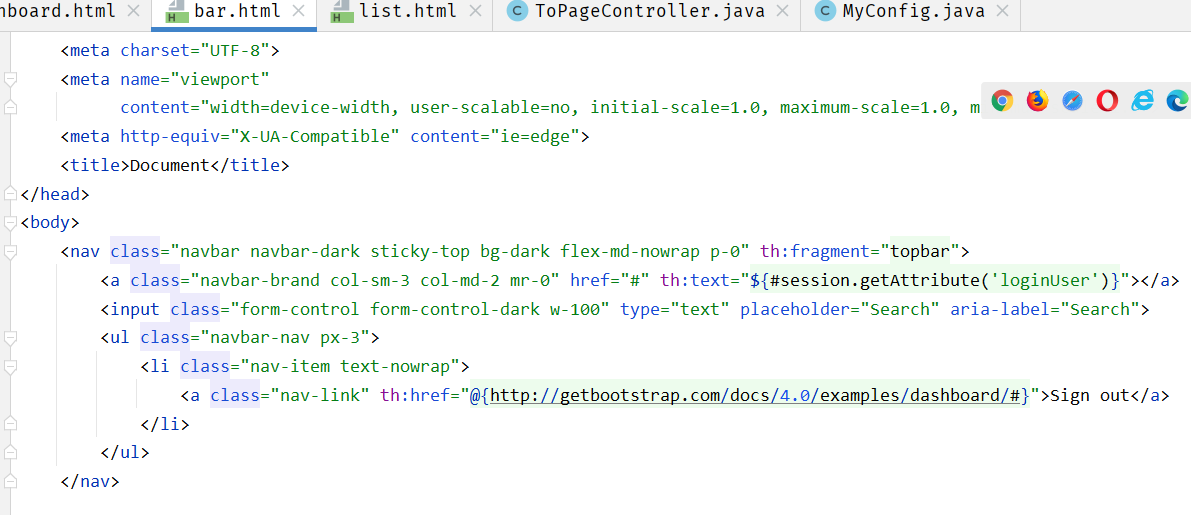
    image-20210227214229599

    image-20210227214157642

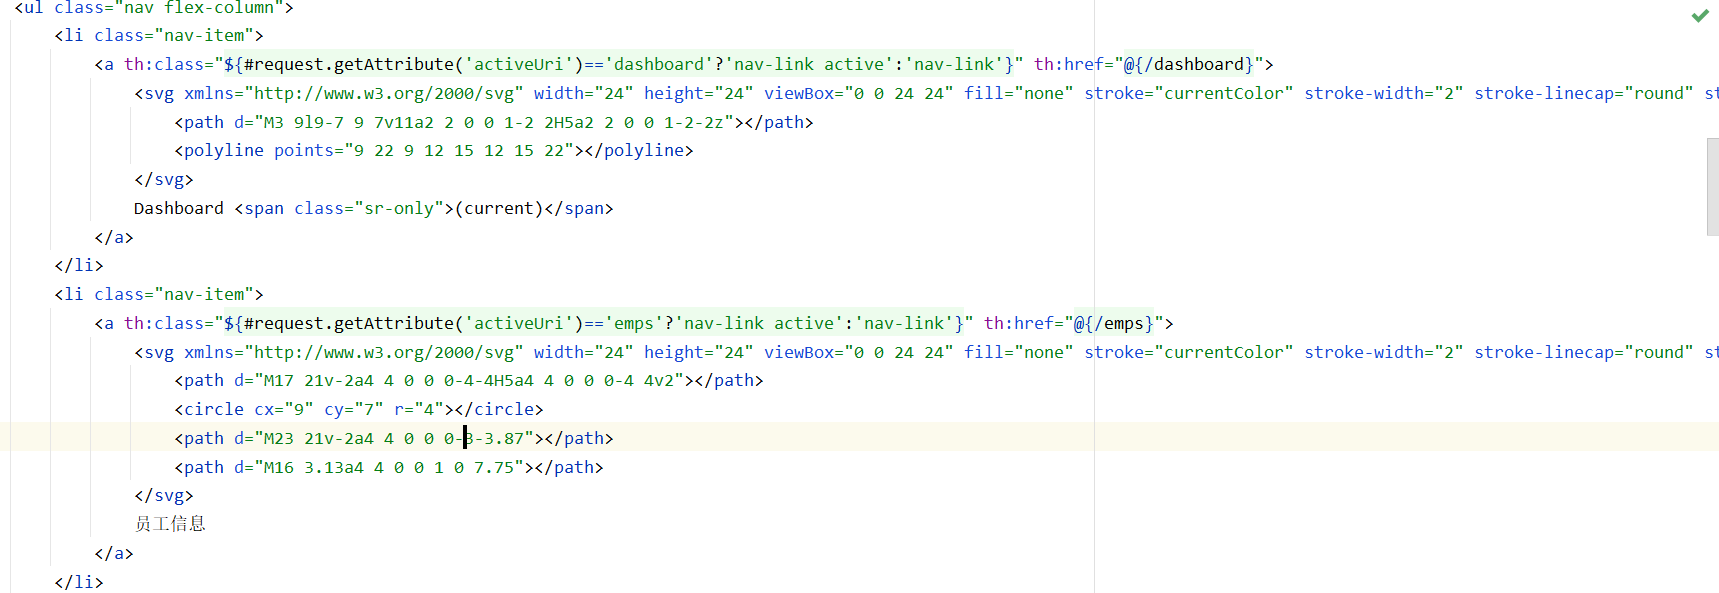
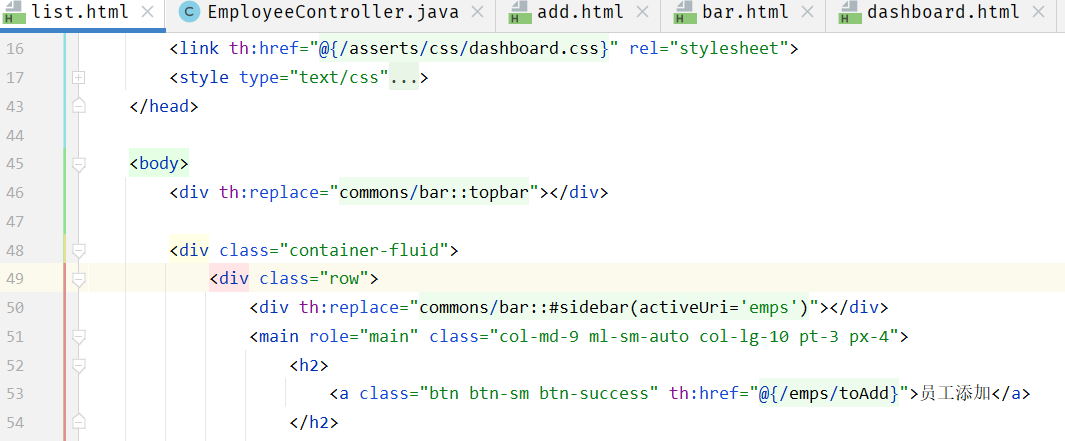
链接高亮——页面块参数
  1. 抽取公共块到一个文件下

image-20210227222235836

image-20210227224116202

image-20210227224123870

image-20210227224056842

Thymeleaf遍历取出数据+数据格式调整+列表界面
1
2
3
4
5
6
7
8
9
10
11
12
13
14
15
16
17
18
19
20
21
22
23
24
25
26
27
28
29
30
31
<h2>
<button class="btn btn-sm btn-success">员工添加</button>
</h2>
<div class="table-responsive">
<table class="table table-striped table-sm">
<thead>
<tr>
<th>id</th>
<th>LashName</th>
<th>Email</th>
<th>Gender</th>
<th>DepartmentName</th>
<th>Birth</th>
<th>操作</th>
</tr>
</thead>
<tbody>
<tr th:each="emp:${emps}">
<td th:text="${emp.id}"></td>
<td th:text="${emp.lastName}"></td>
<td th:text="${emp.email}"></td>
<td th:text="${emp.gender}_0?'女':'男'"></td>
<td th:text="${emp.department.departmentName}"></td>
<td th:text="${#dates.format(emp.birth,'yyyy-MM-dd HH:mm:ss')}"></td>
<td>
<button class="btn btn-sm btn-primary">编辑</button>
<button class="btn btn-sm btn-danger">删除</button>
</td>
</tr>
</tbody>
</table>
C——新增
跳转到新增页面+表单

image-20210228122338104

image-20210228122351983

1
2
3
4
5
6
7
8
9
10
11
12
13
14
15
16
17
18
19
20
21
22
23
24
25
26
27
28
29
30
31
32
33
34
35
36
37
<main role="main" class="col-md-9 ml-sm-auto col-lg-10 pt-3 px-4">
<h2>
编辑员工信息
</h2>
<form method="post" th:action="@{/emps/add}">
<div class="form-group">
<label>LastName</label>
<input name="lastName" type="text" class="form-control" placeholder="auspicetian" required/>
</div>
<div class="form-group">
<label>Email</label>
<input name="email" type="text" class="form-control" placeholder="auspicetian@email.com" required/>
</div>
<div class="form-group">
<label>Gender</label><br/>
<div class="form-check form-check-inline">
<input class="form-check-input" type="radio" name="gender" checked th:value="1">
<label class="form-check-label"></label>
</div>
<div class="form-check form-check-inline">
<input class="form-check-input" type="radio" name="gender" th:value="0">
<label class="form-check-label"></label>
</div>
</div>
<div class="form-group">
<label>Department</label>
<select class="form-control" name="department.id">
<option th:each="depart:${departments}" th:value="${depart.id}" th:text="${depart.departmentName}"></option>
</select>
</div>
<div class="form-group">
<label>Birth</label>
<input name="birth" type="text" class="form-control" placeholder="2021-02-28" required/>
</div>
<button type="submit" class="btn btn-primary">添加</button>
</form>
</main>
新增行为
1
2
3
4
5
6
7
8
9
10
11
12
13
14
15
16
17
18
19
20
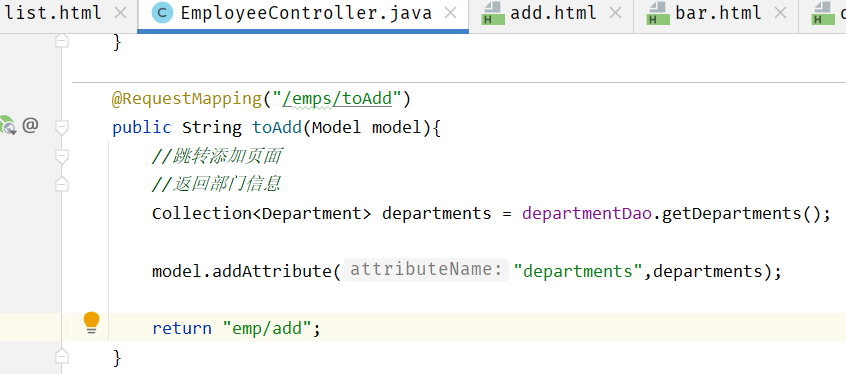
@RequestMapping("/emps/toAdd")
public String toAdd(Model model){
//跳转添加页面
//返回部门信息
Collection<Department> departments = departmentDao.getDepartments();

model.addAttribute("departments",departments);

return "emp/add";
}

@PostMapping("/emps/add")
public String add(Employee employee){
System.out.println("Employee"+employee);

//转发到指定请求,直接返回会由Thymeleaf进行拼串
//redirect:重定向到一个地址 /代表当前项目
//forward:转发到一个地址
return "redirect:/emps";
}
添加数据+日期类型格式转换
1
2
3
4
5
6
7
8
9
10
11
12
13
14
15
16
17
18
19
20
21
22
23
24
@RequestMapping("/emps/toAdd")
public String toAdd(Model model){
//跳转添加页面
//返回部门信息
Collection<Department> departments = departmentDao.getDepartments();

model.addAttribute("departments",departments);

return "emp/add";
}

@PostMapping("/emps/add")
//SpringMVC自动将请求参数可前端参数的属性进行一一绑定
//前提:javaBean属性和前端的name属性名一致
public String add(Employee employee){
System.out.println("Employee"+employee);

//转发到指定请求,直接返回会由Thymeleaf进行拼串
//redirect:重定向到一个地址 /代表当前项目
//forward:转发到一个地址
employeeDao.save(employee);

return "redirect:/emps";
}

提交的数据格式不对 :生日:日期;

日期格式化;SpringMVC将页面提交的值需要转换为指定类型

类型转换,格式化

默认日期是按照 2021/02/28 方式
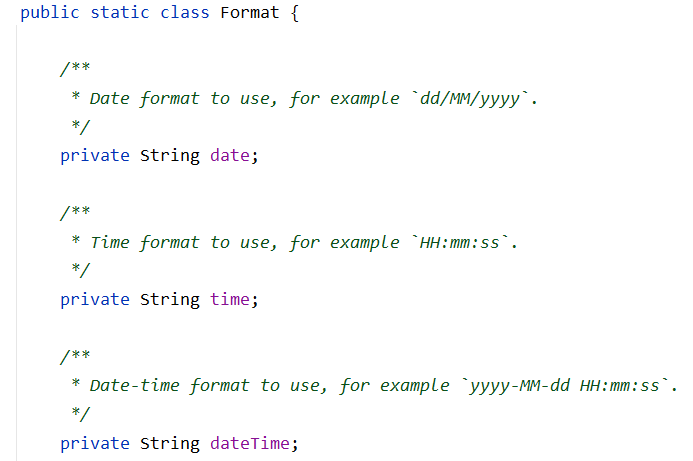
image-20210228202206435

1
2
3
4
spring:
mvc:
format:
date: yyyy-MM-dd
UD有天坑——开启HiddenHttpMethodFilter

对于POST请求,接收 _method参数,判断URI类型
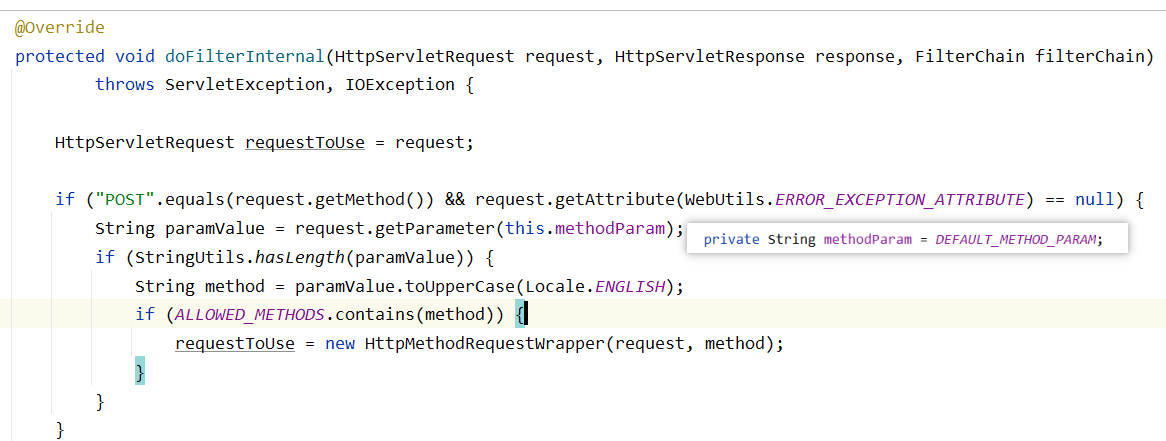
image-20210301101454202

image-20210301101706862

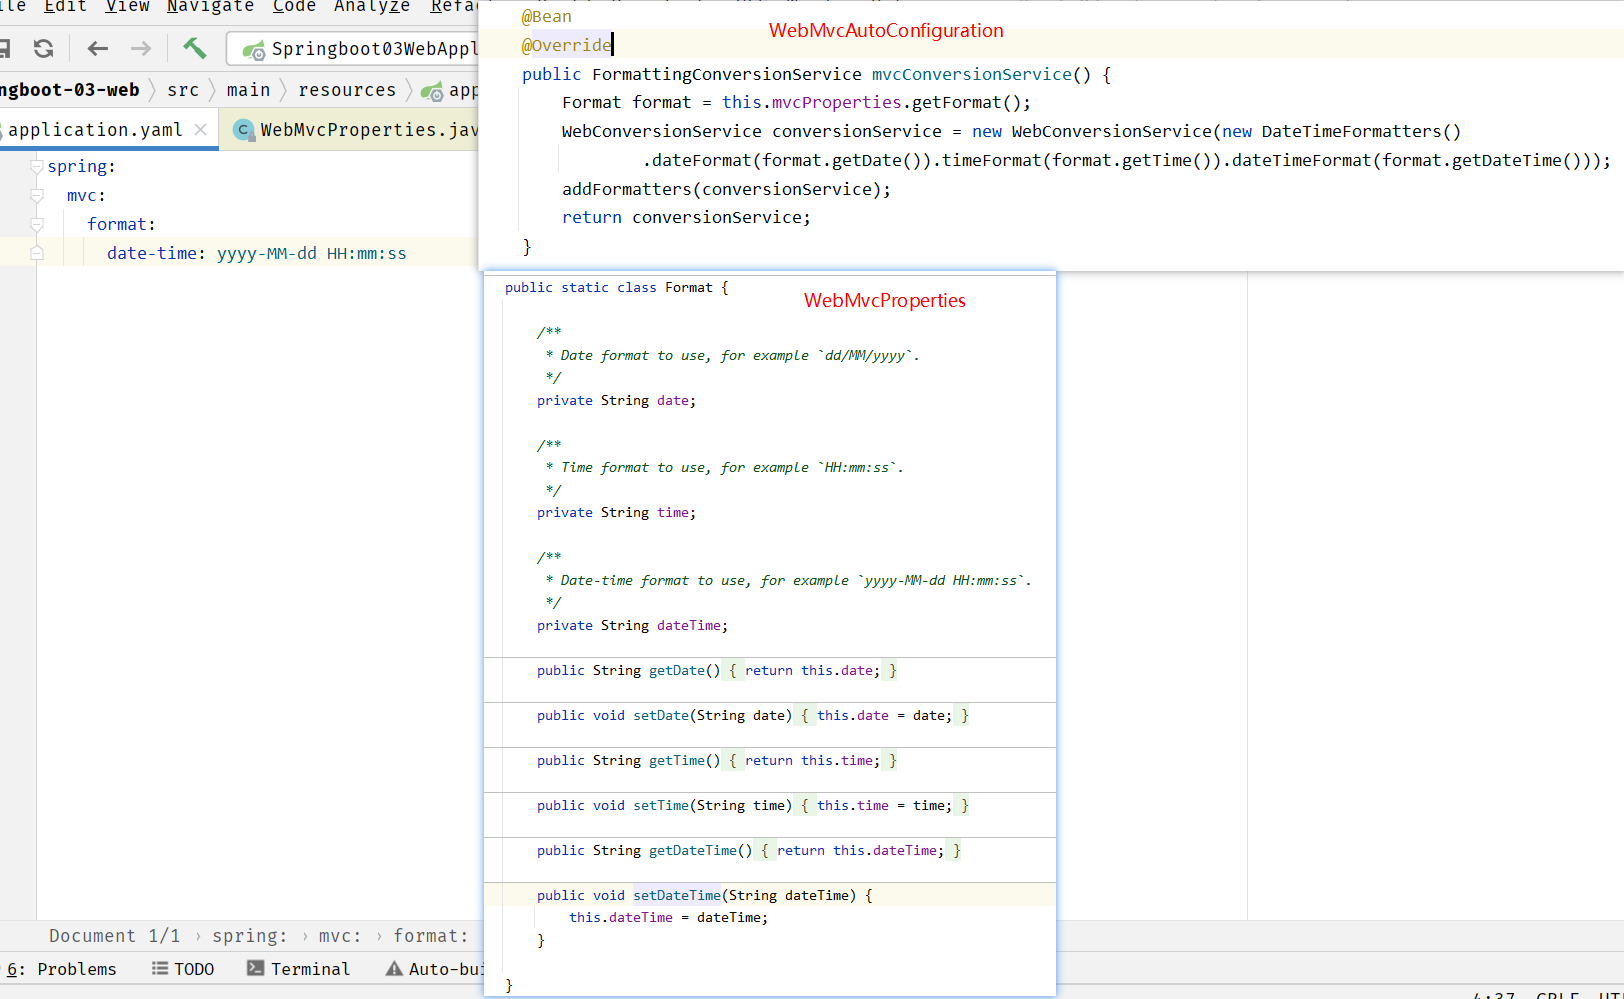
springBoot装配SpringMVC时,默认关闭请求过滤器,所以需要在配置文件中开启

虽然请求方式仍为POST,但会转发为PUT请求方式

U——修改+Thymeleaf条件判断
  1. 参数跳转
1
2
3
4
<td>
<a class="btn btn-sm btn-primary" th:href="@{'/emps/update/'+${emp.id}}">编辑</a>
<a class="btn btn-sm btn-danger">删除</a>
</td>
  1. 到修改页面,信息回显

    1
    2
    3
    4
    5
    6
    7
    8
    9
    10
    11
    12
    @RequestMapping("/emps/update/{id}")
    public String toupdate(@PathVariable("id")Integer id,Model model){

    Collection<Department> departments = departmentDao.getDepartments();
    model.addAttribute("departments",departments);

    Employee employee = employeeDao.getEmployeeById(id);
    model.addAttribute("emp",employee);

    //回到新增页面。复用
    return "emp/add";
    }
    1
    2
    3
    4
    5
    6
    7
    8
    9
    10
    11
    12
    13
    14
    15
    16
    17
    18
    19
    20
    21
    22
    23
    24
    25
    26
    27
    28
    29
    30
    <div class="form-group">
    <label>LastName</label>
    <input name="lastName" type="text" class="form-control" th:value="${emp!=null}?${emp.lastName}:''" placeholder="auspicetian" required/>
    </div>
    <div class="form-group">
    <label>Email</label>
    <input name="email" type="text" class="form-control" placeholder="auspicetian@email.com" th:value="${emp!=null}?${emp.email}:''" required/>
    </div>
    <div class="form-group">
    <label>Gender</label><br/>
    <div class="form-check form-check-inline">
    <input class="form-check-input" type="radio" name="gender" checked th:value="1" th:checked="${emp!=null}?${emp.gender}_1">
    <label class="form-check-label"></label>
    </div>
    <div class="form-check form-check-inline">
    <input class="form-check-input" type="radio" name="gender" th:value="0" th:checked="${emp!=null}?${emp.gender}_0">
    <label class="form-check-label"></label>
    </div>
    </div>
    <div class="form-group">
    <label>Department</label>
    <select class="form-control" name="department.id">
    <option th:selected="${emp!=null}?${depart.id_emp.id}" th:each="depart:${departments}" th:value="${depart.id}" th:text="${depart.departmentName}"></option>
    </select>
    </div>
    <div class="form-group">
    <label>Birth</label>
    <input th:value="${emp!=null}?${#dates.format(emp.birth,'yyyy-MM-dd HH-mm-ss')}" name="birth" type="text" class="form-control" placeholder="2021-02-28" required/>
    </div>
    <button type="submit" class="btn btn-primary" th:text="${emp!=null}?'修改':'添加'"></button>
  2. 修改请求方式

    之前的 PutMapping

    1
    2
    3
    4
    5
    <!--发送put请求修改员工数据
    1. SpringMVC中配置HiddenHttpMethodFilter(SpringBoot自动配置)
    2. 页面创建一个post表单
    3. 创建一个input项,name="_method",值就是指定的请求方式
    -->
    1
    2
    3
    4
    5
    6
    7
    <form method="post" th:action="@{/emps/au}">
    <!--发送put请求修改员工数据
    1. SpringMVC中配置HiddenHttpMethodFilter(SpringBoot自动配置)
    2. 页面创建一个post表单
    3. 创建一个input项,name="_method",值就是指定的请求方式
    -->
    <input type="hidden" name="_method" value="put" th:if="${emp!=null}" />
    1
    2
    3
    4
    5
    6
    @PutMapping("/emps/au")
    public String update(Employee employee){
    System.out.println("修改的员工数据"+employee);
    employeeDao.save(employee);
    return "redirect:/emps";
    }
  3. 参数为 id,避免重复添加

image-20210228205649247

D——Thymeleaf自定义属性值

image-20210301110306283

1
2
3
4
5
6
@DeleteMapping("/emps/delete/{id}")
public String delete(@PathVariable("id") Integer id){

employeeDao.delete(id);
return "redirect:/emps";
}

问题:每一个表项都会创建一个表单

Thymeleaf自定义属性值
1
2
<img src="../../images/gtvglogo.png" 
th:attr="src=@{/images/gtvglogo.png},title=#{logo},alt=#{logo}" />

image-20210301120113925

1
2
3
4
5
<script type="text/javascript">
$(".delBtn").click(function(){
$('#delForm').attr("action",$(this).attr("delUri")).submit()
});
</script>
1
2
3
4
5
6
@DeleteMapping("/emps/delete/{id}")
public String delete(@PathVariable("id") Integer id){

employeeDao.delete(id);
return "redirect:/emps";
}

错误处理机制

  1. 返回一个默认错误页面

image-20210301120429885

image-20210301163342791

  1. 其他客户端,默认响应一个JSON数据

image-20210301120530935

image-20210301163439031

处理机制

参照ErrorMvcAutoConfiguration

步骤:

一旦系统出现4XX或者5XX,ErrorPageCustomizer 就会生效(定制错误的响应规则); 发送/error请求,由 BasicErrorController 处理 /error 请求;响应处理中携带的信息由DefaultErrorAttriute指定

返回结果_>

  • 响应页面:去哪个页面由DefaultErrorViewResolver解析得到,将错误信息(status,model)发送给所有的ErrorViewResolver,得到ModelAndView

    • 若有 ErrorViewResolver ,使用自定义的
    • 若没有ErrorViewResolver,则时候用 DefaultErrorViewResolver
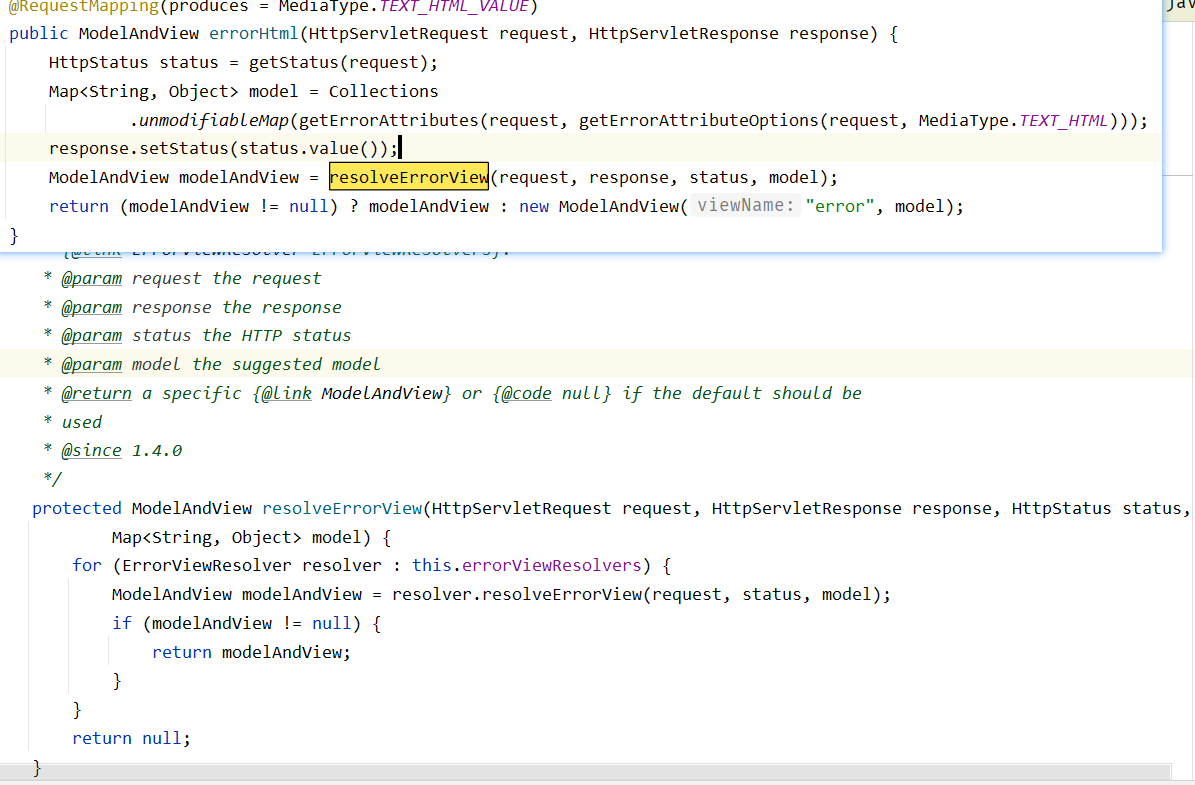
    image-20210301181722341

  • 响应JSON数据

涉及到的组件

  1. ErrorPageCustomizer

    image-20210301122623056

    系统出现错误以后,来到 /error请求 进行处理

  2. BasicErrorController

    image-20210301180355956

    • 浏览器发来的请求用 errorHtml() 方法处理,产生html类型的数据
    • 其他客户端发来的数据用 ResponseEntity(),产生JSON类型的数据
  3. DefaultErroViewResolver

    image-20210301183137958

  4. DefaultErrorAttributes

    image-20210301184222365

    由errorAattributes指定返回给页面的错误信息

如何定制错误页面?

_1. 有模板引擎_

  • 将错误页面命名为 错误状态.html,放在模板引擎文件文件夹下的error文件夹下
  • 发生哪个错误状态码,跳转到哪个页面 error/状态码

可以使用4XX,和5XX作为错误页面的文件名用于匹配这种类型的所有错误

优先寻找精确的状态码.html

image-20210301164601358

页面能获取的信息

  • timestamp
  • status
  • error错误提示
  • exception:异常对象
  • message:异常消息
  • errors:JSR303数据校验错误
Thymeleaf开启接收异常信息
1
2
3
4
server:
error:
include-exception: true
include-message: always

image-20210301202423757

2. 模板引擎找不到错误页面

静态资源文件夹下

3. 以上都没有

SpringBoot默认的错误提示页面
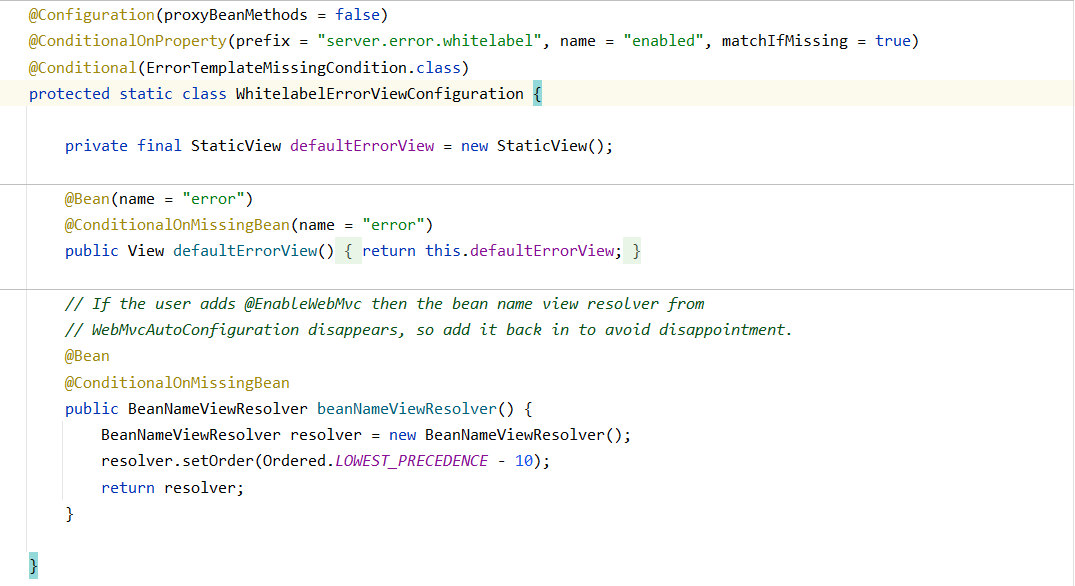
image-20210301185226902

默认空白页内容:

image-20210301185220385

image-20210301185226902

如何定制错误的JSON数据?

1. @ExceptionHandler(XXX.class)

自定义异常

1
2
3
4
5
6
public class UserNotExistException extends Exception{

public UserNotExistException() {
super("用户不存在");
}
}

异常处理器

1
2
3
4
5
6
7
8
9
10
11
12
13
14
@ControllerAdvice
public class MyExceptionHandler {

@ResponseBody
@ExceptionHandler(UserNotExistException.class)
public Map<String,Object> handleException(Exception e){
Map<String,Object> map = new HashMap<>();

map.put("code","user.notexist");
map.put("message",e.getMessage());

return map;
}
}

异常验证

1
2
3
4
5
6
7
8
9
10
11
12
13
@Controller
public class ExceptionController {
//浏览器客户端都是JSON数据
@ResponseBody
@RequestMapping("/exception")
public String exception(@RequestParam("u") String u) throws UserNotExistException {
if(u.equals("u")){
throw new UserNotExistException();
}

return "hello";
}
}

image-20210301192540428

问题:没有自适应效果

  • 浏览器,客户端的返回都是JSON

_>如何变成错误请求自适应响应

2. 转发到 /error 请求
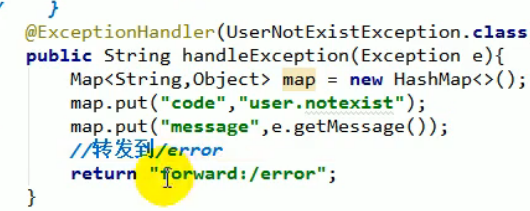
image-20210301192812288

BasicErrorController处理

image-20210301204415789

响应的的是默认空白页面,想要的是跳转到自定义的错误页面

image-20210301200549284

原因

状态码,2开头表示请求成功,之前的错误视图都是4开头

响应页面设置状态码

从HttpRequest中获取状态码

image-20210301201247349

image-20210301201101370

传入自己的错误状态码

1
2
3
4
5
6
7
8
9
10
11
12
13
@ExceptionHandler(UserNotExistException.class)
public String handleException(Exception e, HttpServletRequest request){
Map<String,Object> map = new HashMap<>();
/*必须传入 错误代码status 否则不会进入自定义错误页面
* Integer statusCode = (Integer) request.getAttribute(RequestDispatcher.ERROR_STATUS_CODE);
* */
request.setAttribute("javax.servlet.error.status_code",500);
map.put("code","user.notexist");
map.put("message",e.getMessage());


return "forward:/error";
}

问题:没有将定制属性携带出去

_3. 携带自定义属性实现自适应响应处理_

原理
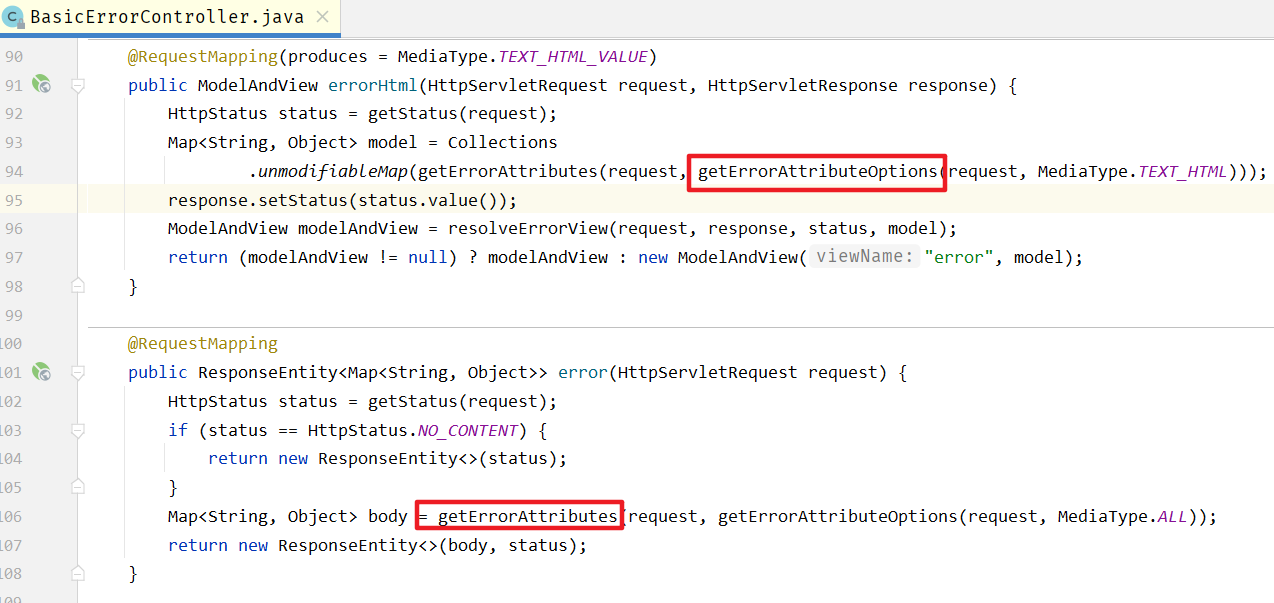
image-20210301204615309

image-20210301205128756

image-20210301203415376

出现错误后,请求转发的方式转发到 /error,会被BasicErrorController处理,响应出去可以获取的数据都是通过 getErrorAttributes()方式添加到返回信息中,而getErrorAttributes()是类AbstractErrorController中的方法(implements ErrorController)

所以将自定义属性添加到返回信息中,有两种思路

  • 完全编写一个ErrorController的实现类【或者编写AbstractErrorController】,放在容器中
  • 返回的数据,都是通过getErrorAttributes获取。容器中DefaultErrorAttributes进行数据处理

image-20210301205905147

实现
1
2
3
4
5
6
7
8
9
10
11
12
13
14
15
@ExceptionHandler(UserNotExistException.class)
public String handleException(Exception e, HttpServletRequest request){
Map<String,Object> map = new HashMap<>();
/*必须传入 错误代码status 否则不会进入自定义错误页面
* Integer statusCode = (Integer) request.getAttribute(RequestDispatcher.ERROR_STATUS_CODE);
* */
request.setAttribute("javax.servlet.error.status_code",500);

//将要携带的信息传入request
map.put("code","user.notexist");
map.put("message","用户信息错误");
request.setAttribute("ext",map);

return "forward:/error";
}

image-20210301210935040

1
2
3
4
5
6
7
8
9
10
11
12
13
14
15
16
@Component
public class MyErrorAttribute extends DefaultErrorAttributes {

@Override
public Map<String, Object> getErrorAttributes(WebRequest webRequest, ErrorAttributeOptions options) {
Map<String,Object> map = super.getErrorAttributes(webRequest, options);

map.put("author","tian");

//异常携带的信息
Map<String,Object> ext = (Map<String, Object>) webRequest.getAttribute("ext", 0);
map.put("ext",ext);

return map;
}
}

image-20210301211355035

Servlet容器

SpringBoot默认是用嵌入式Servlet容器(Tomcat)

image-20210301212438367

SpringBoot默认是将应用打包为jar包,启动嵌入式的Servlet容器,进而启动SpringBoot的web应用。

1. 如何定制和修改Servet容器的相关配置

  1. 修改和 server 有关的配置
1
2
3
4
5
6
7
8
9
10
11
12
#通用的Servlet容器配置
server.xxx
server:
servlet:
context-path: /web
port: 8081

#Tomcat的设置
server.tomcat.xxx
server:
tomcat:
uri-path: UTF-8
  1. 编写一个EmbeddedServletContainerCustomizer:嵌入式Servlet容器的定制器;用于修改Servlet默认配置

    1
    2
    3
    4
    5
    6
    7
    8
    9
    10
    11
    12
    @Configuration
    public class MyServerConfig {
    @Bean
    public WebServerFactoryCustomizer webServerFactoryCustomizer(){
    return new WebServerFactoryCustomizer<ConfigurableWebServerFactory>() {
    @Override
    public void customize(ConfigurableWebServerFactory factory) {
    factory.setPort(8081);
    }
    };
    }
    }

2. 注册三大组件——Servlet、Filter、Listener

ServletRegistrationBean

image-20210301221835357

1
2
3
4
5
6
7
8
9
10
11
12
public class MyServlet extends HttpServlet {
//自定义Servlet实现
@Override
protected void doGet(HttpServletRequest req, HttpServletResponse resp) throws ServletException, IOException {
this.doPost(req, resp);
}

@Override
protected void doPost(HttpServletRequest req, HttpServletResponse resp) throws ServletException, IOException {
resp.getWriter().write("Hello SpringBoot Servlet!");
}
}
1
2
3
4
5
6
7
8
9
10
11
12
13
14
15
@Configuration
public class MyServerConfig {

//每个Servlet作为一个组件,注入容器
@Bean
public ServletRegistrationBean myservlet(){
//新建一个Servlet类及Servlet映射
ServletRegistrationBean servletRegistrationBean
= new ServletRegistrationBean(new MyServlet(),"/servlet");
//servlet配置
servletRegistrationBean.setLoadOnStartup(1);

return servletRegistrationBean;
}
}
DispatcherServlet的注册

SpringBoot绑我们自动注册SpringMVC时,自动注册SpringMVC的前端控制器DispatcherServlet
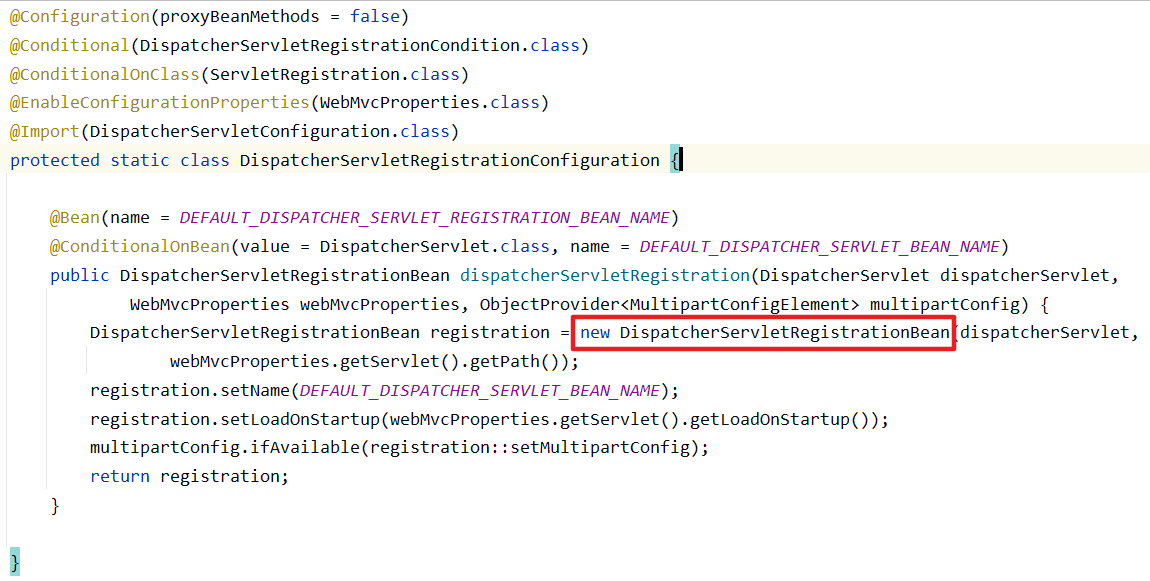
image-20210301225101806

默认拦截: /所有请求,包括静态资源

可以通过server.servletPath来修改SpringMVC前端控制器默认拦截的请求路径

FilterRegistrationBean

1
2
3
4
5
6
7
8
9
10
11
12
13
14
15
16
17
public class MyFilter implements Filter {
@Override
public void init(FilterConfig filterConfig) throws ServletException {

}

@Override
public void doFilter(ServletRequest servletRequest, ServletResponse servletResponse, FilterChain filterChain) throws IOException, ServletException {
System.out.println("MyFilter process...");
filterChain.doFilter(servletRequest,servletResponse);
}

@Override
public void destroy() {

}
}
1
2
3
4
5
6
7
8
9
10
11
12
13
@Configuration
public class MyServerConfig {
//每个Servlet作为一个组件,注入容器
@Bean
public FilterRegistrationBean myFilter(){
FilterRegistrationBean filterRegistrationBean = new FilterRegistrationBean();
filterRegistrationBean.setFilter(new MyFilter());
//设置过滤路径
filterRegistrationBean.setUrlPatterns(Arrays.asList("/servlet"));

return filterRegistrationBean;
}
}

Listener

1
2
3
4
5
6
7
8
9
10
11
public class MyListener implements ServletContextListener {
@Override
public void contextInitialized(ServletContextEvent sce) {
System.out.println("contextInitialized。。。。。web应用启动");
}

@Override
public void contextDestroyed(ServletContextEvent sce) {
System.out.println("contextDestroyed.....web应用销毁");
}
}
1
2
3
4
5
6
7
8
9
10
@Configuration
public class MyServerConfig {
@Bean
public ServletListenerRegistrationBean myListener(){
ServletListenerRegistrationBean servletListenerRegistrationBean = new ServletListenerRegistrationBean();

servletListenerRegistrationBean.setListener(new MyListener());
return servletListenerRegistrationBean;
}
}

3. 切换嵌入式Servlet容器

  • jetty

    • 长连接应用——聊天
  • Undertow(不支持JSP)

    • 高性能非阻塞,并发性性能好

image-20210303150602155

嵌入式工厂:创建嵌入式容器

image-20210302122802542

选中需要排除的容器 shift+delete,引入其他Servlet容器

1
2
3
4
5
6
7
8
9
10
11
12
13
14
15
16
<dependency>
<groupId>org.springframework.boot</groupId>
<artifactId>spring-boot-starter-web</artifactId>
<!--移除tomcat-->
<exclusions>
<exclusion>
<artifactId>spring-boot-starter-tomcat</artifactId>
<groupId>org.springframework.boot</groupId>
</exclusion>
</exclusions>
</dependency>
<!--引入jetty容器-->
<dependency>
<groupId>org.springframework.boot</groupId>
<artifactId>spring-boot-starter-jetty</artifactId>
</dependency>

image-20210302131413918

4. 嵌入式Servlet容器自动配置原理

步骤:

  1. SpringBoot根据依赖的导入情况,给容器中添加相应的 XXXServletWebServerFactory

  2. 只要是ServletWebServerFactory创建组件,就会触发后置处理器 WebServerFactoryCustomizerBeanPostProcessor

    只要是嵌入式的Servlet容器工厂,后置处理器就工作

  3. 后置处理器是从容器中获取所有的WebServerFactoryCustomizer,调用定制器的定制方法给工厂添加配置

自动配置原理

ServletWebServerFactoryAutoConfiguration——Servlet容器自动配置类
1
2
3
4
5
6
7
8
9
10
@ConditionalOnClass(ServletRequest.class)
@ConditionalOnWebApplication(type = Type.SERVLET)//如果是Web应用,则生效
@EnableConfigurationProperties(ServerProperties.class)
//允许通过ServerProperties修改属性的值
//可以在 application配置文件中修改
@Import({ ServletWebServerFactoryAutoConfiguration.BeanPostProcessorsRegistrar.class,
ServletWebServerFactoryConfiguration.EmbeddedTomcat.class,
ServletWebServerFactoryConfiguration.EmbeddedJetty.class,
ServletWebServerFactoryConfiguration.EmbeddedUndertow.class })
public class ServletWebServerFactoryAutoConfiguration {
ServletWebServerFactory
1
2
3
4
5
6
7
8
9
10
11
12
13
14
15
16
17
//判断当前是否引入了Tomcat依赖;
@ConditionalOnClass({Servlet.class, Tomcat.class, UpgradeProtocol.class})

/**
*判断当前容器没有用户自己定义ServletWebServerFactory:嵌入式的web服务器工厂;
*作用:创建嵌入式的web服务器
*/
@ConditionalOnMissingBean(
value = {ServletWebServerFactory.class},
search = SearchStrategy.CURRENT
)

public static class EmbeddedTomcat {
TomcatServletWebServerFactory factory = new TomcatServletWebServerFactory();

return factory;//返回TomcatServletWebServerFactory
}

ServletWebServerFactory 作用是返回ServletWebSercer

1
2
3
4
5
6
7
8
9
10
11
12
@FunctionalInterface
public interface ServletWebServerFactory {

/**
* Gets a new fully configured but paused {@link WebServer} instance.
* @param initializers {@link ServletContextInitializer}s that should be applied as the server starts
* @return a fully configured and started {@link WebServer}
*/

//工厂类的作用是获取Servlet容器
WebServer getWebServer(ServletContextInitializer... initializers);
}

image-20210303162147435

可见 xxxServletWebServerFactory 主要作用是返回一个 WebServer

换言之,只要实现了 ServletWebServerFactory 的类都可以作为 servlet 容器的工厂类

image-20210303170640201

SpringBoot已经帮我们实现了三个Servlet容器工厂

实现了 WebServer 的类可以作为Servlet容器

image-20210303171804782

SpringBoot已经实现的Servlet容器

eg:EmbeddedTomcatWebServerFactory
1
2
3
4
5
6
7
8
9
10
11
12
13
14
15
16
17
18
19
20
21
22
23
24
25
26
27
28
29
30
31
32
33
34
35
36
37
38
39
40
@Override
public WebServer getWebServer(ServletContextInitializer... initializers) {
if (this.disableMBeanRegistry) {
Registry.disableRegistry();
}
//创建Tomcat
Tomcat tomcat = new Tomcat();

//Tomcat的基本配置
File baseDir = (this.baseDirectory != null) ? this.baseDirectory : createTempDir("tomcat");
tomcat.setBaseDir(baseDir.getAbsolutePath());
Connector connector = new Connector(this.protocol);
connector.setThrowOnFailure(true);
tomcat.getService().addConnector(connector);
customizeConnector(connector);
tomcat.setConnector(connector);
tomcat.getHost().setAutoDeploy(false);
configureEngine(tomcat.getEngine());
for (Connector additionalConnector : this.additionalTomcatConnectors) {
tomcat.getService().addConnector(additionalConnector);
}
prepareContext(tomcat.getHost(), initializers);

//将配置好的Tomcat传递出去,返回一个EmbeddedsServletContainer,启动Tomcat服务器
return getTomcatWebServer(tomcat);
}

protected TomcatWebServer getTomcatWebServer(Tomcat tomcat) {
return new TomcatWebServer(tomcat, getPort() >= 0, getShutdown());
}

public class TomcatWebServer implements WebServer {
public TomcatWebServer(Tomcat tomcat,
boolean autoStart, Shutdown shutdown) {
Assert.notNull(tomcat, "Tomcat Server must not be null");
this.tomcat = tomcat;
this.autoStart = autoStart;
this.gracefulShutdown = (shutdown _ Shutdown.GRACEFUL) ? new GracefulShutdown(tomcat) : null;
initialize();
}

配置修改原理

在自动装配Servlet容器时,还注册了一个组件 BeanPostProcessorsRegistrar

BeanPostProcessorsRegistrar:后置处理器注册器(也是给容器注入一些组件)

1
2
3
4
5
6
7
8
9
10
11
12
13
14
15
16
17
18
19
public static class BeanPostProcessorsRegistrar implements ImportBeanDefinitionRegistrar, BeanFactoryAware {

private ConfigurableListableBeanFactory beanFactory;

@Override
public void registerBeanDefinitions(AnnotationMetadata importingClassMetadata,
BeanDefinitionRegistry registry) {
if (this.beanFactory _ null) {
return;
}

//向容器中注入两个组件
registerSyntheticBeanIfMissing(registry,
"webServerFactoryCustomizerBeanPostProcessor", WebServerFactoryCustomizerBeanPostProcessor.class, WebServerFactoryCustomizerBeanPostProcessor::new);

registerSyntheticBeanIfMissing(registry,
"errorPageRegistrarBeanPostProcessor", ErrorPageRegistrarBeanPostProcessor.class, ErrorPageRegistrarBeanPostProcessor::new);
}
}

webServerFactoryCustomizerBeanPostProcessor:

1
2
3
4
5
6
7
8
9
10
11
12
13
14
15
16
17
18
19
20
21
22
public class WebServerFactoryCustomizerBeanPostProcessor {

//在Bean初始化之前
public Object postProcessBeforeInitialization(Object bean, String beanName) throws BeansException {
//判断添加的Bean是不是WebServerFactory类型的
if (bean instanceof WebServerFactory) {
this.postProcessBeforeInitialization((WebServerFactory)bean);
}

return bean;
}

private void postProcessBeforeInitialization(WebServerFactory webServerFactory) {
//获取所有的定制器,调用每一个定制器的customize方法来给Servlet容器进行属性赋值;
((Callbacks)LambdaSafe.callbacks(
WebServerFactoryCustomizer.class,this.getCustomizers(),
webServerFactory,
new Object[0]).withLogger(
WebServerFactoryCustomizerBeanPostProcessor.class)).invoke((customizer) -> {
customizer.customize(webServerFactory);
});
}

而 appplication.yaml中的配置由注解注入

image-20210303173725150

2.xx以下

EmbeddedServletContainerAutoConfiguration
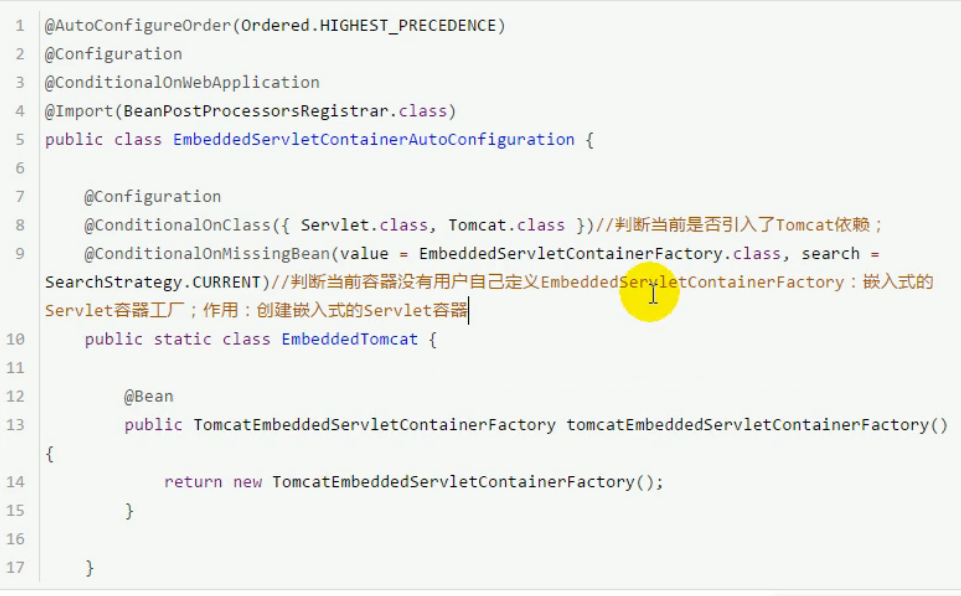
image-20210303145024390

  1. EmbeddedServletContainerFactory(嵌入式Servlet容器工厂)
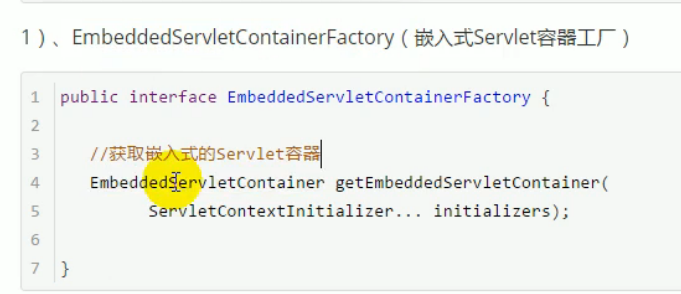
    image-20210303145136752

    image-20210303145335036

  2. EmbeddedServletContainer(嵌入式Servlet容器)

    image-20210303145433524

    移除Tomcat依赖,导入Jetty依赖

image-20210303150703527

image-20210303150733376

image-20210303150739664

  1. 以嵌入式Tomcat容器工厂为例

image-20210303151532231

  1. 对嵌入式容器配置的修改

    • 修改 serverProperties属性

    • EmbeddedServletContainerCustomizer:定制器帮我们修改了Servlet容器的一些配置(端口号)

      怎么修改

      image-20210303151825997

      image-20210303151853199image-20210303151945285

  1. 容器中导入了EmbeddedServletContainerCustomizerBeanPostProcessor
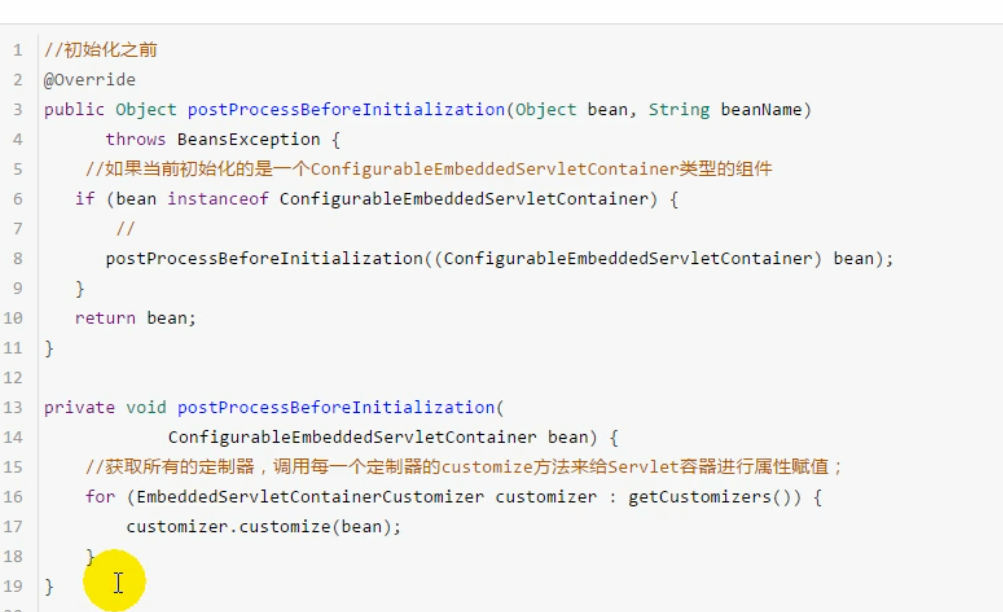
image-20210303152356183

image-20210303152548713

application.yaml中的属性怎么配置上的

image-20210303152654981

5. 嵌入式Servlet容器启动原理

嵌入式容器工厂什么时候创建Servlet容器

什么时候获取嵌入是Servlet容器,并启动Servlet容器

  1. SpringBoot应用启动运行run方法

    image-20210303181715679

    image-20210303181501723

    image-20210303182722927

  2. 创建IoC容器对象,并初始化容器(包括创建容器中的每一个组件)

    如果是web应用,创建AnnotationConfigEmbeddedWebApplicationContext,否则创建默认的IoC容器AnnotationConfigApplicationContext

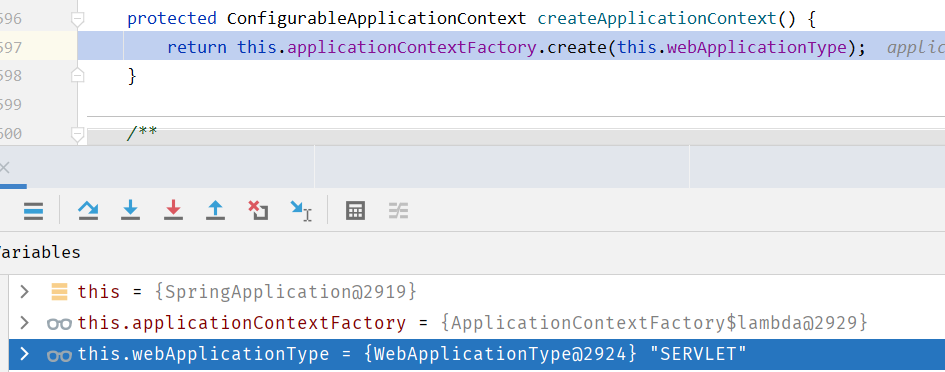
    image-20210303181538977

    image-20210303183213136

  3. refresh(context),刷新刚才创建好的ioc容器

    image-20210303181600074

  4. onRefresh(),web的IoC容器重写了onRefresh()方法

  5. webIoC容器会创建嵌入式Servlet容器 createEmbeddedServletContainer()

  6. 获取嵌入式 Servlet 容器工厂

    EmbeddedServletContainerFactory containerFactory = getEmbeddedServletContainerFactory();

    从IoC容器中获取 EmbeddedServletContainerFactory 组件

    TomcatEmbeddedServletContainerFactory 创建对象,后置处理器获取所有定制器,先处理定制ServletContainerFactory的相关配置

  7. 使用容器工厂获取嵌入式Servlet容器

    this.embeddedServletContainer = containerFactory.getEmbeddedServletContainer(getSelfInitializer());

  8. 嵌入式Servlet容器创建对象并启动servlet容器

先启动Servlet容器,再将IoC容器中剩下没有创建出来的对象获取出来

IoC容器启动,创建Servlet容器

6. 切换外部Servlet容器

嵌入式Servlet容器:应用打包方式jar

缺点:

  • 默认不支持JSP
  • 优化定制复杂
    • 使用定制器EmbeddedServletContainerCustomizer
    • ServerProperties
    • 自己编写嵌入式ServletContainerFactory

外置Servlet容器:应用打包方式war

外部Servlet容器启动SpringBoot应用原理

  • jar:执行SpringBoot主类的main方法,启动IoC容器,创建嵌入式的servlet容器

  • war:启动服务器,服务器启动SpringBoot应用[SpringBootServletInitializer],启动IoC容器

Servlet3规则:Shared Lobraries/runntimes pluggability

  1. 服务器启动时(web应用启动)会创建当前web应用里面每一个jar包里的ServletContainerInitializer实例
  2. ServletContainerInitializer实现类的全类名放在jar包的 META/INF/services文件夹下,有一个名为 javax.servlet.ServletContainerInitializer的文件
  3. 还可以使用 @HandlesTypes,在应用启动的时候加载我们需要的类

流程

  1. 启动外部Tomcat,根据Servlet3.0标准:服务器启动时(web应用启动)会创建当前web应用里面每一个jar包里的ServletContainerInitializer实例

  2. ServletContainerInitializer实现类的全类名放在 org\springframework\spring-web\5.3.4\spring-web-5.3.4.jar\META-INF\services\javax.servlet.ServletContainerInitializer
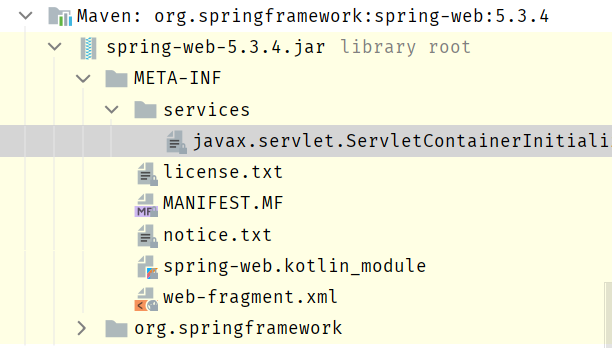
    image-20210303195936200

    1. ServletContainerInitializer扫描由@HandlesTypes标注的类,存到 onStartup方法中的Set<Class<?>> ,并为这些WebApplicationInitializer类型的类创建实例

      image-20210303210945785

    2. 每一个WebApplicationInitializer都调用自己的onStartUp:

      image-20210303211040914

    3. 相当于我们创建的ServletInitializer(继承了SpringBootServletInitializer的类)会被创建对象,并执行onStartUp方法
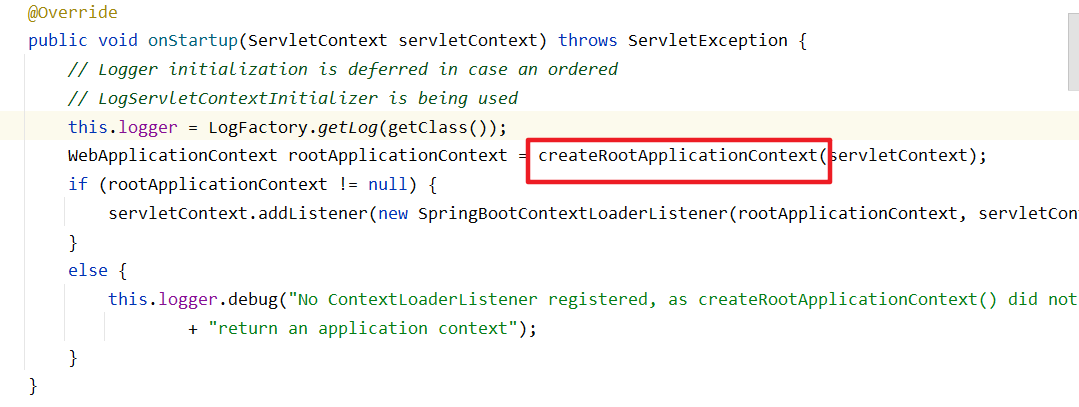
      image-20210303211459760

      会调用createRootApplicationContext方法,创建应用容器

    4. createRootApplicationContext

      1
      2
      3
      4
      5
      6
      7
      8
      9
      10
      11
      12
      13
      14
      15
      16
      17
      18
      19
      20
      21
      22
      23
      24
      25
      26
      27
      28
      29
      30
      31
      32
      33
      34
      35
      protected WebApplicationContext createRootApplicationContext(ServletContext servletContext) {
      //创建SpringApplicationBuilder
      SpringApplicationBuilder builder = createSpringApplicationBuilder();
      builder.main(getClass());
      ApplicationContext parent = getExistingRootWebApplicationContext(servletContext);
      if (parent != null) {
      this.logger.info("Root context already created (using as parent).");
      servletContext.setAttribute(WebApplicationContext.ROOT_WEB_APPLICATION_CONTEXT_ATTRIBUTE, null);
      builder.initializers(new ParentContextApplicationContextInitializer(parent));
      }
      builder.initializers(new ServletContextApplicationContextInitializer(servletContext));
      builder.contextFactory((webApplicationType) -> new AnnotationConfigServletWebServerApplicationContext());

      //调用configure方法,子类重写了这个方法,将SpringBoot主程序传进来
      builder = configure(builder);
      builder.listeners(new WebEnvironmentPropertySourceInitializer(servletContext));

      //创建一个Spring应用
      SpringApplication application = builder.build();
      if (application.getAllSources().isEmpty()
      && MergedAnnotations.from(getClass(), SearchStrategy.TYPE_HIERARCHY).isPresent(Configuration.class)) {
      application.addPrimarySources(Collections.singleton(getClass()));
      }
      Assert.state(!application.getAllSources().isEmpty(),
      "No SpringApplication sources have been defined. Either override the "
      + "configure method or add an @Configuration annotation");
      // Ensure error pages are registered
      if (this.registerErrorPageFilter) {
      application.addPrimarySources(Collections.singleton(ErrorPageFilterConfiguration.class));
      }
      application.setRegisterShutdownHook(false);

      //启动Spring应用
      return run(application);
      }

      image-20210303212023419

    5. 加载@SpringBootApplication主类,启动IoC容器

操作

  1. 必须创建一个 war 项目

    image-20210303185133410

  2. 将嵌入式的Tomcat指定为provided

    1
    2
    3
    4
    5
    <dependency>
    <groupId>org.springframework.boot</groupId>
    <artifactId>spring-boot-starter-tomcat</artifactId>
    <scope>provided</scope>
    </dependency>
  3. 将当前项目改造为一个web项目

    image-20210303185440444

    image-20210303190359260

  4. 必须编写一个SpringBootServletInitializer的子类,并调用configure方法

    1
    2
    3
    4
    5
    6
    7
    8
    public class ServletInitializer extends SpringBootServletInitializer {

    @Override
    protected SpringApplicationBuilder configure(SpringApplicationBuilder application) {
    //传入SpringBoot应用的主程序
    return application.sources(Springboot03WarwebApplication.class);
    }
    }
  5. 启用服务器即可

    配置Tomcat

    image-20210303190901784

可以指定前后缀

1
2
spring.mvc.view.prefix=/WEB-INF/jsp/
spring.mvc.view.suffix=.jsp

数据访问

  • JDBC
  • MyBatis
  • Spring Data JPA

SpringBoot数据访问都是基于Spring Data

JDBC

环境搭建

  1. 新建项目

    image-20210307195651382

  2. 导入依赖

    1
    2
    3
    4
    5
    6
    7
    8
    9
    <dependency>
    <groupId>org.springframework.boot</groupId>
    <artifactId>spring-boot-starter-data-jdbc</artifactId>
    </dependency>
    <dependency>
    <groupId>mysql</groupId>
    <artifactId>mysql-connector-java</artifactId>
    <scope>runtime</scope>
    </dependency>
  3. 配置数据源

    1
    2
    3
    4
    5
    6
    spring:
    datasource:
    username: root
    password: Aa12345+
    driver-class-name: com.mysql.cj.jdbc.Driver
    url: jdbc:mysql://8.140.130.91:3306/jdbc?characterEncoding=utf8&useSSL=false&serverTimezone=UTC
  4. 测试连接

    1
    2
    3
    4
    5
    6
    7
    8
    9
    10
    11
    12
    13
    @Autowired
    DataSource dataSource;

    @Test
    void contextLoads() throws SQLException {
    //com.zaxxer.hikari.HikariDataSource
    System.out.println(dataSource.getClass());

    Connection connection = dataSource.getConnection();
    System.out.println(connection);

    connection.close();
    }

默认使用 com.zaxxer.hikari.HikariDataSource 作为数据源

数据源的相关配置在 DataSourceProperties

原理

数据源配置原理
  1. 参考 DataSourceConfiguration ,根据配置创建数据源,默认使用 Hikari 连接池,可以使用 spring.datasource.type 指定默认数据源类型

    1
    2
    3
    4
    5
    支持的数据源类型
    oracle.ucp.jdbc.PoolDataSource
    org.apache.commons.dbcp2.BasicDataSource
    com.zaxxer.hikari.HikariDataSource
    org.apache.tomcat.jdbc.pool.DataSource
  2. 自定义数据源类型

    1
    2
    3
    4
    5
    6
    7
    8
    9
    10
    11
    12
    13
    14
    /**
    * Generic DataSource configuration.
    */
    @Configuration(proxyBeanMethods = false)
    @ConditionalOnMissingBean(DataSource.class)
    @ConditionalOnProperty(name = "spring.datasource.type")
    static class Generic {

    @Bean
    DataSource dataSource(DataSourceProperties properties) {
    //使用DataSourceBuilder创建数据源,利用反射创建响应type的数据源,并且绑定相关属性
    return properties.initializeDataSourceBuilder().build();
    }
    }
sql语句执行原理

DataSourceInitializationConfiguration 中注册了 DataSourceInitializerPostProcessor

1
2
3
4
	DataSourceInitializationConfiguration
=> DataSourceInitializerPostProcessor
=> DataSourceInitializerInvoker
=> DataSourceInitializer

所以SpringBoot在创建连接池后还会运行预定义的SQL脚本文件

image-20210307211857197

  • 如果用户指定脚本路径,则直接去找用户的脚本

  • 如果没有在配置文件中配置脚本的具体位置,就会在classpath下找schema-all.sqlschema.sql ,platform获取的是all,platform可以在配置文件中修改

默认只需要将待执行的sql脚本命名为 schema-*.sql、data-*.sql

可以使用

1
2
3
4
spring:
datasource:
schema:
- classpath:department.sql

指定脚本名

执行sql语句

程序启动后发现表并没有被创建,DEBUG查看以下,发现在运行之前会有一个判断
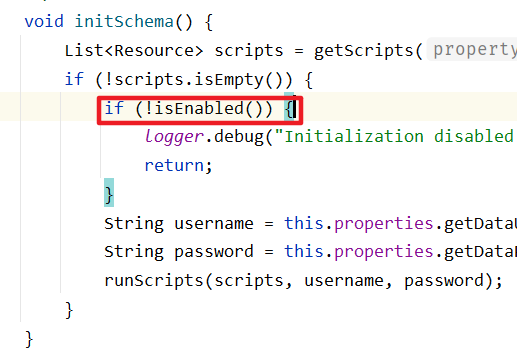
image-20210307213620036

image-20210307213602303

在配置文件中改为 true

1
2
3
spring:
datasource:
initialization-mode: always

image-20210307213854993

操作数据库

自动配置了 JDBCTemplate 操作数据库

1
2
3
4
5
6
7
8
9
10
11
12
13
14
@Controller
public class MyController {

@Autowired
JdbcTemplate jdbcTemplate;

@ResponseBody
@GetMapping("/query1")
public Map<String,Object> query1(){
List<Map<String,Object>> list = jdbcTemplate.queryForList("select * from department");

return list.get(0);
}
}

image-20210307214921663

Durid

-------------本文结束-------------